Jump to content

Welcome to RennTech.org Community, Guest

There are many great features available to you once you register at RennTech.org
You are free to view posts here, but you must log in to reply to existing posts, or to start your own new topic. Like most online communities, there are costs involved to maintain a site like this - so we encourage our members to donate. All donations go to the costs operating and maintaining this site. We prefer that guests take part in our community and we offer a lot in return to those willing to join our corner of the Porsche world. This site is 99 percent member supported (less than 1 percent comes from advertising) - so please consider an annual donation to keep this site running.

Here are some of the features available - once you register at RennTech.org

  • View Classified Ads
  • DIY Tutorials
  • Porsche TSB Listings (limited)
  • VIN Decoder
  • Special Offers
  • OBD II P-Codes
  • Paint Codes
  • Registry
  • Videos System
  • View Reviews
  • and get rid of this welcome message

It takes just a few minutes to register, and it's FREE

Contributing Members also get these additional benefits:
(you become a Contributing Member by donating money to the operation of this site)

  • No ads - advertisements are removed
  • Access the Contributors Only Forum
  • Contributing Members Only Downloads
  • Send attachments with PMs
  • All image/file storage limits are substantially increased for all Contributing Members
  • Option Codes Lookup
  • VIN Option Lookups (limited)

Recommended Posts

Posted

Painting Bumperettes


Given that I just spent a bunch of money on suspension – there is no way I could justify to the other half spending $300 on painted bumperettes from Bumperplugs. So I decided to give it a try as a DIY. Figured if it failed, then I would have to buy them :) Sorry, but these are less than attractive. Inputs:   Sandpaper various grits (120 grit to 2000 grits) Flexible primer for bumpers Spray bomb Arena Red Metallic Clear Coat Sandable high-solids primer (not shown) Brake cleaner a


Posted

Zaktoo:

Looks like an excellent result.

"After" photos of the painted bumperettes on the car would be great to see!

As far as longevity, the weak point may turn out to be the lack of flex agent in the color coat and in the clear coat. That would require you to have to use a spray gun set up.

Since you have them painted now, you won't get any more of that sun and ozone damage on the now-painted bumperettes. If there is a next time, it will be that much easier to prep and redo. eek.gif

Thanks for posting the DIY!

Regards, Maurice.

Posted

Sorry it took a week. In finishing I accidentally burned through the clear coat on one and hard to refinish it.... Oops

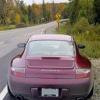
Here they are mounted (compare to the original)

IMG_1038edit.jpg

IMG_0387edit.jpg

Posted

Sorry it took a week. In finishing I accidentally burned through the clear coat on one and hard to refinish it.... Oops

Here they are mounted (compare to the original)

IMG_1038edit.jpg

IMG_0387edit.jpg

Looks VERY EXCELLENT! Quite a dramatic difference for a relatively straightforward mod. clapping.gifclapping.gifclapping.gif

Now that you have started modding, what's next?

Regards, Maurice.

Posted
Now that you have started modding, what's next?

Note the exhaust tips... :)

Have done the muffler hack, replaced regular seats with sport seats.... and the X74 suspension arrives next week.

Create an account or sign in to comment

You need to be a member in order to leave a comment

Create an account

Sign up for a new account in our community. It's easy!

Register a new account

Sign in

Already have an account? Sign in here.

Sign In Now
×
×
  • Create New...

Important Information

We have placed cookies on your device to help make this website better. You can adjust your cookie settings, otherwise we'll assume you're okay to continue.