Jump to content

Welcome to RennTech.org Community, Guest

There are many great features available to you once you register at RennTech.org
You are free to view posts here, but you must log in to reply to existing posts, or to start your own new topic. Like most online communities, there are costs involved to maintain a site like this - so we encourage our members to donate. All donations go to the costs operating and maintaining this site. We prefer that guests take part in our community and we offer a lot in return to those willing to join our corner of the Porsche world. This site is 99 percent member supported (less than 1 percent comes from advertising) - so please consider an annual donation to keep this site running.

Here are some of the features available - once you register at RennTech.org

  • View Classified Ads
  • DIY Tutorials
  • Porsche TSB Listings (limited)
  • VIN Decoder
  • Special Offers
  • OBD II P-Codes
  • Paint Codes
  • Registry
  • Videos System
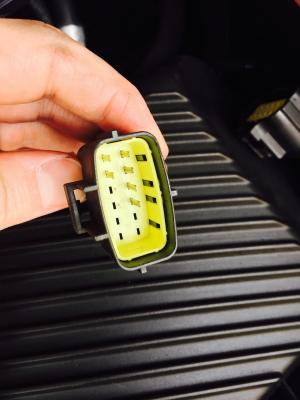
  • View Reviews
  • and get rid of this welcome message

It takes just a few minutes to register, and it's FREE

Contributing Members also get these additional benefits:
(you become a Contributing Member by donating money to the operation of this site)

  • No ads - advertisements are removed
  • Access the Contributors Only Forum
  • Contributing Members Only Downloads
  • Send attachments with PMs
  • All image/file storage limits are substantially increased for all Contributing Members
  • Option Codes Lookup
  • VIN Option Lookups (limited)

IslaTurbine

Members
  • Posts

    57
  • Joined

  • Last visited

Profile Fields

  • From
    DFW
  • Porsche Club
    PCA (Porsche Club of America)
  • Present cars
    Porsche 996 Aero Kit

Recent Profile Visitors

1,015 profile views

IslaTurbine's Achievements

Member

Member (1/1)

0

Reputation

2

Community Answers

  1. Fair enough. I’ve been on and off RennTech over the years and know you’re very well versed and respected on these types of things. But out of sheer curiosity, how can a five chain motor have a cam skip if only one actuator is changed at a time? The cams are interlinked so I don’t understand how there’s any risk. Zombie thread bumps can be head scratchers, but I also hate having a solid question go unanswered. 🍻
  2. My understanding is that only 3-chain engines must have the cams locked. Locking the crank at TDC will suffice for a 5-chain engine. Hopefully someone more knowledgeable than I will jump in to confirm.
  3. Update: I pulled the driver side door panel off to return the crappy aftermarket speakers back to stock. When doing so I noticed that the door airbag wire harness had detached due to a cracked connector. I was able to repair and reattach it. A local shop cleared the light with a scan tool and it has stayed off!
  4. The passenger seatbelt was my initial thought and the tech was familiar with that common issue. My front passenger seat sometimes triggers the light and I figured it would be the culprit in this instance. But I don’t think the 28 code is related to that. I used to live on an island and flew turbine aircraft, hence IslaTurbine. Not very original I guess. ?
  5. Btw, “drivers side airbag” refers to the airbag in the driver side door? Or the airbag in the driver steering wheel?
  6. Thanks Loren. Any tips on how to test the wiring in order to determine if it or the airbag is at fault?
  7. So I had an airbag light pop up recently. The tech who read the code wrote down “drivers airbag circuit." The light won’t clear so it’s obviously an active fault. I recently replaced the entire ignition switch and steering lock assembly. The light came on a few days after the repair so I’m not sure if it could be possibly related. The car is a 1999 996. The only thing I can seem to find via searching is that a code 28 is related to the driver's door airbag? Any insight is appreciated. Thanks.
  8. This thread was a big help but I have a few pointers to add after changing out the lock assembly today. 1. As with others on here, I recommend removing the instrument gauge pod to give yourself more access. But you also need to make sure that you extend the steering wheel all of the way aft towards the seat. This is the only way that I could figure out that gave me enough room to access the area behind the steering wheel (due to the lower plastic shielding that is loose but not able to be completely removed). 2. I used needle nose vice grips to hold on to the open end of a 10mm wrench to loosen/tighten the nut on the 10mm bolt. I used the box end of the wrench to securely hold the 10mm nut in place. 3. The electronic wiring that connects to the ignition assembly is both purple and black. The purple doesn't separate from the black in order to remove the wire harness. The black portion is what detaches from the rear of the ignition assembly. 4. When reinstalling the left dash vent, make sure the vent dial is "Up" (open). If you try to reinstall this assembly with the dial "down" (closed), the lever arm on the left side of the assembly will be in the way of the dash structure and it won't allow it to fit in. 5. I too removed the inner (silver) light switch mechanism from the left vent assembly before attempting to reinstall the vent. You'll need a 24mm socket or similar in order to remove the large nut that retains the switch to the vent assembly. I'm not sure that removing this mechanism from the vent assembly was totally necessary so your mileage may vary. 6. Lastly, my ignition key pinhole was at the 1 o'clock position like others on here. After installing the new ignition mechanism, I was unable to get my key to turn on the ignition of the car when I reinstalled it with the pinhole at the 7 o'clock position. I don't know what the issue was, but it worked perfectly when I changed it back to the 1 o'clock position again.
  9. Is a copper crush washer acceptable to use on the M96 with the LN Magnetic Plug? I have never used one but a local shop supplied me some new copper ones and acted like he was doing me a favor since they were copper. I’m a little hesitant to use them....
  10. I don’t believe so. I think all that can be done is to remove the bulb behind the dash.
  11. Update: I was able to take extra length of wire from the #2 and #5 connector wires to create my own wire for the seventh one that I was missing. I then fabricated a connector pin from a computer cable and attached it to the new wire, soldered the wire ends of those three wires together, and got the new pin to seat in the connector assembly. Put it all back together, got the car up to 80 mph and no more spoiler warning light. Fixed!
  12. Ok thanks for taking a look. I guess I'll just have to continue scratching my head as my harness is clearly missing a wire. Plus I've noticed that the wing has all of the markings of an OEM piece (imbedded PD and Turnwald lettering, not a sticker) but it is missing the "Made In France" lettering next to it. The car has all of the other factory stickers under the lid and is a '99 but was built in October 1998. I'm wondering if it that could make a difference? Additionally, the car has "XAA" on the underhood sticker. Looks like the correct wiring harness has "appreciated" in value over the years. The cheapest I can find is close to $300. Crazy.
  13. Loren, I've been corresponding with another factory-installed aero kit owner. He has 7 wires coming out of his connector whereas I only have 6. If you still have your aero kit 996, is there any chance you could take a look and see how many wires are coming out of your connector? Thanks again.
  14. The upper left two pins have resistance to each other. These two pins are to the wires that I don't know where they run to. The upper right two pins have resistance to each other. These two wires run to the fan. The lower right to pins have resistance to each other. These two wires run to the light.
×
×
  • Create New...

Important Information

We have placed cookies on your device to help make this website better. You can adjust your cookie settings, otherwise we'll assume you're okay to continue.