Jump to content

Welcome to RennTech.org Community, Guest

There are many great features available to you once you register at RennTech.org
You are free to view posts here, but you must log in to reply to existing posts, or to start your own new topic. Like most online communities, there are costs involved to maintain a site like this - so we encourage our members to donate. All donations go to the costs operating and maintaining this site. We prefer that guests take part in our community and we offer a lot in return to those willing to join our corner of the Porsche world. This site is 99 percent member supported (less than 1 percent comes from advertising) - so please consider an annual donation to keep this site running.

Here are some of the features available - once you register at RennTech.org

  • View Classified Ads
  • DIY Tutorials
  • Porsche TSB Listings (limited)
  • VIN Decoder
  • Special Offers
  • OBD II P-Codes
  • Paint Codes
  • Registry
  • Videos System
  • View Reviews
  • and get rid of this welcome message

It takes just a few minutes to register, and it's FREE

Contributing Members also get these additional benefits:
(you become a Contributing Member by donating money to the operation of this site)

  • No ads - advertisements are removed
  • Access the Contributors Only Forum
  • Contributing Members Only Downloads
  • Send attachments with PMs
  • All image/file storage limits are substantially increased for all Contributing Members
  • Option Codes Lookup
  • VIN Option Lookups (limited)

nhirsch

Contributing Members
  • Posts

    19
  • Joined

  • Last visited

About nhirsch

Profile Information

  • Gender
    Male

Profile Fields

  • From
    Juno Beach, FL, USA
  • Porsche Club
    No
  • Present cars
    GMC Yukon SUV
  • Future cars
    2012 Cayenne Turbo
  • Former cars
    2012 Cayenne Turbo

Recent Profile Visitors

1,571 profile views

nhirsch's Achievements

Member

Member (1/1)

2

Reputation

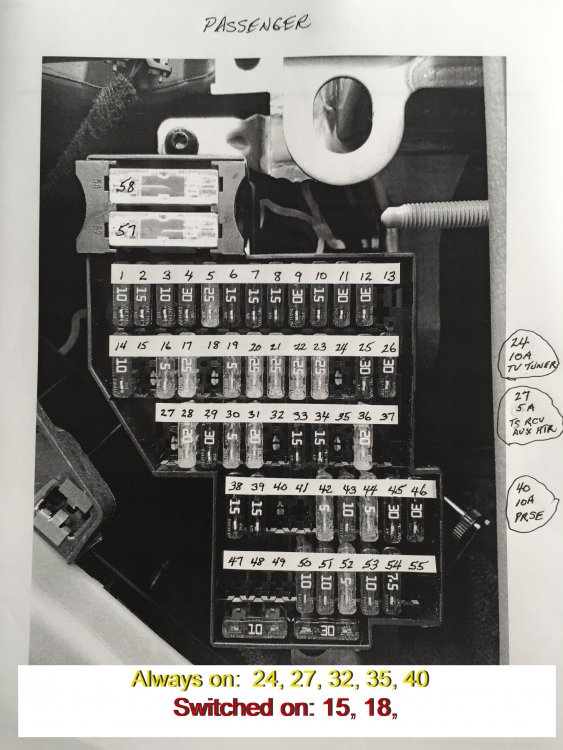
  1. I posted information on both fuse panels with pictures in my install of a Blackvue 650GW dashcam. If not here, then look in 6 speed. Never mind. Found them and attached. Notes on and at bottom of each picture.
  2. On my 2012 Cayenne CTT, I believe you need to drive about 20 miles once you've opened hood in order to check oil level via the console. Until then it will read unavailable. If I recall correctly, one half quart will raise it up one notch.
  3. Long story short, the engine on my 2012 Cayenne Turbo with 6300 miles is being changed after developing a loud ticking/clicking noise. The dealer doing the work is Champion, the world's largest so I have a lot of faith in the job being done well. They will deliver the car back and pickup the loaner in the next day or so. My question is if anyone knows of a checklist to go thru to make sure everything was connected and working? I'm planning a road trip and don't want Murphy's law to mess with my trip, for example discovering something on the trip that I forgot to check it. Any other thoughts on this would be appreciated. Thanks.
  4. Installation of CTEK 56-864 Battery Charger in Cayenne 958 Installing his charger with this connector which has 3 leds on it to indicate battery condition at all times. First picture is what it looks like under the hood. Red cover hides 3 connectors including one big round post. The negative pipe can be seen just forward (to the left) sticking out. It is simply a conductive pipe attached to the frame. I stuck the camera inside to show how the white acorn nut holds the negative conductive pipe it to the frame. This picture shows a closeup of my use o Author nhirsch Category Cayenne (92A) - Accessories Submitted 12/17/2012 09:20 PM Updated 09/28/2013 12:51 PM
  5. Installing his charger with this connector which has 3 leds on it to indicate battery condition at all times. First picture is what it looks like under the hood. Red cover hides 3 connectors including one big round post. The negative pipe can be seen just forward (to the left) sticking out. It is simply a conductive pipe attached to the frame. I stuck the camera inside to show how the white acorn nut holds the negative conductive pipe it to the frame. This picture shows a closeup of my use of a stainless steel small hose clamp to hold the connector to the ground pipe still leaving pipe to clam onto if necessary. Now you can see both connections made with the small comfort monitor/indicator flashing the existing charge level of the battery. I used a velcro tie wrap to hold the comfort monitor/indicator wire to the black plastic car part. No holes drilled, nothing done that can't be undone back to original. Then I connected the charger and took a couple pictures showing it at stage 3 out of 8. The little comfort monitor/indicator fits nicely in the space next to the ground point so no interference with the hood mechanism. An attached dust cap covers the contacts to keep them clean while stowed. Note: After charging, you will notice your car utilizes the Automatic engine shutoff at stops more often than when the battery is not fully charged. Note: Not enough experience or information found on whether this charger in fact lengthens battery life or the reverse! Finally a picture of the nice bag that comes with the charger--reinforcing that you connect the DC before the AC, then set the mode. UPDATE: The "comfort" connector's 3 LED lights stopped working although the connector continued to work/charge the battery. I removed this part nevertheless and replaced it with the connector that didn't have the lights on it. I returned and Amazon credited back the cost of the LED connector. Don't really need the LEDs so will leave it the way it is. UPDATE2: Because the CTEK gets pretty hot, I decided to mount it on a heatsink. I figured that if the heat left the body of the CTEK quicker, it would last longer. I ordered a large heatsink off of heatsinkusa.com which is pretty good because they can cut their extrusions to whatever length you want. I ordered the one that's 7.28" wide and had them cut it at 3". I filed off the plastic "feet" that were molded into the base of the CTEK so it would sit flat on the heatsink. I drilled holes thru the two mounting holes of the CTEK into the heatsink and tapped it out w/#10 x 32. Installed the screw but wasn't careful as the head of the machine screw was a little too large so it put pressure on the mounting hole. Additionally I put a little oil on the threads. Between the two, the mounting holes cracked. They really weren't meant for a solid mount as it's mostly hollow where the mounting holes are located so I glued them back and filled the mounting holes with JB Weld. I'll then re-drill and things should be good to go. So the caution is if you decide to do this, go gently with the mounting holes!
  6. I think you meant twit instead of twat! LOL. Sorry can't help with the problem.
  7. From the picture, I can't tell if it takes the male bit or the female socket.
  8. Last night I went into the Porsche USA website and loaded the configuration of the car I'm planning to pick up in about one month. The website asked if I wanted to convert this configuration to the New Model Year configuration. I said OK vs cancel which wouldn't let me continue. It immediately asked me to remove two options if I want the 20" Spyder wheel which was in my configuration that I'm planning to pick up in Leipzig next month!: 17mm spacers for rear wheels and the exterior color wheel extensions. I then noticed there is another (second) 20" Spyder wheel that specifies 9.5" width and a new option for 5mm spacers on all wheels (not allowing the 17mm spacers for rear only that was in my existing configuration--which is no longer available in my configuration!) and allows the exterior colored wheel extensions. I also noticed there is a WLAN option now and LED additional comfort lighting. I'm curious about the 20" Spyder wheel differences. Can anyone elaborate what differences there are? It appears this was done for the new GTS but is available for Turbo which is what I have planned. Sure would like to know what other things have happened in this "new model year" and how can an option that I have selected be suddenly not possible?
  9. [#10TUT007] That tutorial doesn't exist!
  10. I can't disagree with what you said but I do believe the European delivery specialist (who told me that it cost them $500). Maybe that is what the factory charges back to them, who knows? I'm sure Porsche gets a significant discount from Navtec, after all Garmin Europe City Navigator NT is easily purchased for about $100 and likely it's very similar data. This is the same gal that happily told me the good news of the new program being free instead of the previous 2.5% so I truly felt she is "on my side" as opposed to the typical salesman. In my business, network security, I often see hardware vendors take readily available parts from IBM or Hitachi and put their own part number on it at 10X the price! Even the original part number remains on the part but they would say they do extra quality control, blah blah to justify. What can you do?
  11. I am planning European delivery pickup in May, 2012. Atmy request they will have the European maps installed in NAV system. Cost is $500 to Porsche of which I will pay half and Porsche the other half. When car arrives dealer in US, they will program back the US maps at no cost. European maps will remain on system inactive, I'm told. Due to cost to Porsche, the European maps are not normally installed with European delivery, instead they loan you free a small GPS unit that you return when you bring back the vehicle to the factory. BTW, the European delivery is now free to the customer although the dealer told me that Porsche has billed them a large fraction of the original cost. As this is a new program, all details are still uncertain to the dealer.
×
×
  • Create New...

Important Information

We have placed cookies on your device to help make this website better. You can adjust your cookie settings, otherwise we'll assume you're okay to continue.