Welcome to RennTech.org Community, Guest
There are many great features available to you once you register at RennTech.org
You are free to view posts here, but you must log in to reply to existing posts, or to start your own new topic. Like most online communities, there are costs involved to maintain a site like this - so we encourage our members to donate. All donations go to the costs operating and maintaining this site. We prefer that guests take part in our community and we offer a lot in return to those willing to join our corner of the Porsche world. This site is 99 percent member supported (less than 1 percent comes from advertising) - so please consider an annual donation to keep this site running.
Here are some of the features available - once you register at RennTech.org
- View Classified Ads
- DIY Tutorials
- Porsche TSB Listings (limited)
- VIN Decoder
- Special Offers
-
OBD II P-Codes - Paint Codes
- Registry
- Videos System
- View Reviews
- and get rid of this welcome message
It takes just a few minutes to register, and it's FREE
Contributing Members also get these additional benefits:
(you become a Contributing Member by donating money to the operation of this site)
- No ads - advertisements are removed
- Access the Contributors Only Forum
- Contributing Members Only Downloads
- Send attachments with PMs
- All image/file storage limits are substantially increased for all Contributing Members
- Option Codes Lookup
- VIN Option Lookups (limited)


Silver_TT
-
Posts
779 -
Joined
-
Last visited
-
Days Won
15
Content Type
Profiles
Events
Forums
External Paint Colors
Downloads
Tutorials
Links Directory
Collections
Classifieds
Store
Posts posted by Silver_TT
-
-
Thanks for the input, guys. I'll check the basic stuff this weekend like fuses, power supply, and adapter connection, etc. Since it still works manually, and this is only related to the automatic adjustment with the seat memory, it's not bothering me too much. I just don't like to see any error codes... I will fix it if it doesn't require a new motor ($200) or control module ($$$$)
Thanks
-
Thanks for the response, Loren. Really appreciate it, this is helpful. I had a few questions if you or anyone else can answer....
1. Is there a way to tell if the fault code is referring to the driver's side or passenger's side...or both? My understanding is that each seat is controlled separately, not centrally controlled. Please correct me if I'm wrong (very possible!).
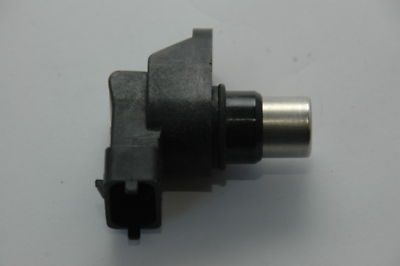
2. Is the Hall-effect sensor part# 99660610602 ... It appears this is a Hall-effect sensor but used on the engine.. I'm guessing not the same? I was trying to figure out where this part is in the vehicle (under the seat I assume?) and what it looks like. I found the picture attached of the part# I mentioned (see 1st attachment). Is this it? It looks like the Hall-sensor is used in various areas of the vehicle so I'm not sure if it's the same.
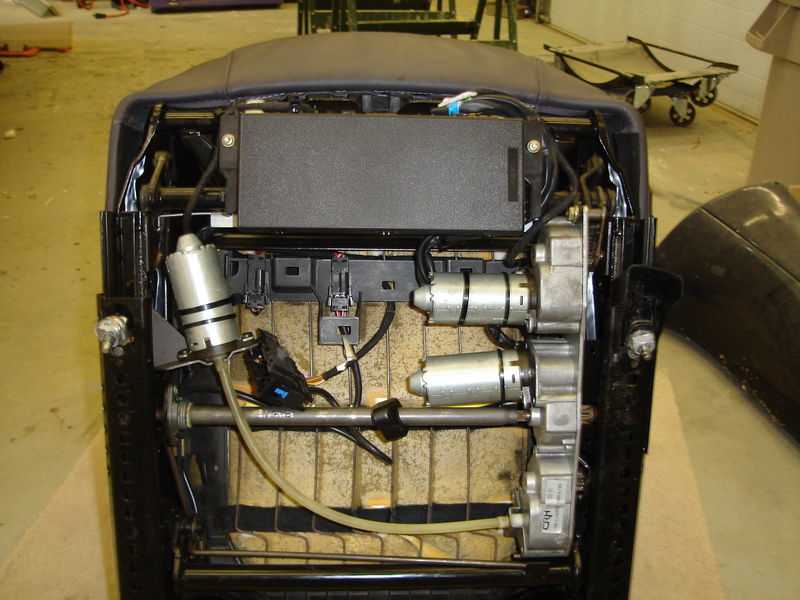
3. Is the control module under the seat? Is it visible in this second picture I have attached (see 2nd attachment)? Are pin2 and pin3 labeled? I will test with my multimeter if so. I just want to be sure I know what I'm looking for.
Thanks in advance!

-
2002 C4S
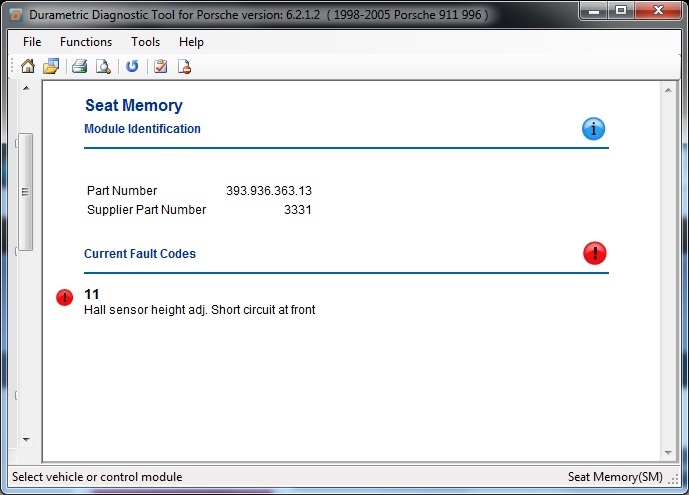
Got my Durametric yesterday and have been playing around. Looks like no new faults after clearing some related to an alternator issue recently fixed except the following one which I was wondering about:
11 - Hall sensor height adj. Short circuit at front (see attached pic)
Can anyone give me more detail about this? Is this referring to the driver or passenger seat? I don't know if it's related but my passenger seat had a broken cable that attached from the motor to the seat for the up/down seat adjustment a few months ago that I fixed myself. As far as I can tell, all works now that the cable has been replaced (it was missing when I got the car). Doesn't appear to be a short circuit...at least if there is one it doesn't appear to be causing any adverse side effects. I tried to clear the fault but it instantly comes back again.
This leads me to my second questions which is: What is the source of finding more detailed information on these errors? I looked at the PDF manual that came with the Durametric and I don't see a database of error codes.
I've got about 30 minutes experience with the Durametric so maybe I'm missing something or doing something stupid. Any input would be greatly apprecaited.
Thanks!
-
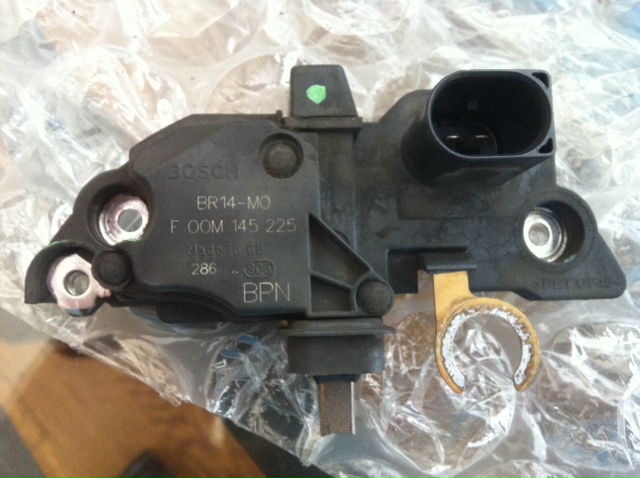
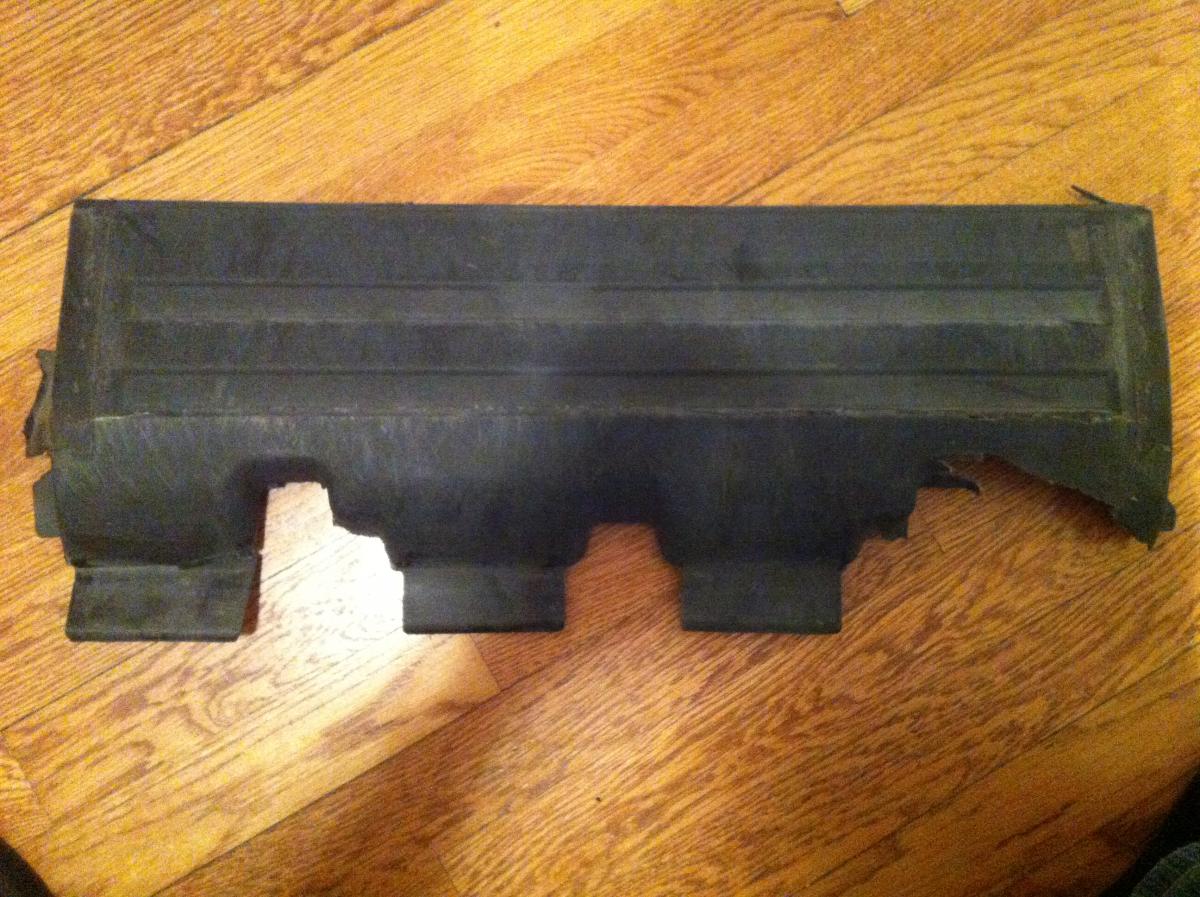
Here's a picture of the culprit. This was the original voltage regulator taken from my alternator and replaced with the part I mentioned above (that also works in various other cars like VW, Mercedes, etc).
I can't say what caused what, but it turns out that my wiring harness that runs from the alternator to the starter to a junction block was also bad and was causing resistance when it heated up (I believe there's a TSB related to this). Thanks to JFP in PA who was a huge help tracking this down and told me that these two parts can sometimes go out together. I saw Logray and some others had this problem too in the past (see link below) so that was helpful too. It's been 100+ degrees F here for the last few weeks so it's not surprising that if it was going to happen, it would happen now.
http://www.renntech.... guage harness
Also, FYI, in response to my own question above: The "Battery / Generator" warning message and accompanying battery light on the console goes on when the computer detects that the voltage is too low. It's not something that is "tripped" and it will go off once the battery is recharged and the alternator issues are fixed, therefore keeping the battery charged. This can also happen if you leave your light on or door open in the car too long and it drains the battery. Just take it for a spirited drive to let the alternator charge the battery or hook the battery up to a charger if it gets too low to crank the starter.
Thank you!
:renntech:

-
 1
1
-
-
I recently had a very similar problem. I was just curious if you tried to replace the voltage regulator in the alternator first before replacing the entire alternator...?
Glad you got it sorted!
-
Thanks Dharn, I appreciate your input (and I say that generally speaking -- one of your posts a while back helped me fix my passenger seat motor as well). I will look into this further. I also thought that the path for the lines seemed very peculiar.
-
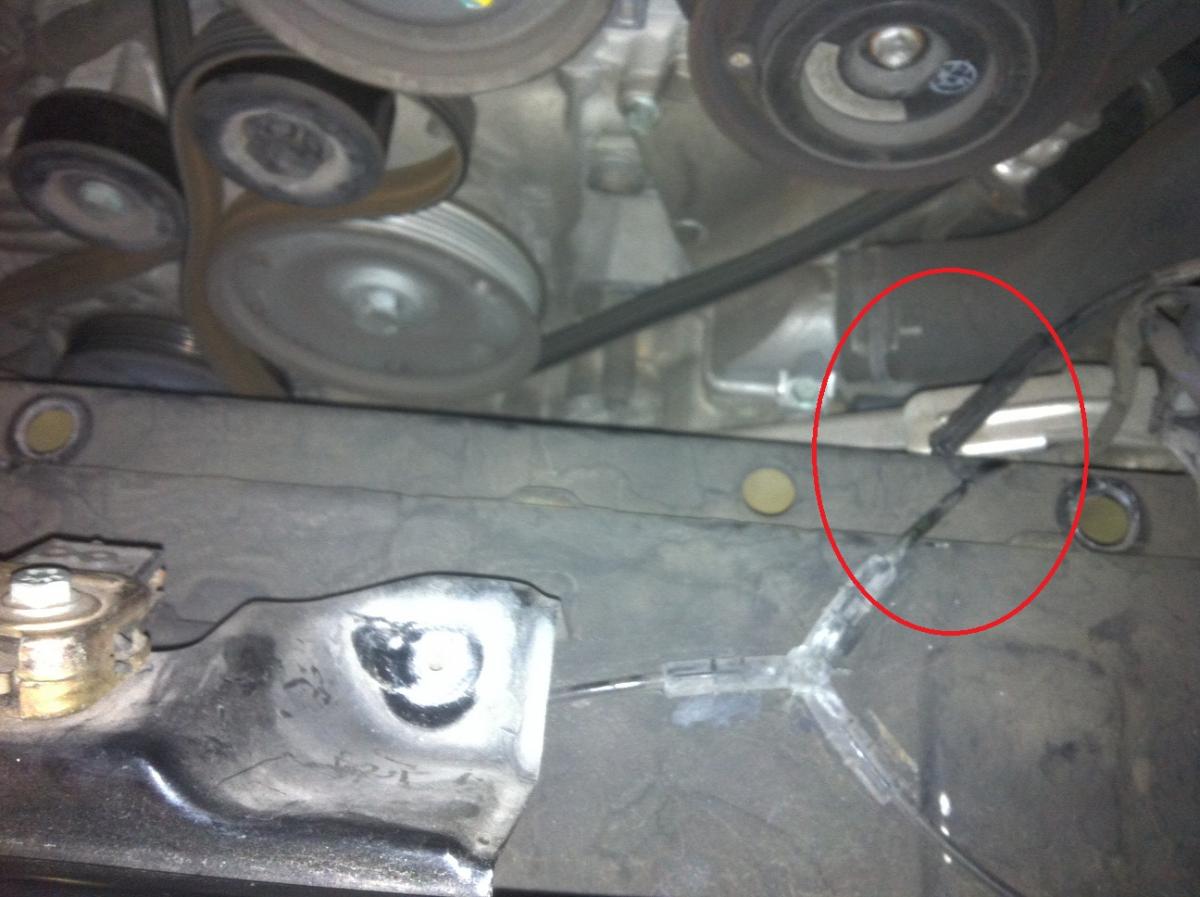
This is the exhaust vacuum for my sport exhaust <insert raspy growl here> ...
Not really sure if it's something to be concerned with since it's presumably been broken for some time (didn't notice until I pulled the MAF off to get into the engine to do some other work) and my car seemed to fun just fine -- either way, I am going to replace the tube.... If it's there I assume the Germans put it there for a reason.
-
Replaced the voltage regulator, all is good now. $30 for a new voltage regulator...or $300 for a new alternator. Tough choice, eh?
As the Pelican link above says, the original Bosch part# was F-00M-145-225. I bought a Bosch VR-IB225N from Ibc Automotive out of California, which they said was interchangeable and it was. This part is interchangeable with a ton of German cars including VW, Mercedes, Porsche, etc.
It's always best to have your alternator tested if you have this issue but the tell-tale sign to me was that I was seeing the voltage on the console show all sorts of crazy readings. It would jump around... then drop... then spike when I accelerated. Definitely not the constant, steady voltage readings I get under normal operation.
Conceptually this DIY is a 1 / 10 on a scale of difficulty. Getting the MAF off is cake, and getting the belt off is simple (needed to buy a 24mm socket for the tension pulley--also needed a 14mm or 15mm for the alternator). However, once I got to the alternator I had a lot of problems getting it off because of the bushing in the rear flange. Getting it in and aligned so you don't strip the long bolt with the pulley on the right-side of the alternator is also a total PITA. Be sure to follow the instructions closely when taking the alternator out and whack that bolt with a hammer (use a buffer as not to damage the bolt) after a few twists out. Getting the alternator in/out was by far the hardest part of this procedure and probably made it more like a 5 / 10 for me. Had it been easier to get that in/out, I would have had the whole job done in 30 minutes or less. Instead I ended up spending at least a few hours...
Thanks to JFP for the advice. It was dead-on and you saved me a few hundred bucks, which I greatly appreciate (hey, I own a 996, I'm a value hunter :)).
-
Thanks JFP, you were right (of course).
For people doing this in the future: Follow the instructions in Loren's DIY very carefully (don't be dense like me). The instructions explicitly say in step 7, "Undo right fastening screw (with deflection roller) by three turns. A gentle tap on the fastening screw loosens the threaded bushing in the generator arm (use aluminum mandrel)."
I made the mistake of completely unscrewing and taking out the long bolt right off the bat -- Wrong! Should have followed instructions. It makes a lot more sense now that I understand how the bushing pulls forward in the rear flange. Trying to get the bolt back in proved to be an arduous task. Aligning the alternator was quite difficult. Be very careful not to strip the bolt. Lots of swear words may have been spoken in my garage last night :)
The irony of this DIY was that getting into the engine and accessing the alternator was trivial. It only took under 10 minutes if you don't count my trip to the hardware store to get a set that contained 14mm, 15mm, and 24mm sockets. Conceptually, replacing the voltage regulator is very, very easy. However, in practice, in my case anyway, getting the alternator actually out to do the replacement once I got to it was a major PITA. I can tell that getting it back in tonight is going to be a lot of fun too.
Thanks again JFP for your guidance in helping me with this. Next round of beers is on me :cheers:
-
Thanks for the response, Loren. I did previously see that support topic post regarding your DIY. It looks like some other people have had similar issues. Unfortunately, in my case, the alternator is "stuck" on the right-hand side and so I'm not really able to pry it out of there.
If anyone has any brilliant ideas I'm all ears -- else I will try to use a crowbar tonight and use more force (while trying not to damage the alternator/fins). I might spray some WD-40 on that right side once it's out to make it easier to get back in after I replace the voltage regulator.
Good times, good times.....
-
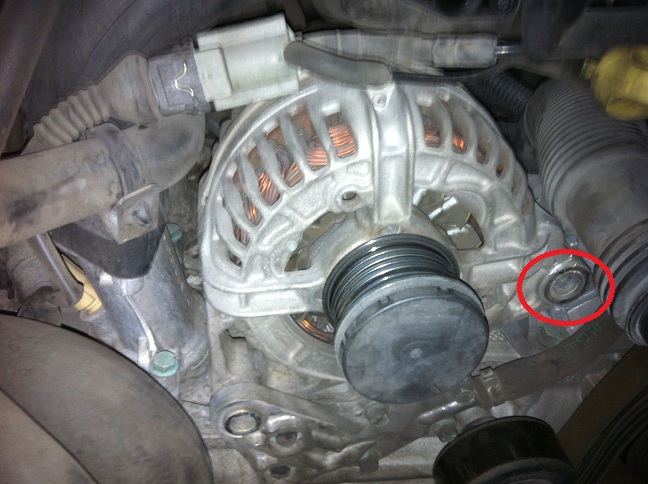
Got to the alternator this evening pretty quickly en route to switching out the voltage regulator in the alternator. On the left side of the alternator where a single bolt holds it in, I can get some play moving the alternator up/down....Only problem is the right side of the alternator, the side with the screw that goes throught the pulley, (see red circled area in attached pic) won't budge. I think it's just pinched on there real tight after the last 10 years, as that screw goes through the pulley and the flange and screws in near the back of the alternator. I tried giving it some taps with the hammer but it's at an ackward angle and I'm not getting much traction. The thing is either stuck or I need to start hitting the gym more often, one of the two.
Anything obvious I'm missing with respect getting the alternator in/out? It's right at the front of the motor--shouldn't be this hard. I'm hoping it's not this hard getting it back in there too once I'm finished with the alternator repair.
Thanks in advance for any thoughts or comments.
-
Anyone know what the broken plastic tube is that I have circled in red in the attached pic? I pulled the MAF out to work on my alternator and noticed this directly under it as you can see with the engine in the background. Is this something I should be concerned with?
-
Thanks for the response, JFP.
I ordered a Durametric this morning. While not completely ruled out, I'm guessing it's not the battery since I just replaced it late last year. I will perform the proper diagnostics but assuming this is the voltage regulator, I understand that this is not sold under a separate Porsche 996 part number. However, I saw the link below on Pelican which says you can buy Bosch part# F-00M-145-225. I was wondering if following this procedure is considered good practice (not replacing the whole alternator if it's just the voltage regulator, which you say is not uncommon) or if it would be better to replace with a new alternator. My vehicle has ~ 90k miles and I believe is on the original alternator. I asked the indy shop I use and the guy at the front desk said he thinks they usually replace the whole alternator when the voltage regulator goes.
-
After letting the car sit an hour, I just took it on a short drive and the battery voltage is now between 12 - 14 and constant as it normally is. However the battery light is still on. Anyone know if this means the computer is currently detecting an issue or if instead this is a light that can become "tripped" (like the airbag light) and just needs a Durametric to be reset. I'm still assuming there's something flakey going on with the alternator.
Thanks in advance for any ideas.
-
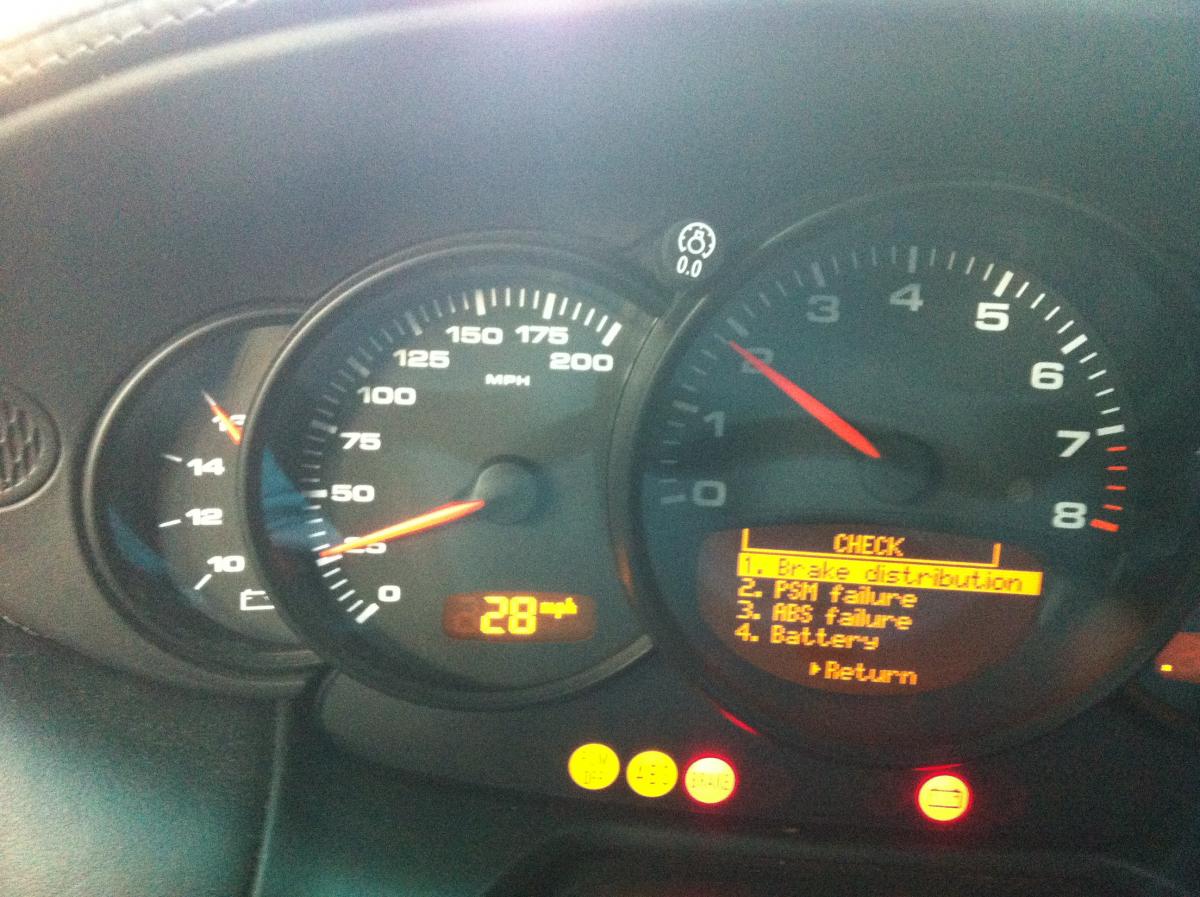
2002 Carrera 4S. I did a search and didn't see these exact symptoms simultaneously.
See attached picture. I was driving at 5k RPM in 3rd when the power of the car was suddenly reduced (by the computer I believe) and the console beeped displaying the following 4 checks: 1. Brake distribution 2. PSM failure 3. ABS failure 4. Battery -- also, as you can see in the pic, the battery voltage meter is maxing out. When I disengage the clutch from the engine the voltage drops some (and the brake/PSM/ABS messages go away and are temporarily ok) but is still running significantly higher than what I'm used to seeing. Could this high voltage be damaging to the electronics system? Presumably there's something going on with the voltage regulator. Does the ABS/PSM turn off automatically for saftey when there are voltage spikes?
My battery is an Interstate and is ~ 1yr old. This seems to me like the alternator (possibly the voltage regulator). I realize it would be better if I had a Durametric to hook it up to and get the exact error codes off of. That may need to be done to properly diagnose what's going on here.
Thanks in advance for any help/input.
Cheers,
Alex
-
The likelihood of getting a response would be greater if you posted this in the correct forum. You have a 996 series but posted in the 991 series forum.
-
Thanks, Thorstein. Your car is a beauty as well.
-
xmac -
That is a sweet pic. Love the '99s, beautiful car. Not sure if I like better -- what you posted or your avatar with the M3 chasing you in the background :)
I was just curious, what does the "XAA" denote in your vehicle? Does that have to do with the aerokit?
-
Oggie -
I had the same issue last year -- it was only the flap that was broken -- and read that you can buy the visor part from the Boxster and just use the flap. But it seemed like a hack and I wasn't sure if you could get the flap off and then on without breaking those little tabs... so I took Loren's advice and just went ahead and replaced the part with the OEM one. Using that DIY it didn't take much time and if I recall correctly the part was only around $60 from Sunset. Works like a charm now.
-
You may want to have your battery tested...? Doesn't sound right if your battery drains after just a few days; a few weeks might be more reasonable but a few days is crazy.
I have a 1yr old Interstate MTP-91 battery in my 02 C4S and when I came back from a 3 week trip, it started right up without hesitation -- didn't even turn over slow on the start. I was surprised after reading a lot of posts that said what you are describing. I can't comment on that other than to say that fortunately my car doesn't exhibit the same behavior.
-
Was gone almost 3 weeks (including in Germany driving on the auto bahn :notworthy:) and I left the car NOT hooked up to the C-Tek charger (after thinking about it didn't like the idea of leaving electrical stuff hooked up when I was gone so long and figured I could always charge it when I was home at night if it was drained). However, I got home expecting that the battery might be drained on the 996 but she started right up with a hungry roar, no problem at all. I don't know what the deal was with all the posts I read saying the battery dies on these cars in a week or two if you let them sit. That was not my expeience at all.
Ironically it was my BMW (that has been rock solid in the last 8 years I owned it) that wouldn't start. Turns out that the engine was flooded. Mechanic told me that this can happen when you turn the car on and then off real fast -- which was the case as I started up the car for only 5-10 seconds and probably gunned it with gas just to quickly pull it into the garage.
Thanks for your guys' input on this.
-
Did a search and see a bunch of related post but I don't see anything that answers specifically the following....
Since buying my 2002 C4S I have driven it pretty much every day. However, for the next 3 weeks she will be sitting in my garage while I'm traveling. I have read that the battery drains pretty quick on these cars and had two specific questions:
1. How long can the car sit without being driven before you have to worry about the battery draining? I have a Interstate battery purchased within the last year. I'm asking this question more thinking ahead for if I leave the car at the airport, etc.
2. I bought a CTEK Charger - Multi US 7002 after reading good things. I was going to hook it up to the car the night before I leave for 3 weeks but the shipper made a mistake and now it won't be here in time. Pending the answer to my first question, if 3 weeks is too long to leave the car sitting without driving it because of battery draw, is my best bet to just disconnect the battery while I'm gone? I don't want to come home to a dead battery and I've also read it's not the best thing for the battery to drain completely and have to be jump-started.
Thanks in advance.
-
Ya, you're right. I looked closer and the column headings in the table (in my AutoAtlanta link) aren't aligned propertly (might be a browser issue?). At any rate, I believe I have the right information now so thanks to both of you. I ordered the part and the 9 screws (only $.23 each) from Sunset and it was $75 + shipping.
Much appreciated.
-
I attached a picture of mine (2 actually, one of each side).
Does this sound correct? Trying to be sure I order the right parts and I'm not missing anything.

changing the oil in a 996 while the car is on an incline
in 996 Series (Carrera, Carrera 4, Carrera 4S, Targa)
Posted · Edited by ferrugia
I was wondering if there was anything specific in the mechanics manual for the 996 that says the car should be completely level/flat (eg. 0 degree incline) when doing an oil change. I'm about to do my first DIY oil change on this car since getting it. I'm guess it would be best to have the vehicle completely level, however, that said, I was wondering what the caveats are, if any, to having the vehicle on an incline while I do the oil change.
I recently purchased some "rhinoramps" since ramps seemed to be more convenient and practical for my needs vs. jack stands. Obviously one consequence of using ramps is that when I work on the car, it's a bit tilted.
I saw some related posts -- users who thought changing their oil on an incline caused some old oil to stay in the engine as they measured by how much new oil they put in the engine after the change -- however, the consensus I took away from that seemed to indicate an incline was ok.
Any input would be greatly appreciated. Thanks.