Welcome to RennTech.org Community, Guest
There are many great features available to you once you register at RennTech.org
You are free to view posts here, but you must log in to reply to existing posts, or to start your own new topic. Like most online communities, there are costs involved to maintain a site like this - so we encourage our members to donate. All donations go to the costs operating and maintaining this site. We prefer that guests take part in our community and we offer a lot in return to those willing to join our corner of the Porsche world. This site is 99 percent member supported (less than 1 percent comes from advertising) - so please consider an annual donation to keep this site running.
Here are some of the features available - once you register at RennTech.org
- View Classified Ads
- DIY Tutorials
- Porsche TSB Listings (limited)
- VIN Decoder
- Special Offers
-
OBD II P-Codes - Paint Codes
- Registry
- Videos System
- View Reviews
- and get rid of this welcome message
It takes just a few minutes to register, and it's FREE
Contributing Members also get these additional benefits:
(you become a Contributing Member by donating money to the operation of this site)
- No ads - advertisements are removed
- Access the Contributors Only Forum
- Contributing Members Only Downloads
- Send attachments with PMs
- All image/file storage limits are substantially increased for all Contributing Members
- Option Codes Lookup
- VIN Option Lookups (limited)

1schoir
Contributing Members-
Posts
2,739 -
Joined
-
Last visited
-
Days Won
6
Content Type
Profiles
Events
Forums
External Paint Colors
Downloads
Tutorials
Links Directory
Collections
Classifieds
Store
Everything posted by 1schoir
-
... "Afterwards, air up the tires, a full tank of fuel dosed with StaBil, a full cleaning of the car, hook it up to a battery maintainer, and put the dust cover over it until spring"... JFP: Thanks for the info on "winterizing" the car for storage. I'm assuming that the StaBil is a different type of StaBil fuel stabilizer than the one that was used "in the old days", before ethanol. I have tried StarTron by StarBrite recently but I'm not sure if that the best product out there for avoiding ethanol-related problems when gasoline is being stored or unused for a prolonged (6-9 months) period of time. Regards, Maurice.
-
Here is somebody's very positive experience with that shop, posted on 6speedonline.com: http://www.6speedonline.com/forums/northeast/310253-porsche-shop-new-jersey.html I have no personal experience with that shop, but I thought that this might help some. Perhaps PM the poster on 6speed. Regards, Maurice.
-
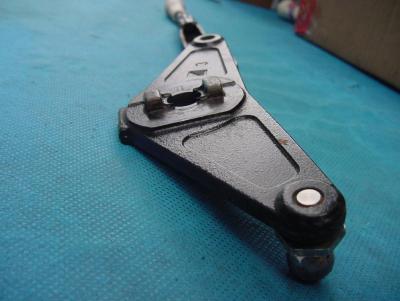
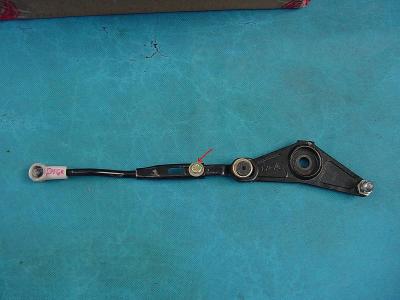
Garry: Hope you are okay after that incident and the drunk driver gets a stiff sentence. The steel ball (on the end of the body-colored clamshell support arm) popping out of the black slider and the broken cable on the right side will not by themselves cause the canvas part of the top to drop. The canvas and frame part of the convertible top is driven by the front pushrods when each of the two red (in the older 986's, white in the newer 986's) ball cups is connected (i.e., pressed) onto its respective steel ball that is screwed into the underside of the B-pillar part of the convertible top frame. The front pushrods also have to be still connected to the V-lever and the two parts of each front pushrod have to still be bolted to each other with the 10mm nut with fat washer. If those four things are connected as they are supposed to be, the only way the canvas part of the top can drop is if the gears inside the transmissions are completely stripped or the 19mm bolt that holds the V-lever onto the transmission has backed out far enough to allow the keyways (male and female) to spin past each other. Here is a photo of an intact front pushrod and its plastic ball cup: Note that the red arrow points to the 10mm bolt with fat washer that holds the two metal parts of the pushrod together. The steel ball on the V-lever is connected to one end of the black "hydraulic" pushrod which operates on the clamshell. Here is a photo of the other side (underside) of the V-lever showing the male keyway. The first thing you should do after you examine all of the parts to see if anything is askew is to replace the broken drive cable, then pop the steel ball back into the black plastic slider and then go from there. Regards, Maurice.
-
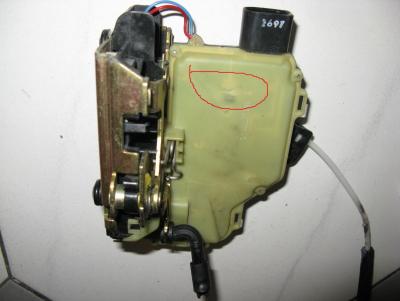
The heat affecting the operation of the door lock may be an indication of a failure of some of the solder connections inside the door lock assembly. IIRC, there are five solder connections which are located on the circuit board roughly in the area indicated under the red circle I have drawn on this photograph: When you take the assembly apart, you will find little solder "cones" on the circuit board. Inside of each cone is the termination of an electrical wire. You have to look at the "cone" solder connection with a magnifying glass to detect the minute cracks in that solder joint. If you reflow the solder connections at each of those "cones", it will eliminate the intermittent nature of the connection. The cracks are so small that when the car is parked with the door in the sun it will result in a change in the connection/disconnection of the wire to the circuit board. I plan on taking apart another one of these assemblies and will post photos of the inside circuit board, showing the cones and their cracks. Regards, Maurice.
-
Garry: The clamshell only moving on one side and the canvas part of the top dropping down are two different problems with two different causes. The clamshell only moving on one side can be caused by a stretched, frayed or broken drive cable (in your case here, on the passenger side) or a fault in the convertible top transmission (again on the passenger side in your case). You have to narrow down the cause of the problem by starting with the least complicated first. In this case, take a look at the outer surface of the black vinyl drive cable on the passenger side. If the surface is smooth, it's likely that the outer sheath has stretched, thereby effectively pulling the inner metal cable out of the electric motor's drive flange. If the surface is cross-hatched, it's less likely that the cable has stretched. Nonetheless, verify that the inner metal cable is sticking out at least 1/2 inch from the outer black vinyl sheath by pulling out the cable from the output flance on the side of the electric motor (on the side that is not moving or lagging behind). If that is not the problem, pull the inner metal cable out of the black vinyl sheath and examine it to make sure it is not frayed and that it is all in one piece. If either of these conditions exist, that side's transmission will not turn the V-lever. If the cables are not the problem, the problem lies inside the transmission. Usually a deformed worm gear housing or a cracked small 360 degree gear. The reason that the convertible top dropped suddenly after a "pop" was that one or both of your plastic ball cups (on the end of the front pushrods) either popped off their respective steel balls or shattered apart. Note that the front pushrods cause the canvas part of the top to operate and the rear black "hydraulic" pushrods cause the clamshell to operate. With respect to the clamshell, you also have to verify that the steel ball which is located at the base of the body-colored support arm of the clamshell has not popped out of the black plastic slider that rides back in forth in the channel (located on the inside of the quarter panel, near the top horizontal surface of the convertible top well. Inspect those things and report back so that we can narrow down the problem. Regards, Maurice.
-
If your drive cables are the cross-hatched variety (as opposed to smooth-sided), then it is more unlikely that the drive cable is the problem. That, combined with the fact that your dash light will not go out may indicate a problem with one of the two sensors INSIDE the driver's side transmission, or with some other damage to the small plastic gear in there. Here is a photo of the cross-hatched cable that is less prone to stretching. The stretching causes the inner metal cable to appear to "retract" inside the black vinyl outer sheath and that in turn causes the inner metal cable to no longer be engaged in the output flange on that side of the electric motor. When that happens, the electric motor does not turn the metal cable and the transmission does not turn the V-lever on that side. To try to narrow down the problem, pull the cable outboard from the side of the electric motor (after pulling off the upside down U-clip and take a look at how much of the inner metal cable is sticking out. It it's less than 1/2 inch that is the problem and you have to rectify that problem to continue with your diagnosis. If the cable is sticking out 1/2 to 3/4 of an inch, (and there are no dead-spots on the electric motor) the problem is with the transmission on that side. Regards, Maurice.
-
Stumped, where to start...Electrical?
1schoir replied to otisdriftwood's topic in 986 Series (Boxster, Boxster S)
On a 986, if pulling up on the handbrake does not illuminate the idiot light on the dashboard, there will be no power to the convertible top mechanism. As the link provided by Ahsai shows, either clean the contacts on the microswitch under the handbrake or replace it. Sometimes if you keep pulling up and down on the handbrake with varying degrees of force, it will free up the switch and the idiot light will go on. When that happens, you will again have power to the top. Regards, Maurice. -
Airbag light advice requested
1schoir replied to steve20186's topic in 996 Series (Carrera, Carrera 4, Carrera 4S, Targa)
Here is a summary of the TSB that I wrote up for Boxsters a few years ago, translated into "more understandable" English :eek: ! When diagnosing Airbag Warning Lamp on and the fault codes are DTC 44, 45, 46, or 50 Drivers side and/or DTC 47, 48, 49, or 51 Passenger side, the faults may be caused by poor connection at pins B7 and B8 of plug connections X16 and X17. The wiring connections have been corrected as of VIN WPOCA2983WS620157 and the belt buckles as of VIN WPOCA298XWS620138. The rest of it describes how to replace the wiring connections and belt buckles. SUMMARY OF PROCEDURE TO RECTIFY AIRBAG LIGHT PROBLEM The TSB is dated 6/99 and is TSB number 6924. There is a "belt buckle service kit" which contains all the needed parts for the fix and that kit is part number 000 043 204 32. If you are a contributing member on RennTech.org, you can access the TSB's. When diagnosing Airbag Warning Lamp on and the fault codes are DTC 44, 45, 46, or 50 Drivers side and/or DTC 47, 48, 49, or 51 Passenger side, the faults may be caused by poor connection at pins B7 and B8 of plug connections X16 and X17. The wiring connections have been corrected as of VIN WPOCA2983WS620157 and the belt buckles as of VIN WPOCA298XWS620138. The latest Porsche fix involves replacing both seat belt buckles, splicing and soldering in four leads with "gold plated and greased" contact springs and substituting them for four of the original contact springs in the 8-pin connector under the driver's (left) side seat (positions B5, B6, B7, & B8), doing the same but with only two contact springs on the 8-pin connector under the passenger's (right) side seat (positions B7 & B8), and then splicing and soldering beefier leads with cable lugs in place of thinner leads all leading to a ground point under each seat. After that, you must substitute new plug caps on the the 8-pin connectors, which now include a tab that is used to securely fasten all of the wires exiting the 8-pin connectors with cable ties, and add cable ties to the female 8-pin connectors on the undersides of the seats and you are almost done. Again, it's a straightforward job once you decipher the descriptions and language in the TSB, which is a special chore in itself. Then you have to reset the airbag light with your Durametric, PST2 or PIWIS and that provides a "permanent" fix. Not doing both seats (regardless of the specific codes) is just putting off the inevitable, IMHO. Total cost was about $170, and, contrary to the TSB, no special Porsche tool needed (just an adapted $5 terminal extractor). Regards, Maurice. -
Give a call to Maryland Metrics (http://mdmetric.com/). The salesmen there are very knowledgeable about the type of nuts and bolts that are best suited for various applications. They have every type of metric fastener you can imagine, and some that you can't. B) I replaced my exhaust flange bolts with studs and a special type of brass nuts and lock washers. Eliminates the problem of breaking off the stock bolts which eventually rust solid into the cylinder head. Regards, Maurice.
-
Central Locking System Problem
1schoir replied to hosickjg's topic in 986 Series (Boxster, Boxster S)
There is one external fuse for the immobilizer. It's a 15 amp fuse, and it's located on the rear of the unit. You can unbolt the seat and just lean it back, supported by a block of wood under one front corner to access the unit. It's easily removable by just turning the one phillips screw 90 degrees. If you want to take the seat out, you have to be careful not to set off the airbag light, which can't be reset without a Durametric, PST2 or PIWIS. You can take out the driver's seat without disconnecting it from the connector if you set the seat on a small platform next to the door sill (the wires are long enough). Regards, Maurice.- 1 reply
-
- 1
-

-
Top keeps breaking....
1schoir replied to Pulseguy's topic in 987-1 Boxster Convertible Top Issues and Solutions
Installing the metal ball sockets is a VERY bad idea, IMO. In the event of a malfunction, your front pushrods with their new metal ball cups may stay intact, but, for example, the small steel balls onto which the ball cups press may tear away from the part of the frame that they are screwed onto. Cost of a pair of replica plastic ball cups: about $35. Cost of a pair of OEM front pushrods: about $150 Cost of the part of the frame ("main folding top bow") that would break: about $2500. Regards, Maurice. -
Convertible roof operation
1schoir replied to cdharchitect's topic in 987-1/987C1 Series Part Number Requests
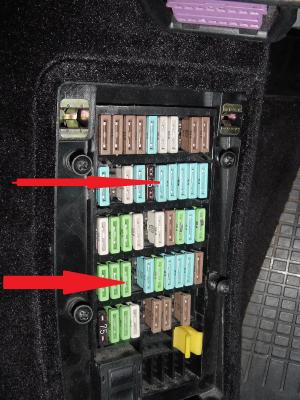
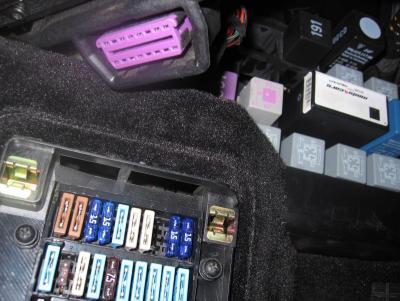
I'm assuming you are talking about a Boxster. If so, which year Boxster? The early Boxsters have a different top mechanism. Most of the functions of the top (whether early or late) are controlled by the double relay that is located in the relay tray immediately above the fuse tray in the driver's side kick panel. There are additional microswitches in the convertible top latch assembly at the center of the windshield frame. Here is a photo of the double relay and its location. If your double relay has a black square on top, it's the "B Version" transmissions and set -up. If your double relay has a black triangle on top, you have the "A Version" transmissions. Also check these two fuses (B6 and D3): Regards, Maurice. -
Top stopped working
1schoir replied to bwillis's topic in 986 Boxster Convertible Top Issues and Solutions
The overall length of the front pushrods affects the final location of the leading edge of the convertible top when it approaches the top horizontal surface of the windshield frame. You can make adjustments to achieve an even space between the top and the windshield frame on both sides and then adjust the overall length of each pushrod so that, when the electric motor turns off and the top is at its "final position" before latching, the leading edge of the top does not start going back towards the rear of the car. Note that the adjustments to the overall length of the pushrods don't yield a straight, linear progression. At some particular point, the leading edge of the top will end up further away from the windshield frame even though it had been getting closer and closer with successive, incremental increases in the overall length. The eccentric adjusting screw at the lower end of the body-colored clamshell arm positions that side's horizontal level in relation to the level of the rear quarter panel channel. If you loosen the nut that surrounds the screw and then turn the screw you will see how it (the screw) rotates closer and then further from the horizontal level of the forward part of the clamshell. That positions it closer or further away from the top of the rear quarter panel. You should also make sure that the small black plastic adjusting clip that sits inside the channel is not causing that end of the clamshell to end up higher than it should. To adjust that one you have to pull it apart or push it back together. Pulling it apart causes the forward end of the clamshell arm to sit lower and pushing it together forces that end up in small increments. If you have a photo of the "slot on the lid" that you refer to, post it so that I can see what you are referring to. Regards, Maurice. -
996 Complete Coolant Flush DIY
1schoir replied to krazyk's topic in DIY Articles - Carrera (996) - Maintenance
Moondoggy: If you are just "a little low" you can get by with just adding distilled water. A quart or so will not make an appreciable difference in the mixture. The question of whether to use only Porsche coolant or not is a much more difficult question to answer as Porsche has gone to great lengths to protect that little profit center. There are lots of threads discussing the type of coolant to be used and just as many opinions. Regards, Maurice. -
Top stopped working
1schoir replied to bwillis's topic in 986 Boxster Convertible Top Issues and Solutions
Tony: Excellent work! It looks like you're 95% of the way there, and, let me assure you, you won't miss getting out to do the "chop" or miss worrying whether it's just a tad too cold to put the top down for fear of cracking the plastic window. Let me know if you run into any glitches. Regards, Maurice. -
Driver window does not drop when door handle is opened
1schoir replied to jborchel's topic in 986 Series (Boxster, Boxster S)
Here is the link to the bicycle brake adjuster fix on the 986forum: http://986forum.com/forums/general-discussions/25704-window-regulator-permanent-fix-stretched-cable-2.html IIRC, the zip tie fix did not hold up well, but the bicycle brake adjuster fix has been "permanent". Regards, Maurice. -
Driver window does not drop when door handle is opened
1schoir replied to jborchel's topic in 986 Series (Boxster, Boxster S)
Here is a link to a good DIY that includes door panel removal for a Boxster: http://www.bombaydig...rojects/window/Here's a link to another thread here where the original poster had "too much play" in his window regulator:http://www.renntech....cle#entry189868Regards, Maurice. -
Changing micro switches in door
1schoir replied to boeykew's topic in 996 Series (Carrera, Carrera 4, Carrera 4S, Targa)
You can sometimes restore the "stickiness" of the original black sealant on the foam membrane behind the door panel by heating it up a little with a heat gun and then pressing the foam membrane back onto the sheet metal frame of the door. If your sealant is too far gone, you can use Permatex Black Silicone Adhesive Sealant (part # 81158), which is waterproof and stays somewhat flexible. Here is a link to what it looks like: http://www.amazon.com/Permatex-81158-Silicone-Adhesive-Sealant/dp/B000AL6WLA/ref=sr_1_1?ie=UTF8&qid=1366433481&sr=8-1&keywords=permatex+black#productDetails If you can't get it in Belgium, another silicone adhesive sealant can do the job, as long as it doesn't have any ingredients that attack the foam membrane. It is very important to seal the membrane carefully so as to avoid getting water into the cabin. If it's not sealed properly, you can usually feel the carpet getting wet first just below the door sill after a rain or a car wash. If you get water into the cabin, it will promptly find its way under the driver's seat, where it will fry the immobilizer. Regards, Maurice. -
2001 Boxster Door Locks Not Working
1schoir replied to TheGuy's topic in 986 Series (Boxster, Boxster S)
Guy: The symptoms you describe are consistent with a faulty door lock assembly. Sometimes it's something mechanical, as "cmos" has described, other times it's the result of cracked solder connections to the door lock assembly. If you do a search here, you will find instructions on how to take off the door panel. You can then remove the door lock assembly and inspect it. As "cmos" said, it's fairly easy to take apart that assembly and put it back together. Your other option (once you have determined that the door lock assembly is faulty) is to replace the assembly, at a cost of about $200. Be thankful you don't have a '97 as that same part is about $450. :eek: Regards, Maurice. -
Convertible Top Compartment Cover Not Tight When Top Down
1schoir replied to KMN's topic in 986 Series (Boxster, Boxster S)
Thanks for the clarification. Regards, Maurice. -
Convertible Top Compartment Cover Not Tight When Top Down
1schoir replied to KMN's topic in 986 Series (Boxster, Boxster S)
If someone charged you to replace a "right side motor" you were charged for a non-existent part :eek: . All 986 and 987 Boxsters have only one electric motor, located on the rear firewall of the convertible top well and that motor drives both transmissions by means of drive cables. Regards, Maurice. -
Xavier: Could you post photos to illustrate the part that no longer depresses the microswitch to which you are referring, along with the mounting holes? Regards, Maurice.

