Welcome to RennTech.org Community, Guest
There are many great features available to you once you register at RennTech.org
You are free to view posts here, but you must log in to reply to existing posts, or to start your own new topic. Like most online communities, there are costs involved to maintain a site like this - so we encourage our members to donate. All donations go to the costs operating and maintaining this site. We prefer that guests take part in our community and we offer a lot in return to those willing to join our corner of the Porsche world. This site is 99 percent member supported (less than 1 percent comes from advertising) - so please consider an annual donation to keep this site running.
Here are some of the features available - once you register at RennTech.org
- View Classified Ads
- DIY Tutorials
- Porsche TSB Listings (limited)
- VIN Decoder
- Special Offers
-
OBD II P-Codes - Paint Codes
- Registry
- Videos System
- View Reviews
- and get rid of this welcome message
It takes just a few minutes to register, and it's FREE
Contributing Members also get these additional benefits:
(you become a Contributing Member by donating money to the operation of this site)
- No ads - advertisements are removed
- Access the Contributors Only Forum
- Contributing Members Only Downloads
- Send attachments with PMs
- All image/file storage limits are substantially increased for all Contributing Members
- Option Codes Lookup
- VIN Option Lookups (limited)

1schoir
Contributing Members-
Posts
2,739 -
Joined
-
Last visited
-
Days Won
8
Content Type
Profiles
Events
Forums
External Paint Colors
Downloads
Tutorials
Links Directory
Collections
Classifieds
Store
Everything posted by 1schoir
-
It is is the same general area, not far from the AOS. Go to this thread for a good pic of the location of the Crankshaft Position Sensor from a '99 Boxster. Specifically look at post #3: http://www.renntech.org/forums/topic/42186-couldnt-locate-the-crank-position-sensor-for-99-boxster/?hl=crankshaft#entry225237 Regards, Maurice.
-
Bill: They may have used the earlier, more than 10 year old cars, to show that there was a problem with the M96 engine. Then, the parties came to an agreement (which the judge now has to approve) that if you got 10 years' use out of the car, or 130,000 miles (whichever comes first), then that represented fair value in terms of what you bargained for when you bought the car. Even though some cars had their IMS bearing self-destruct, they may have agreed that if the IMS bearing lasted 10 years or 130,000 miles and the owner had not had an IMS bearing related repair performed, then that particular bearing could not be considered defective, and that, in effect, it had done its job and that those owners were therefore not entitled to any compensation. Without seeing the judge's decision and rationale, that's the best I can come up with. Regards, Maurice.
-
horn goes of for no reason
1schoir replied to frankie050258's topic in 986 Series Part Number Requests
Frankie: Here is a thread that covers the reason for the horn malfunction and detailed fixes. Posts #8 and #10 by "jporter" are particularly helpful for the fix: http://www.renntech.org/forums/topic/1728-horn-problem/?hl=horn Regards, Maurice. -
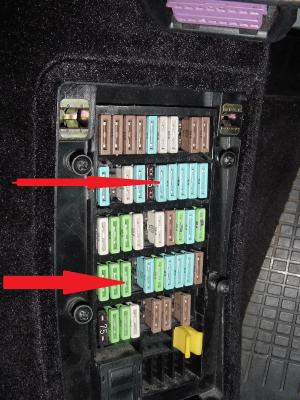
Start by checking to see if there is any moisture or water under the driver's seat, where the immobilizer is located. If your convertible top drains are clogged and the car sat in the rain or was washed, the water will end up under the seat. Then check the fuse located on the back of the immobilizer, as suggested by Electrict. You can access the immobilizer by removing the four bolts that hold down the seat rails and just tilting the seat back. That will give you enough access to get at the immobilizer and you won't set off the airbag light (which would happen if you take out and disconnect the connectors under the seat). For the convertible top, check the fuses located at B6 (power to the convertible top double relay) and D3(power to the convertible top electric motor) in the manner suggested by Loren. Here is a photo of the where the B6 and D3 fuses are located: Here is a photo of the immobilizer, showing the screw you must turn to remove it and access the 15amp fuse (rotate that screw 1/4 turn counterclockwise to release it): The fuse is located on the back of the unit, in between the two connectors. Regards, Maurice.
-
The part number for these front pushrods is 986.561.279.02, and Porsche only sells the complete pushrod assembly and does not sell the plastic ball cups by themselves. You can get the parts from Sunset Porsche, a board sponsor (click on "Special Offers" at the top of the page and then select "Sunset Porsche-parts". There is a guy in the Netherlands who has had the plastic ball cups manufactured and he sells them at a reasonable price. If you want his info, send me a PM. Regards, Maurice.
-
starter motor 1998 boxster
1schoir replied to frankie050258's topic in 986 Series Part Number Requests
Frankie: There are three starters listed for the 986 Boxster: 20 986 604 104 00 Starter 1 1,2 KW (20) A 996 604 104 00 Starter 1,8 KW 1 M 249 (20) 996 604 103 00 Starter 1 M 249 M 198 The "M 249" designation is for Tiptronic 986's, so it looks like the correct starter is the 1.2KW unit, part number 986 604 104 00 Regards, Maurice. -
Roof mechanism broke, advice needed!
1schoir replied to RJ2013's topic in 987-1 Series (Boxster, Boxster S)
The alignment is not difficult to adjust when you get to that point, but turning the V-levers one complete revolution will not do any harm. The only caution is to make sure that the now-dangling pushrods do not dig into the foam drain trays or get jammed and damaged. It you rip or get a tear in the foam drain trays, you will get water inside the cabin and it will immediately seek electronic components on the floor pan! Regards, Maurice. -
Roof mechanism broke, advice needed!
1schoir replied to RJ2013's topic in 987-1 Series (Boxster, Boxster S)
AFAIK, the rear control unit and the front luggage compartment control unit don't have any effect on the operation of the convertible top. The entire operation is controlled by the double relay that sits in the relay tray in the driver's side kick panel, above the fuse panel. On U.S. cars, that relay tray is on the left side. Not sure about which side it's located on in U.K. cars, but it should be above the fuse tray. Your windows should be dropping down the 4 inches when you pull the latch open, regardless of whether the plastic ball joints or the rear "hydraulic" push rods are connected. If your windows are not dropping, the convertible top latch microswitch is faulty. It's the same part number for 986's after 2000 and for all 987's, part number 986 613 299 00. Remove the unit and you may find it's actually composed of two microswitches, a plunger-type microswitch and a parallel strips microswitch. Regardless of what you find in there (let us know), if that unit is faulty, it will not allow power to flow to the electric motor. On the subject of the electric motor, some of these have had dead spots on occasion and that results in intermittent operation. Remove the connectors from the motor and apply 12 volts directly to it to see if it spins freely. Regards, Maurice. -
Roof mechanism broke, advice needed!
1schoir replied to RJ2013's topic in 987-1 Series (Boxster, Boxster S)
Considering that there was moisture and corrosion in the immobilizer under your seat, that was most likely the source of your original problem with the roof mechanism. Now that you have replaced it, presumably with a good, new unit, you have to eliminate possible causes for not getting power to the roof's electric motor. There are a few possible causes that remain after looking at the symptoms that you describe. 1. Is your brake "idiot light" illuminated on the dashboard when you pull up on the handbrake? If not, no power will flow to the motor. 2. Double check the two fuses specific to the top mechanism: B6 (power to the convertible top double relay) and D3 (power to the convertible top electric motor). Test the fuses with a multimeter (not just visually) and clean off the receptacles into which they are inserted. 3. Are your windows dropping down the 4 inches when you pull on and open the convertible top latch? If not, one of the two microswitches inside the convertible top latch assembly is faulty. 4. Take out your double relay and clean the metal spades of any corrosion, and also give the relay a couple of sharp raps on the floor (that will sometimes revive a dead relay). Also pull off and press back in the double relay as that sometimes cleans off some of light corrosion that might have built up on the relay tray's receptacles for the double relay spades. 5. You may also have just a dead spot on the armature of the convertible top electric motor. Clean the connections to the motor and give it a couple of taps with a small hammer (that will sometimes revive it). Regards, Maurice. -
986 Interior Monitoring Sensor
1schoir replied to 1schoir's topic in 986 Series (Boxster, Boxster S)
You are probably correct (as usual) :cheers: . PM Sent. Regards, Maurice. -
986 Interior Monitoring Sensor
1schoir replied to 1schoir's topic in 986 Series (Boxster, Boxster S)
That exploded view might be helpful. I wanted to see what it looks like before I go out to the Boxster (it's still cold out here on Long Island) to try to locate and rectify this long standing fault code. I will pull the code and post it when it gets a little warmer here and I'll check my VIN to see if my car is one of the affected ones. The TSB was helpful also. Thanks for posting that. It says that the sensor must be replaced, but it doesn't explain why you must replace the sensor if the locating pins are causing the problem. Regards, Maurice. -
Looking for a photo of the interior monitoring sensor on an early Boxster ('97). I have a long standing fault code from this source and would like to know what the unit looks like. Regards, Maurice.
-
A lubricant for this application that is hard to beat (although it is a tad pricey) is Dupont Krytox, in a spray form. It's an excellent lubricant that does not attract dust or dirt and to which these do not stick. It's long lasting and is chemically inert. You can also use white lithium grease (spray or tube), but it is tacky. It won't wash off easily and is very affordable. Regards, Maurice.
-
1997 door lock where to get ?!?
1schoir replied to MarcoAtCA's topic in 986 Series (Boxster, Boxster S)
The only part number listed for door lock assembly for the passenger side of a '97 Boxster is 3B1-837-016-D. Regards, Maurice. -
Dont know if i should just call it quits :/
1schoir replied to Aceler8's topic in 986 Series (Boxster, Boxster S)
-
Dont know if i should just call it quits :/
1schoir replied to Aceler8's topic in 986 Series (Boxster, Boxster S)
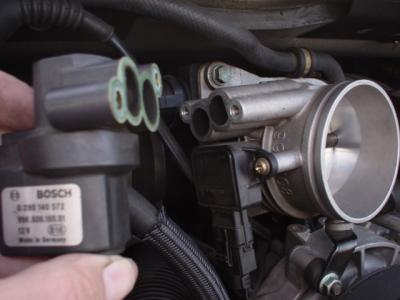
Here is a photo of where the two bolts that fasten the Idle Control Valve onto the throttle body are located on a non e-gas Boxster: Here is what the ICV looks like, removed from the side of the throttle body (this photo from Pedro, IIRC): Regards, Maurice. -
:welcome: +1 Here is a link on the ignition switch, where to get it, and how to replace it: https://sites.google.com/site/mikefocke2/ignitionswitchreplacement Regards, Maurice.
-
Dont know if i should just call it quits :/
1schoir replied to Aceler8's topic in 986 Series (Boxster, Boxster S)
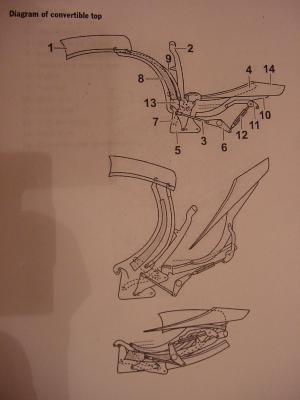
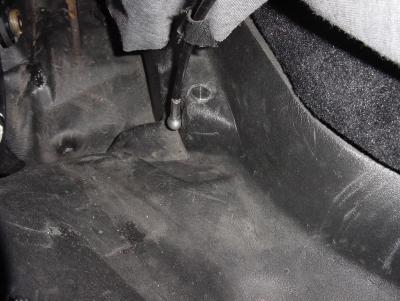
Don't despair...It is relatively easy to open the convertible top when everything is not working in the automatic mode. There is a way to do it by spinning the drive cables with a cordless drill and a way to do it manually by disconnecting the pushrods. If you want the cordless drill, more automatic, method, let me know and I will give you the details for that procedure. I will spell out the procedure for doing it manually here: First, unlatch the latch of the convertible top at the top center of the windshield frame. To get the top to open manually, you must disconnect the white (or red if yours are original and have never been replaced) plastic cups at the base of the B-Pillar and the black hydraulic pushrods where they connect to the V-levers. Disconnecting the white plastic cups will allow you to operate the convertible top manually. Disconnecting the black hydraulic pushrods will allow you to operate the clamshell manually. Here is a diagram of the mechanism, which should help you orient yourself as to what you are looking for: The V-lever is part #6, the black hydraulic pushrod is part #12, and the white (or red) plastic cup is located on the forward end of part #3. Part #14 is the clamshell, and Part #1 is the canvas top. To have a better chance to see the parts that must be disconnected, you will have to pull aside the (vinyl) rain curtain. That curtain is loosely held in place by yet another cable that is located at the rearmost corners of the (carpet-covered) engine compartment lid (on the car body, not on the lid). That cable is held on to a small metal ball and you must pry it apart from that metal ball. Here is a photo of the flexible cable that leads to the metal ball (hidden under the metal cup at the bottom of the cable) at the side of the curtain: That particular connection is easy to separate, unlike the black hydraulic pushrod. Once you have the curtain's cable separated, you may also have to remove the black plastic cosmetic covers that are simply clipped onto the arms that support the clamshell (those arms are part #10 in the diagram, and extend from where it is numbered all the way to the front towards part #3 in the diagram). Note that most of the time, on used Boxsters, they have been removed for a repair and not replaced. . To access the white plastic cups, sit sideways in the driver's seat with the door open and your feet on the ground. Look down from above the side of the car (just behind where the rear quarter panel meets the rear of the door if the door were closed) and you should be able to see the white (or red) plastic cup. Pry that cup off by levering it outboard. You will need a fat screwdriver or pry bar. Then you will have to reach between the roll bar hoops, or possibly reach through them, to get at the connection of the hydraulic push rod to the V-lever. That connection is a real bear, so you will have to apply a great deal of pressure to separate it. Be careful not to hurt yourself there, but you just have to get the connection apart, again with the red plastic capped tool in the tool kit, a fat screwdriver or, preferably an angled screwdriver-type pry bar. I have also had success using a non-automotive tool called a cat's claw, which is usually used to pull nails. Now that you have disconnected the front pushrods and the rear pushrods from their respective steel balls (two on the underside of the B-Pillar frame and two on the rear of the V-levers), you can just pick up the rear of the clamshell and pull it rearward to the 45 degree rearmost position and then just pull the canvas part of the convertible top back to open the top. Once you have the various parts disconnected, DO NOT press the dashboard switch without CAREFULLY marking (and photographing) the position of the V-levers relative to the sides of the body that they are mounted on. Otherwise, it will be much more difficult to re-sychronize the V-levers (part # 6 in diagram). Also, be very careful if you decide to operate your top manually because the push rod arms (part #3 in the dagram) that are normally connected to the steel balls at the base of the B-pillars will be dangling from the V-levers. When they are dangling and you move the convertible top V-levers, those push rod arms can dig into the foam liner and tear it, which will cause leaks into the cabin later on. Those push rod arms can also dig in and prevent the V-levers from turning. Let us know if you run into any roadblocks. P.S. Don't sell the Boxster unless you are ready to buy another one. :eek: Any problem you have with the convertible top we can figure out and fix for very little $$. Regards, Maurice. -
Convertible Top Compartment Cover Not Tight When Top Down
1schoir replied to KMN's topic in 986 Series (Boxster, Boxster S)
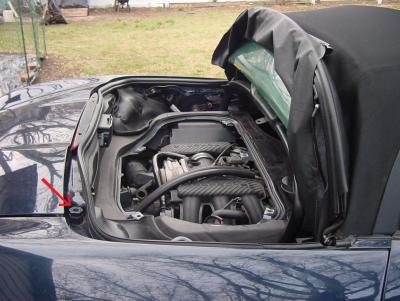
There are a number of things that can cause the clamshell to not reach a position that makes it level with the surrounding body panel (forward edge of the trunk lid and inboard edges of the rear quarter panels). The first thing to check is to make absolutely sure that there are no foreign objects obstructing the stowing of the frame of the convertible top. Next, monitor the two black plastic cones on the underside of the clamshell to make sure that they are not getting hung up on the edges of the female receptacles which are just forward of each forward corner of the trunk lid. Here is a photo of the driver's side cone: Here is a photo of the part on the passenger side that the right cone is supposed to fit into (note that the clamshell has been removed for this particular photo): Next, examine whether the forward edge of the clamshell is pressing down on the folded down top surface of the convertible top. If there is no space between the underside of the forward edge of the clamshell and the canvas part of the top immediately under it, it's possible that the rear main bow is preventing the top from folding down far enough. If that's the case, make sure that the tension ropes (cable on each side at the rear of the convertible top frame that pulls down on the rear main bow) are actually connected to their respective steel balls and neither of the tension ropes are frayed or broken. If the tension ropes (which are actually steel cables) are intact, check that they are properly adjusted, and, if necessary, adjust the tension by means of the adjustment bolts. Turning the 14mm bolt counterclockwise will increase the tension and pull the rear main bow of the convertible top frame down. Mark the original position of the bolt on the bolt head so that you can reset it, if necessary and turn each one of the bolts (left and right side) by one full turn each and then check to see what effect that has had on the clamshell when you put the top down. Here is a photo of the driver's side adjustment bolt. The bolts are located inside the convertible top well, just outboard of the engine cover's rear "corners": Here's a photo of the mechanism, so that you know what you are turning: If none of the above are the cause of the problem on your Boxster, you will have to investigate whether your V-levers have not rotated far enough to pull the clamshell down tight and level. The easiest way to determine that is a little involved, but not difficult. To do that, you will have to disconnect all four pushrods (front and rear pushrods on each side) so that you can then see if the clamshell will lie flat and even when there is no tension or pressure being applied to the convertible top frame and the clamshell by the pushrods. You can then operate the convertible top canvas frame and the clamshell manually and determine if a little light hand pressure will get the clamshell down even with the surrounding body panels. Try the previous steps above and report back. If you are not familiar with the pushrods, we can delve into that next in detail. Regards, Maurice. -
Convertible Top Compartment Cover Not Tight When Top Down
1schoir replied to KMN's topic in 986 Series (Boxster, Boxster S)
Does the clamshell end up in the EXACT same position whether the top is in the completely closed or completely open position? The answer to that question will narrow down what you might be able to do to improve the lining up of the clamshell panel. Regards, Maurice. -
:thumbup: :cheers: :thumbup: Thanks for the update! Regards, Maurice.
-
If you are going to take out the seat, be careful not to unplug the connection under the seat or you will set off the airbag light, which can then only be reset with a PST2, PIWIS or Durametric. You can access the immobilizer by just unbolting the 4 bolts on the seat rails and then leaning back the seat by placing a block under the seat frame. While you are checking the immobilizer, verify that there is no water or moisture under, around or inside the immobilizer and any corrosion on the circuit board. Boxsters are notorious for clogged drains and resultant moisture/water migrating to the immobilizer. Since the clutch interlock switch operates by allowing the ignition to fire only when the plunger is fully released (i.e., with the clutch pedal all the way down), you cannot zip tie it to get the desired effect. You can, as you suggested, pull out the two wires and jumper them together. You are then bypassing the switch, and that will have the same effect as no switch at all, meaning that the connection is "on" all the time. Just be careful that the car is NOT in gear when you try to start it or the car will lurch forward. Regards, Maurice.
-
Here's the link to the bicycle brake adjuster fix from 986forum.com: http://986forum.com/forums/general-discussions/25704-window-regulator-permanent-fix-stretched-cable-2.html Regards, Maurice.


