Welcome to RennTech.org Community, Guest
There are many great features available to you once you register at RennTech.org
You are free to view posts here, but you must log in to reply to existing posts, or to start your own new topic. Like most online communities, there are costs involved to maintain a site like this - so we encourage our members to donate. All donations go to the costs operating and maintaining this site. We prefer that guests take part in our community and we offer a lot in return to those willing to join our corner of the Porsche world. This site is 99 percent member supported (less than 1 percent comes from advertising) - so please consider an annual donation to keep this site running.
Here are some of the features available - once you register at RennTech.org
- View Classified Ads
- DIY Tutorials
- Porsche TSB Listings (limited)
- VIN Decoder
- Special Offers
-
OBD II P-Codes - Paint Codes
- Registry
- Videos System
- View Reviews
- and get rid of this welcome message
It takes just a few minutes to register, and it's FREE
Contributing Members also get these additional benefits:
(you become a Contributing Member by donating money to the operation of this site)
- No ads - advertisements are removed
- Access the Contributors Only Forum
- Contributing Members Only Downloads
- Send attachments with PMs
- All image/file storage limits are substantially increased for all Contributing Members
- Option Codes Lookup
- VIN Option Lookups (limited)


Q-Ship986
-
Posts
232 -
Joined
-
Last visited
-
Days Won
2
Content Type
Profiles
Events
Forums
External Paint Colors
Downloads
Tutorials
Links Directory
Collections
Classifieds
Store
Everything posted by Q-Ship986
-
I think when he said low beam, he meant the parking light. --Brian
-
wiring diag. for cd changer cable?
Q-Ship986 replied to SPR's topic in 996 Series (Carrera, Carrera 4, Carrera 4S, Targa)
Swap the left and right bulbs. For instance, sometimes a break in the filament is not (easily) visible to the naked eye. If the problem follows the bulb, then you know (what Loren said); if not, carefully check the socket for a detached wire, bent contact, etc. --Brian -
I re-read the original post and see that you may be intending on getting into the trunk storage enclosure as well. There is at least one large grommet in the body behind the CD-changer. (If you don't have a changer, the area I'm referring to is on the right side--passenger side--of the trunk.) If so equipped, remove the CD-changer and its bracket from the firewall. If memory serves me, there are a few plastic caps that hold the trunk lining in place in this vicinity--remove them and pull the liner away from the firewall. This permits access to the grommet from both sides and enables you to route any wiring. --Brian
-
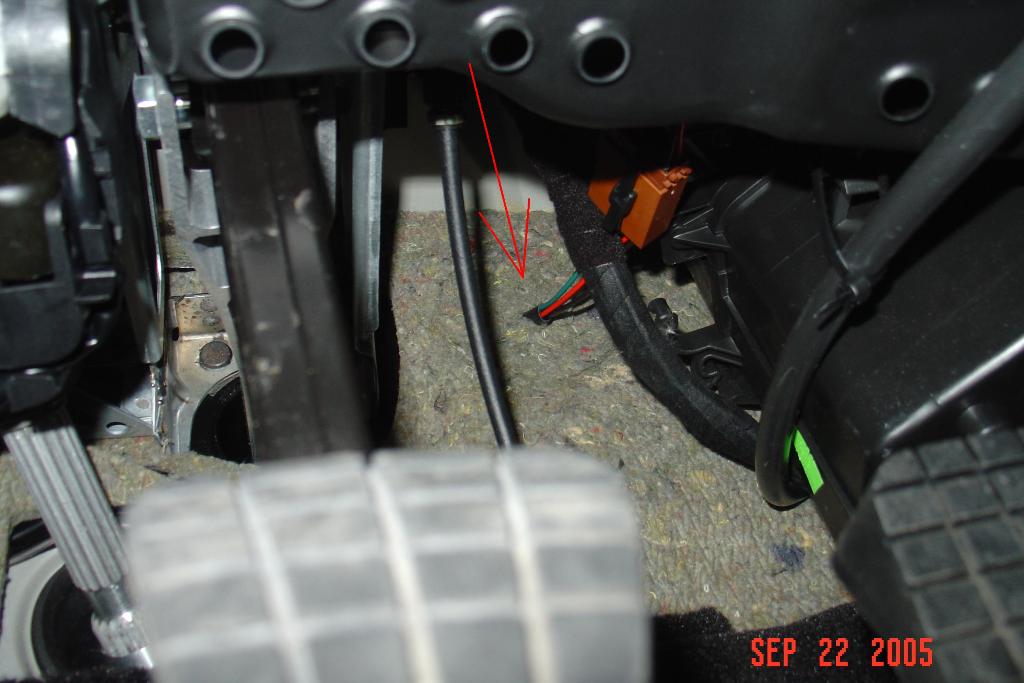
You can route through the firewall by way of a large body filler/grommet located behind the battery. I did this to get wiring to the amplifier in the trunk. The photo below identifies the area. You'll have to remove the battery to gain working access. The photo below is an attempt to show the grommet; it is the dark area behind the wires and tubing in the foreground (those particular wires do not pass through--I couldn't get a good shot of the ones that do). The photo below is a view from the driver's footwell (brake pedal in foreground). The arrow identifies the wiring I passed-through. Also, note the circular outline in the sound-deadening material, about 10 cm diameter around the wiring. This is pre-punched into the fabric; it aligned nearly perfectly with the grommet on my car. Keep the hole punched into the grommet to a minimum size and add a dab of silcone sealant on either side when you're done. Note that the area between the firewall and the trunk--i.e. where the battery is located--is not weather-proof. Bear that in mind if you are intending to mount the garage opener there. --Brian

-
205 To 225 & Falken Azenis
Q-Ship986 replied to jbirkholz's topic in 986 Boxster Suspension, Brakes, and Wheels
I think this is a common misconception. What Porsche is doing is just a little bit more, or slightly different, than most car companies already do with their original equipment tires. I suppose you could consider the "N" mark as a rating, but it is unlike other ratings that are tire/automotive industry standards, i.e. speed ratings. It is really a specification. A Porsche specification. Porsche works with different tire companies on tire specs, often years in advance of model introductions. It is an iterative process, whereby tire companies create prototype tires that are intended to meet the car company performance requirements (i.e. ride comfort, handling, noise, wear, etc.). Sometimes the targets are moved along the way for reasons such as changing prototype vehicles and because car companies sometimes react to changes in the marketplace and customer desires. Once a tire design/construction is approved by the car company, it is usually run for a few model years. If a vehicle is 'refreshed' or 'redesigned,' the tires can change too. Size, tread design, compounding, etc. What Porsche does is uniquely and conspicuously identify for their customers the tires that they spent all the time, effort, and expense to develop, test, and approve. GM does this with their TPC specs. BMW has tire companies mark their tires with a star on the sidewall. Other car companies simply require unique DOT coding, or a construction code on the sidewall. Of course, the customer can take it or leave it. The car company has a lot to optimize with their product, including the tires, and some tire performance parameters mean little to the average consumer. Tire impact on fuel economy comes to mind (although, maybe not so unimportant to U.S. consumers these days....). So, this is not about marketing, and it is certainly not about running just a few more tests. The 'N' spec is what it is, a spec. A part number identifier. A way for you to replace your tires with a part developed, tested, and blessed by the car company just like any other part...shock, spring, MAF, RMS, etc., etc. Unlike most parts on your P-car, Porsche gives you lots of choices for each tire model. The last brochure I saw had 4-6 different brands/models of tires for each major chassis. Just because a tire is marked with an 'N' doesn't mean you can't do better, or that you can't pick a tire that gives you a desired performance gain in one area versus another. You just need to know what you're doing and what to expect. YMMV. --Brian -
The spare in my 986S is a T105/95R17, which has a diameter that happens to split the difference between your 285 and 295 sizes. (This, according to my calculations, because I am not at work and don't have ready access to the published specs.) If your spare is the same, the differences here are on the order of the difference between a new and a worn-out tire. Porsche can be picky, given PSM, ABS, etc., but I think these numbers are so close as to be a non-issue, particularly for temporary service. Now, if you were going down in size, then you'd need to be concerned about load capacity... Regarding the max speed when using a spare, this is what my owner's manual states: "The maximum permitted speed is 50 mph/80 km/h and must not be exceeded because of altered driving characteristics and for reasons of wear." The spare has a reduced tread depth when new, which can be used until 2/32" remains, as with regular road tires. Keep it inflated to 60 psi. --Brian
-
Hi. I am having trouble determining what tires you have originally and for what car. It seems like you might have 225/40R18 front and 285/30R18 rear. Is this correct? So, you bought what? 235/40R18 and 295/30R18? Also, do you have an OE spare tire? Probably not, judging by your predicament. --Brian
-
clean engine
Q-Ship986 replied to alprus's topic in 996 Series (Carrera, Carrera 4, Carrera 4S, Targa)
What a minute...is all that cleanliness photoshopped, too? I'm crushed. ;) --Brian -
clean engine
Q-Ship986 replied to alprus's topic in 996 Series (Carrera, Carrera 4, Carrera 4S, Targa)
I am more interested in how Orient lifts his 996--did he hold back on his DIY on this subject, or is the car so clean it levitates? --Brian
-
It would seem to me that the alignment issue for the steering angle sensor is for changes to front toe only--assuming, as I am, that this sensor is monitoring something in the steering system, i.e. the steering column. Continuing with that assumption, if the steering wheel is level from the factory, remains level through vehicle use, and the total toe is split evenly from side-to-side, the sensor would not change it's relative fix on zero, presuming the sensor doesn't drift, or isn't otherwise faulty. Therefore, if changes to front toe are done properly with the steering wheel fixed level and total toe split equally to both sides, I can't see any real affect on this sensor. Which is, apparently, the practical experience reflected so far. But I am wondering, do the assumptions and theory make sense? Again, this wasn't mentioned in my owner's manual; maybe it is in a maintenance guide, which I didn't check.... --Brian
-
In a 996 thread here, Loren refers to a requirement for recalibration of a steering angle sensor when the alignment is changed on vehicles equipped with PSM. However, I could find nothing regarding this in my '03 986S owner's manual. I figured that the manual would mention it since it is conceivable that an owner would have a non-dealer service the tires/wheels/alignment. In any case, does anyone have experience with this issue? Many thanks, --Brian
-
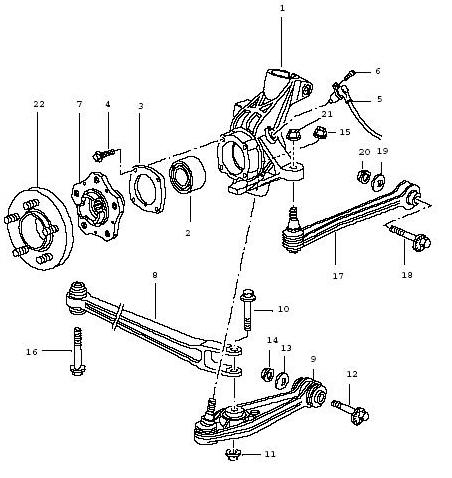
'03 986S Camber Adjustment Locations
Q-Ship986 replied to Q-Ship986's topic in 986 Series (Boxster, Boxster S)
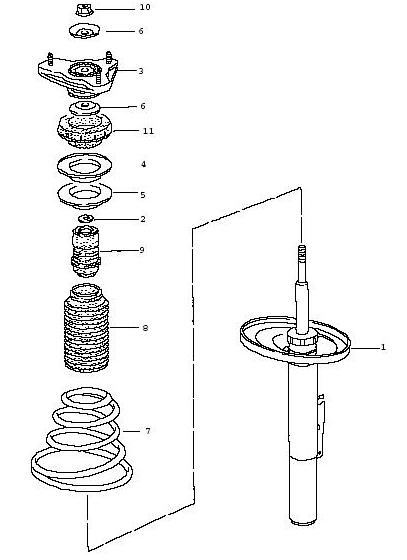
So, for the front, adjust camber with the upper strut mount #3 (below) by loosening the three nuts, right? Any idea on torque specs? Much abliged. --Brian
-
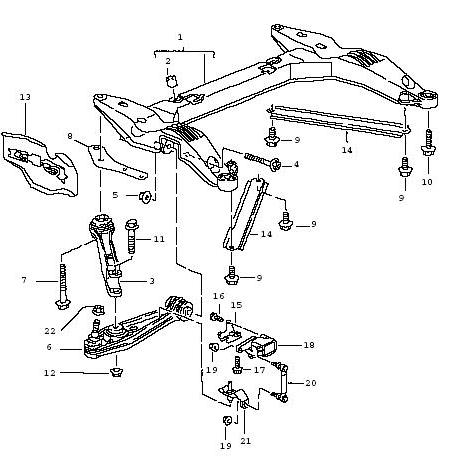
Hi, I am fitting new tires and checking/setting alignment this weekend. However, I have had this car for only a limited time and have yet to get underneath. Before I do exploratory surgery, can anyone verify or point me in the right direction on the adjustment locations for camber? The front suspension: Is there a camber adjustment point somewhere above, i.e. bolt #4 (it is not identified by PET as eccentric, though)?? Or, is camber set by moving the upper strut mount?? The rear suspension: The camber adjustment point sure looks like it is bolt #12; or, is it the upper strut mount?? Also, bolt #18 is toe adjustment point, correct? Last, but not least, what are the torque settings for any alignment points/bolts? Greatly appreciate any help. --Brian
-
I inquired about the plugs when I bought my car. The sales guy said the cars come with them but they are thrown away when the car is prepped for sale (when the front license plate bracket is installed). I bought mine from Suncoast. --Brian
-
Just to extend this thread a little, I removed/replaced these three trim strips in my '03 986S yesterday. The points I'd like to add are the following: If you have an '03 or newer, with the glove box, then you really don't need to undergo the tear-out/solder-iron method. The glove box comes out by first removing the under-dash footwell cover. This is accomplished by removing three plastic screws that hold the foam-like cover in place. Then, remove the torx screws that hold the glove box in place. They are T20, and my memory is that there were about seven of them. Disconnect the glove box light at the connecter and the whole box comes out as an assembly. By contorting your body into the footwell, you get good access to the seven (!) T10 screws that hold the longer trim piece in place. (Bear in mind that there is a metal reinforcement that runs nearly the entire length of the longer strip that also acts as a back plate for the screws. This may only be for the glove-box-equipped cars like mine. If you use the solder iron method to melt the screws out, there is no way you are pulling them through; they'll just fall back into the dash.) For the remaining, smaller trim pieces, I followed Mark's procedure: Removed the gauge cluster, steering wheel 'horseshoe' and driver's a/c vent. I also had the radio and hvac control box out of the car (because I was concurrently installing rear speakers). To facilitate getting at some of the screws, I highly advise using a tiny ratchet like a Craftsman that I bought at Sears; it holds 1/4" driver bits, with a handle that is about 4" long. That ratchet with a T10 bit and an inspection mirror made it possible for me (I'm not a guitar player like Mark)....you still need plenty of patience. During the hours it took me to do this, I tried to imagine why Porsche used 11 screws to hold these 3 trim pieces in place. I mean, the whole car seems to snap together, so why so much mechanical fastening every 3-4 inches? The only thing I could come up with is that in an accident, these pieces probably need to stay in place, or break in a predetermined fashion (take a good look at a cross-section of these pieces, they are not solid), to prevent impinging themselves upon a body part....something to consider for those of you that used silicone.....I have no way of knowing; I'm just saying. I have a black interior, with lots of aluminum-look trim that came standard on my S. The pieces I installed are also alumimum-look (not arctic silver) that I purchased from Suncoast for about $170. They really improve the look of the dash; the time spent was well worth it. --Brian
-
Available dash switches, with pictures?
Q-Ship986 replied to Stefan's topic in 986 Series Part Number Requests
Duh. Thanks, --Brian -
To follow up on this for posterity, below are the part numbers for the 3-pc dash trim in aluminum look (exclusive option XCA), which is NOT arctic silver (close, but no cigar). Anyway, the numbers for LHD-vehicles are: 996.552.959.10 --passenger side, w/'AIRBAG' 996.552.996.12 --driver's side, left 996.552.998.14 --driver's side, right --Brian
-
Available dash switches, with pictures?
Q-Ship986 replied to Stefan's topic in 986 Series Part Number Requests
On the subject of 'blank' tip switches (not dummy switches), I couldn't make heads or tails from PET whether there is such a thing. PET shows switches in a diagram that appear blank, but the listing usually designates them for something specific, i.e. sport exhaust, which do have little pictograms on them. I think I'd consult a dealer, who could look at an actual switch. For a targa roof switch, PET lists 996.613.119.10.A05 (black matte finish). Does anyone have experience with the pin-outs on these switches? (I found pin diagrams for the footwell switch in another RennTech thread--these switches wouldn't necessarily be the same, correct?) Thanks, --Brian -
2003 Boxster S Alignment specs
Q-Ship986 replied to jrummi's topic in 986 Series (Boxster, Boxster S)
Thanks for your reply. I have only had my '03 S for a month, and have yet to take a good look underneath at the suspension linkages. I imagine that the toe adjustment is set on the tie rods in front, and probably a cam on a lateral link in the back. But what about the camber adjustment location? Is it the strut mounts on top? Or, at the wheel ends? In addition, what are the torque specs for any fasteners that are loosened/tightened in the process? :help: Thanks, --Brian -
2003 Boxster S Alignment specs
Q-Ship986 replied to jrummi's topic in 986 Series (Boxster, Boxster S)
Hello, I searched all of the forums--couldn't find an answer to the original inquiry here regarding '03 Boxster S alignment specs. Hints at finding the adjustment locations and torques would be much appreciated as well. Thanks, Brian -
2000 S, rear vibration, dealer no help
Q-Ship986 replied to Phil Davis's topic in 986 Series (Boxster, Boxster S)
If the problem does not change with speed, it is not your tires (or rotors, etc.) Tires typically have a number of force-stiffness/uniformity harmonics that manifest themselves as vibration with varying speed. The first harmonic will usually develop a vibration commonly known in the industry as 'shake' at between 10-15Hz between 55-70mph, depending on tire size. The 2nd and 3rd harmonics contribute to a vibration usually known as 'roughness.' The steering column in many, many vehicles has a natural frequency at about 30Hz, which is usually affected by the 2nd and/or 3rd order harmonics, sometimes at speeds as low as 45mph. Higher order harmonics, 4th through 9th, are very vehicle dependent (some vehicles may have a tire-sensitive natural frequency of the suspension, cowl, firewall, etc.), but fortunately uncommon. Shake at the front axle can create dashboard and floorpan vibrations as well as a steering wheel vibration condition known as 'nibble' (the steering wheel oscillates as if being turned left/right :drive: ). Shake at the rear is usually manifested in the floorpan/seat track. Roughness at the front can affect the dash and floorpan, but usually vibrates the steering column and steering wheel (not like 'nibble'--more of a buzzing) the most. Rear tire roughness, frankly, is usually damped-out and not felt. For the lower order harmonics, to trained ears (or if its bad enough) there may be an audible cue. What's really important here, in this situation, is that the issue seems constant with speed, which is contrary to the noise and vibration elements typically attributed to tire uniformity parameters. With tire vibrations, especially shake, you can get the vibration to phase in and out by easing through the speed range where the vibration is greatest. The Hunter 9700 at the tire shop you visited was measuring the force uniformity of the tire (the "30 lbs" "road force" measurement was 1st harmonic). These machines do not provide very accurate readings (i.e. don't focus on the number "30 lbs"), but the readings can be correlated to laboratory grade machines that do. They were correct to mention the possibility of steering wheel vibration from your right front, but if you're not feeling it there, then all the better. You have to investigate things that don't change (much) with speed. From what you have mentioned, I would not buy tires. I would ask the dealer to swap-out known good tire/wheels from another vehicle to get them to rule it out. Best of luck. --Brian -
I have a factory-installed CDC-4 in my '03 986S. I'm not 100% positive, but because of the MOST (optical) system used by the CDR-23, the CDC-3 may not be compatible --Brian
-
Danke! --Brian
-
Thanks, Tool Pants. Do I have to re-post in the 996 area, or can a topic be moved? --Brian
-
Thanks, Tool Pants. I'll inquire with Suncoast again. --Brian