Welcome to RennTech.org Community, Guest
There are many great features available to you once you register at RennTech.org
You are free to view posts here, but you must log in to reply to existing posts, or to start your own new topic. Like most online communities, there are costs involved to maintain a site like this - so we encourage our members to donate. All donations go to the costs operating and maintaining this site. We prefer that guests take part in our community and we offer a lot in return to those willing to join our corner of the Porsche world. This site is 99 percent member supported (less than 1 percent comes from advertising) - so please consider an annual donation to keep this site running.
Here are some of the features available - once you register at RennTech.org
- View Classified Ads
- DIY Tutorials
- Porsche TSB Listings (limited)
- VIN Decoder
- Special Offers
-
OBD II P-Codes - Paint Codes
- Registry
- Videos System
- View Reviews
- and get rid of this welcome message
It takes just a few minutes to register, and it's FREE
Contributing Members also get these additional benefits:
(you become a Contributing Member by donating money to the operation of this site)
- No ads - advertisements are removed
- Access the Contributors Only Forum
- Contributing Members Only Downloads
- Send attachments with PMs
- All image/file storage limits are substantially increased for all Contributing Members
- Option Codes Lookup
- VIN Option Lookups (limited)

Q-Ship986
Contributing Members-
Posts
232 -
Joined
-
Last visited
-
Days Won
2
Q-Ship986 last won the day on March 7
Q-Ship986 had the most liked content!
About Q-Ship986

Profile Information
-
Gender
Male
Profile Fields
-
From
Hudson, Ohio, USA
-
Porsche Club
PCA (Porsche Club of America)
-
Present cars
2003 Boxster S
Recent Profile Visitors
Q-Ship986's Achievements

Member (1/1)
11
Reputation
-
Peter Farthing started following Q-Ship986
-
hi how do I soften my2003s roof its not letting roof lid close properly its gone a bit stiff from sitting 12 maths From your post I think that's the right deduction. many thanks Peter farthing
-
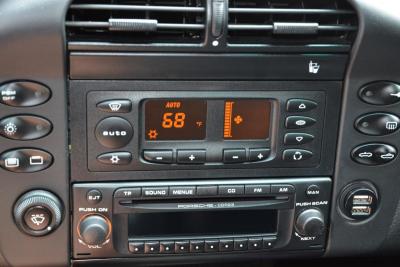
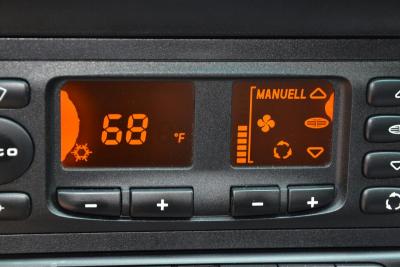
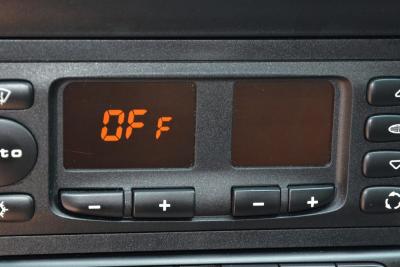
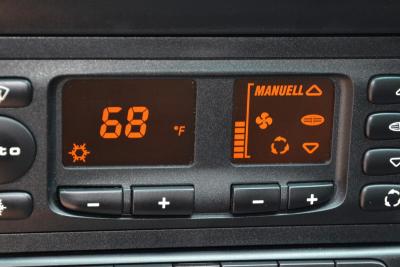
I recommend the kit from http://914rubber.com also. I bought mine from their ebay listing. This replacement part is extremely close. Before / After: "MANUELL" is there, and, "OFf" is retained..... --Brian key words: HVAC climate control LCD screen glass repair
-
Hi Phil, someone else might speak up, but I think I can at least partially answer your question. I just finished repacking the inner and outer joints on my '03 Boxster S because all four boots, almost simultaneously, tore open. Anyway, I noticed that the inner race of both cv joints on the halfshaft had a ring grooved into one side of them. The rings faced inboard on the halfshaft, each towards the other. Before removing the joint from the halfshaft, observe the difference from side-to-side of the inner race and you'll hopefully see what I mean. I don't think the cage or the outer race had any special markings or orientation, but I think it is proper to be careful about the orientation of the inner race; Kent does state above: At the risk of stating the obvious, I would at least change the boot on the outer joint while you're at it. Good luck, --Brian
-
A vehicle's "drift/pull" tendancy describes how it drifts or pulls to one side of the driving lane. It is customarily tested at highway speed on a straight stretch of road in the driving lane (usually the right lane) with nominal crown. "Drift" is observed if the steering wheel is judiciously released and the time to drift from one lane to the next is timed. "Pull" is customarily tested by holding the wheel at whatever angle keeps the vehicle driving straight, and measuring the torque required to hold the wheel in that position. Car companies have thresholds for either drift, or pull, or both. "Clear vision" is the term that describes how the steering wheel is centered during alignment adjustment. Clear-vision is almost exclusively dictated by how the front toe settings are done. A good practice is to set the front toe with the car running at idle speed so the power steering system is pressurized. The steering wheel is centered and locked in place with a fixture (any shop with a decent alignment rack will have this). Then the left and right tie rods are adjusted so that the total toe is equally divided between both sides. I would not remove the steering wheel to correct a clear vision problem. If you can't center the steering wheel with the above procedure, something is really out of wack and vehicle handling and vehicle stability control systems could be seriously compromised. BTW, Porsche recommends a calibration of the steering wheel angle sensor when the alignment is adjusted for vehicles with such electronic systems as PSM. Anyway, drift/pull is not the same as clear vision (a "centered" steering wheel), and their cause/effect relationships are (in most cases) totally independent from each other. Obviously, I haven't even seen or driven the car in question, the alignment values have not been posted, and diagnosing things through the internet ether can be speculative at best, but it sure sounds like the complaint here is about drift/pull, not necessarily clear vision. (1) Don't even worry about the rear wheel alignment settings affecting the problem described here. Not rear camber, toe, or anything else. Rear alignment settings are important to sports car handling characteristics (especially camber) and to a certain extent tire wear. Rear alignment settings do not affect drift/pull tendancies or clear vision characteristics. (2) Front toe will not appreciably affect how much a vehicle drifts or pulls. This might sound counterintuitive. When driving straight on a straight road the front tires attempt to reach equilibrium and take the steering wheel with them, with essentially equal amounts of toe on the left and right. So if the front toe was set properly, then the steering wheel will be straight as the car drives straight. But even if the total toe is way off, and/or with wildly different toe settings on the left/right (poor clear vision setup), all that happens is the steering wheel is off-center, but there is no drift/pull and the car goes straight without unusual steering torque by the driver! This assumes there are no other mitigating factors such as (3) and (4) below. (3) The problem here could be front cross-camber. This is the difference between the left and right camber settings. I am fairly certain the car in this case should nominally have equal camber on the left and right. A difference of 0.1 deg (such as -0.1 on one side and -0.2 on the other) is probably not an issue for drift/pull. A difference of 0.2 (such as -0.1 on one side and -0.3 on the other) could be borderline. More than that, and I'd be suspicious. Make sure the alignment tech checks the camber settings and corrects any differential between the left/right as much as possible. (4) The problem here could be the front tires. Make sure the tires are the same size on the left and right (sounds crazy, but you did say this car was fairly new to you) and that the pressures are properly set. Correct anything that's out of spec and perform a road test. Also, irregular tire wear or a tire uniformity characteristic known as "conicity" can cause drift/pull. Check both tires for irregular wear, particularly wear on one shoulder more than the other. You can't "see" other causes of tire conicity, so they have to be measured on specialized equipment--a Hunter road force balancer can give you some data. A quick test/experiment (even if the tires are directional) is to temporarily swap the left and right front tire/wheel assemblies from one side to the other-- if the drift/pull you had is now drifting/pulling in the other direction, there is your answer...one or both of the front tires. Perform all road tests on the same stretch of road, in the same lane, at the same speed. (5) There could be a stack-up of things. A little front cross-camber might be combining with some front tire factor(s) and causing the drift/pull. In summary, I would: Check the tire sizes. Properly set tire pressures and check for apparent front tire wear irregularities. Check and rectify any front cross camber. Temporarily swap left and right front tire/wheel assemblies. Doing so will almost always help you figure this out. Good luck. Let us know. --Brian
-
Front strut tower bearing lube
Q-Ship986 replied to flybird's topic in 986 Series (Boxster, Boxster S)
I had a noise that I would call "creaking," too. At first, I thought it was coming from under the dash somewhere along the steering column. Ultimately, I had my wife turn the steering wheel left/right while I hunted around for the origin of the sound-- with an ear a few inches from the top of one shock tower or the other, there was no doubt it was coming from there. One was noisier than the other. The bearings are relatively inexpensive, but require removing and disassembling the strut. In a nutshell, you have to remove the caliper, disconnect the tie rod and lower control arm from the knuckle, and remove the fasteners that clamp/hold the strut assemble. Pulling the strut out after everything is disconnected requires some technique. As for special tools, you'll need a spring compressor, a certain kind of ball joint removal tool, and a special socket to properly torque one of the nuts when you put it all back together. Some of the bolts are to be replaced, rather than reused. Even though I carefully marked everything, I performed an alignment afterwards and found some tweaks were needed. After I replaced the bearings, the noise was gone. I highly doubt you can lube them in place and achieve a lasting improvement. --Brian -
So is this issue grave...
Q-Ship986 replied to eidolon's topic in 996 Series (Carrera, Carrera 4, Carrera 4S, Targa)
I think you're thinking of the clutch release bearing, also known as the clutch throw-out bearing. The crankshaft 'thrust' bearing surface(s) diagnosed above as causing the play in the crank are different from the clutch release bearing that can deteriorate from holding down the clutch pedal too long. However, note that the parts shown above are for a GT3 M96 engine, a different case from the M96 variety in the OP's 2001 C4. FWIW. --Brian -
Squeaking Noise From Car
Q-Ship986 replied to t1x's topic in 996 Series (Carrera, Carrera 4, Carrera 4S, Targa)
Open the hood and have a friend turn the steering wheel while you listen near the top of the struts. I had a noise that fits your description, and at first thought it was coming from under the dash. I traced it to the top of one of the struts and ultimately replaced the relatively inexpensive bearing at the top of each strut assembly. --Brian -
Adventures with an HVAC Refresh Kit On occasion during the most humid months of the year, the air coming out of the vents of my nearly 8-year-old car would smell a little 'off.' Since the a/c condensation was draining just fine and the odor wasn't ever-present, it wasn't a major concern to me. However, surfing the web I found a variety of A/C refresh kits that seemed worth a try, if for no reason other than to experiment and see if it was any benefit. But, no good deed goes unpunished. There are a variety of kits out there, som Author Q-Ship986 Category Boxster (986) - Maintenance Submitted 04/04/2011 06:06 PM
-
On occasion during the most humid months of the year, the air coming out of the vents of my nearly 8-year-old car would smell a little 'off.' Since the a/c condensation was draining just fine and the odor wasn't ever-present, it wasn't a major concern to me. However, surfing the web I found a variety of A/C refresh kits that seemed worth a try, if for no reason other than to experiment and see if it was any benefit. But, no good deed goes unpunished. There are a variety of kits out there, some seem OE but most are aftermarket. I found them to have so much in common that I began to think they were made by only one or two manufacturers. The kits I was considering are two products: 1) a foaming spray that you inject into the evaporator housing through the condensation drain, and 2) a spray that you empty into the external air intake while changing the HVAC settings. The kits state or imply that they will clean the evaporator of crud that comes from dirt, mold, mildew, etc. and kill whatever causes odors in the venting. As I mentioned, the kits seemed nearly identical to each other so I bought one based on convenience at a local parts supplier for about $18. For another point of reference, there is a Toyota kit, part number 00289-ACRKT, that you can find here for instance. The product I used was the following: Note: This attempt to clean an HVAC system was for my particular 2003 986S. Other vehicles may be different and there are safety risks involved in doing mechanical or electrical work on a vehicle. What's presented here is a general overview of my DIY project, not a complete step-by-step set of instructions. Please obtain, understand, and follow the necessary repair and installation procedures in order to work safely, avoid damaging anything, and achieve a safe result. Preparation steps: I raised the vehicle up onto four(4) jack stands. Then I loosened or removed numerous underbody panels to expose the area under the passenger side floor pan. The location of the condensation drain is identified by an arrow in the photo below: First use the larger can of "evaporator foaming cleaner." You can read the instructions on the can in one of the photos above. I had to use another piece of tubing between the tapered nozzle and the condensation drain because the drain tube is not flexible and wouldn't hold the nozzle. That should have been the first indication to stop. Notice the grommet around the drain tube in the photo above and how the tube is inconveniently situated between the hot water supply/return for the heater core. As I was trying to force the tubing onto the drain, I pushed the drain tube and grommet into the passenger compartment. I knew it was going to be a pain to put it back, and it was. I had to remove the umbrella trim along the passenger-side door threshold, loosen the floor carpeting, and shove my arm under the carpet to reinstall it. Photos of the attachment and foam injection below: The foam went in, it seemed to sit for a while, it liquefied a bit, and then it drained out. The photo below was taken at a moment just as it was starting to drain: The liquid in the bucket was mostly clear, with a little particulate matter--nothing worth photographing. It didn't have much of a smell; it was slightly medicinal, like disinfectant. Following the instructions on the can, the next step is to use the "a/c intake refresher." Take out the pollen filter and spray into the air intake. You are supposed to change the vent settings between spraying intervals so that the mist runs through different duct work. Again, it has a slight disinfectant smell--pleasant but not flowery and not too strong. Not too bad, right?... Well, I was too preoccupied with the camera to realize what was happening inside the car: After all the effort for something that wasn't really necessary… I had to laugh. I was doing this process as I was preparing the car for winter storage. It was about 40° F (4° C) in my garage. Obviously, a lot of the foam didn't liquefy and drain. If I were to do this again, I would warm up the HVAC system beforehand, or just do the whole process at a higher ambient temperature. I'd also let the evaporator core drain longer (a lot longer) before doing the 2nd can. The photos above are the worst of it; only a little came out of the other vents. I blasted the system for a long time after that and it cleaned up without a problem--no damage to any surfaces. A few days ago I fired up the car for the season. No issues. Live and learn and pass it on. --Brian
-
Popping Noise from Speakers
Q-Ship986 replied to Q-Ship986's topic in 986 Series (Boxster, Boxster S)
No, the problem was never solved. When the dealership was troubleshooting, they eliminated the rear speakers as the cause. I think they did so by simply disconnecting it from the system and retesting. If it's important, the noise does not occur from ordinary radio music, only when playing certain songs on certain CDs. They spent a lot of time trying to figure it out, including replacement of every part but the wiring harnesses. The service manager quipped that the technician was nearly going out of his mind listening to the same songs over and over again. He left it to me to decide whether they should continue trouble-shooting, including replacing parts (again) and even the MOST harness. I declined because I wanted my car back and a few pops here and there don't bother me that much, mostly because the music in this car is really the car itself. I am not that much of an audiophile anyway. You can see from this thread that no one else has apparently experienced this problem, so who knows. You are the first to mention something close. I wouldn't just replace your amp without more cause; they tried that on mine...twice. Good luck, --Brian -
The Porsche-recommended lubricant is a Krytox-brand grease, which is a DuPont product. The lubrication is achieved by molecular bond to the applied surface, similar to Teflon. DuPont makes it in a variety of forms. I use Krytox GPL223, which is a white grease with anticorrosion additives. I bought a tube a 3 or 4 years ago from here. Krytox is inert and the grease carrier is non-petroleum based, so it is safe for rubber. A fact sheet from DuPont is attached. Krytox GPL.pdf Wipe the convertible top and body seals with a damp rag and mild soap. Apply the grease to the seals in very small amounts, spreading thinly until it is virtually gone. I do this every year, takes 10-minutes, and all is quiet. --Brian
-
Installation of Hella Tire Pressure Monitoring System (TPMS) Along with a new set of tires, I decided to install a Hella TC-400 tire pressure monitoring system (TPMS). For reference, another board member installed a system made by Orange Electronics (see http://www.renntech....ms-check-it-out). [Edit 12/9/2018: For sensor replacement, scroll down towards the end.] I settled on the Hella system after some research and experience. I like that it has a small, color-changeable display that results in a clean installation. The display u Author Q-Ship986 Category Boxster (986) - Mods Submitted 11/26/2010 05:20 PM Updated 03/11/2017 06:19 AM
-
Installation of Hella Tire Pressure Monitoring System (TPMS)
Q-Ship986 posted a tutorial in Boxster (986) - Mods
Along with a new set of tires, I decided to install a Hella TC-400 tire pressure monitoring system (TPMS). For reference, another board member installed a system made by Orange Electronics (see http://www.renntech....ms-check-it-out). [Edit 12/9/2018: For sensor replacement, scroll down towards the end.] I settled on the Hella system after some research and experience. I like that it has a small, color-changeable display that results in a clean installation. The display unit provides inflation pressure and cavity temperature of each tire and warns audibly and visually upon excessive inflation pressure loss or elevated temperature. Here is a PDF of the Hella-provided installation and user manual: Hella TC-400 Manual.pdf This TPMS installation was for my particular 2003 986S. Other vehicles may be different, part numbers change, and there are safety risks involved in doing mechanical and/or electrical work on a vehicle. What's presented here is a general overview of my DIY project, not a complete step-by-step set of instructions. Please obtain, understand, and follow the necessary repair and installation procedures in order to work safely, avoid damaging anything, and achieve a safe result. The Hella TC-400 TPMS uses valve-mounted sensors that wirelessly transmit the pressure and temperature information to a hidden receiver that is wired to the remote display unit. Unless you have the proper tools and training, you need to have the sensors installed by a tire service professional. I first made sure the key was out of the ignition and then disconnected the battery. I removed the lower center console, the center console-delete trim, and the glove box. I installed the receiver on the firewall-side of the HVAC/fan housing. I decided on this location to keep it sufficiently away from airbags and other sensitive devices. The receiver has two large tabs that can be used for mounting, but I cut them off and smoothed them over with a rotary tool. The Hella kit comes with double-sided mounting tape that I used to mount the receiver to the HVAC/fan housing. The receiver is light and the tape makes a very strong connection—clean the surfaces with naphtha (or some other cleaner/degreaser) before affixing the tape. In the photo below, the view is upward from the passenger footwell. (The labeling on the receiver was added by me.) The single, black wire is the antenna (it is about 30 cm long) that I merely stretched out and laid along the top of the carpeting, extending towards the passenger door. There are two sets of wiring that connect to the receiver. The first is for power and ground connections, and the second is wiring for the display unit. I bundled both sets of wiring together in black plastic spiral protective wrapping. This wiring harness extends from the receiver, along the underside of the HVAC/fan housing, up the same housing, and then heads over to the center of the dash. The photo below is taken with the glove box removed. I routed the wiring harness through the framing of the center console where I made two connections: A. For the connection to the display unit, I cut the Hella wiring and added a 3-pin male/female Molex connector (available at your local electronics store) in order to facilitate installation/removal of the console-delete carpet trim that the display unit is mounted to. B. For the power connection, I used the phone prep connector. For additional reference see http://www.renntech....stery-connector and http://www.renntech....-interier-parts. To connect directly to the phone prep plug, you need the following Porsche parts: (1) each -- 999.652.758.40 -- plug socket, 4-pin, female (3) each -- 999.652.570.22 -- pins/connectors These parts are inexpensive, but needed to be ordered from Germany, which only took an extra week or so by ordinary delivery methods. I bought extra pin contacts in case I messed up during crimping/soldering. I think the phone prep wiring is a good choice for this application because it has the required constant and switched power (both are fused) and ground connections (thus, I did not install the fuse that came with the Hella kit). For my car, the phone prep wiring corresponded to the Hella wiring as follows: Term. 30 (pin 1) Red w/Green stripe >>>>> Hella Red Term. 15 (pin 2) Green w/Black stripe >>>>> Hella Orange Term. 31 (pin 4) Brown >>>>> Hella Black Do not connect to pin 3 in the phone prep connector (it is for the telephone mute). As you can see in the photos below, both connections are established in front of the shifter assembly away from airbag control module. Porsche specifically advises not to "locate plug in the immediate vicinity" of this module. I wrapped the connectors together with felt tape to prevent rattling/noise. The display unit is simply affixed with Velcro tape to the carpeting. A carefully drilled hole through the plastic backing of the carpet/cover serves as a pass-through for the wiring. The finished installation looks as below. The display lighting can be changed. I selected something that is very close to the other dashboard lighting—the photo gives you some idea (it matches better in reality). The display is only lit at start up or if you press the "check" button. Of course, it is lit (in a different color) when there is a warning. The system self-check indicated maximum signal strength from the tire sensors. To set the system, you need to accurately set the tire pressures after the vehicle has been sitting at rest for at least a few hours and perform a few button presses per the instructions. If you quickly press the "check" button, the display cycles through each tire, showing the pressure and temperature. At the moment I snapped the photo above, the unit was displaying the temperature of one of the tires. You can press the "check" button repeatedly to show data for any tire you want. After a minute of inactivity, the display dims. I like having the peace of mind for the operating condition of the tires, the prevention of damage to a wheel (from a flat), and for safety's sake (of course). --Brian ---------------------------- Edit 12/9/2018: Replacement Sensors for Hella TC-400 It’s been about 8 years since my installation of the Hella TPMS and needing new tires prompted me to look into replacement pressure sensors. The TC-400 system does not seem to be currently marketed, and what Hella products I could find online were minimal and appeared to be new-old-stock. With some TPMS knowledge and use of a diagnostic tool I was able to determine through a little trial and error what ‘fresh’ sensors on the market today would work with the Hella TC-400. Beru/Huf RDE001: This is an original equipment sensor used in many vehicles in the early/mid 2000’s. I tested it and it is a drop-in replacement for the Hella TC-400. Simply install in the tire/wheel assembly and run the reprogramming and pressure setting procedures in the TC-400 manual. The advantage to this sensor is that it will work out of the box; the disadvantage is a more substantial cost per unit. Alligator Sens.it Programmable Sensor 590883 (433.92 MHz): Alligator is a German company in the valve component business. Programmable sensors are more commonly found on the market since they can be used with a wide variety of vehicles with different TPMS technology. These sensors can be much less expensive than OE components, but they require specialized hardware or a TPMS diagnostic tool to program. With that hardware, the user selects the vehicle model the sensor is for, and then the sensor is wirelessly activated and assigned to that vehicle type. Some vehicles will require additional steps to recognize the sensors once programming is complete. I installed four of these sensors with a new tire change and they work flawlessly with the TC-400 already in my car. I programmed them to a 2003 BMW 3-Series E46 (other vehicles may work, including 2005 Boxster, but I had more complete information about the BMW system when I began my research). After programming the sensors, I ran the reprogramming and pressure setting procedures in the TC-400 manual. Other sensors may work, including programmable sensors by Schrader, but I simply did not evaluate or test any others to be sure. ---------------------------- Hella TC-400 Manual.pdf


