Jump to content

Welcome to RennTech.org Community, Guest

There are many great features available to you once you register at RennTech.org
You are free to view posts here, but you must log in to reply to existing posts, or to start your own new topic. Like most online communities, there are costs involved to maintain a site like this - so we encourage our members to donate. All donations go to the costs operating and maintaining this site. We prefer that guests take part in our community and we offer a lot in return to those willing to join our corner of the Porsche world. This site is 99 percent member supported (less than 1 percent comes from advertising) - so please consider an annual donation to keep this site running.

Here are some of the features available - once you register at RennTech.org

  • View Classified Ads
  • DIY Tutorials
  • Porsche TSB Listings (limited)
  • VIN Decoder
  • Special Offers
  • OBD II P-Codes
  • Paint Codes
  • Registry
  • Videos System
  • View Reviews
  • and get rid of this welcome message

It takes just a few minutes to register, and it's FREE

Contributing Members also get these additional benefits:
(you become a Contributing Member by donating money to the operation of this site)

  • No ads - advertisements are removed
  • Access the Contributors Only Forum
  • Contributing Members Only Downloads
  • Send attachments with PMs
  • All image/file storage limits are substantially increased for all Contributing Members
  • Option Codes Lookup
  • VIN Option Lookups (limited)

Ahsai

Contributing Members
  • Posts

    2,804
  • Joined

  • Last visited

  • Days Won

    10

Everything posted by Ahsai

  1. Yes, that's the bypass valve as I understand it. Can you try to grab the round tube in the middle and pull it up (if you plan to replace it anyway so risks of damage is not a concern)?
  2. My understanding is the spring is INSIDE that 1/2" bit. However, I've never take one apart to verify. My expectation is I can pull that metal tube up (to open the valve) and feel the spring.
  3. I just bought a new canister and I can see that the bypass valve is at the bottom of the canister, the "metal tube" you're referring to. It's about half an inch raised at the bottom that mates to the filter.
  4. BTW, I got all these 3 pulleys installed and they fit well. I have expected the pulleys to be a little bit thicker to add some margin to support the belt but it turns out the belt rides all the way to the edges of the pulleys like the photos here (not my car) http://rennlist.com/forums/997-forum/639970-maintenance-replace-serpentine-belt.html#post8649759
  5. Thanks. I'll recheck the torque and see how it goes then. The 24mm big hex head is actually an insert. They should have carved some slots on the end of the insert to mate with the L-shape lever so the insert won't rotate. Then all we need to do is to tighten #4.
  6. And I did put a 16mm wrench on #4 to counter the torque when using the torque wrench on #8. BTW, the stock #4 has a 15mm head but the new #4 has a 16mm head, although nothing to do with the torque spec.
  7. Our posts crossed. Thanks. So yeah, 44ftlb makes a lot more sense although I still found that not tight enough that #8 will start to spin slowly as I crank on it making clocking the tensioner difficult.
  8. Hi John, that part #4 comes with part #8 as a package. It's a M10 bolt with pre-applied red locking compound. 7.5ftlb does not seem to make any sense. Even at 44 ftlb, it's not tight enough. It will spin when I crank on it while reinstalling the serpentine belt. I'm baffled...
  9. Thanks John. The spring loaded tensioner bolt has to be much much higher, maybe 44 ftlb plus, otherwise the bolt will be rotating when you crank the tensioner clockwise with a 24mm socket. Is that 7.5 ftlb for the L shape lever that stems out from the tensioner? There's a 5mm hex holding that L shape lever at the back of the tensioner.
  10. Yes, I knew they are of composite material when I ordered them. I got two of them from ECStuning and one from http://www.porschepartshub.com/(Sunset) Sunset has the best price overall hands down.
  11. Thanks! It's a preventive maintenance. The old one had 9yrs/50k miles. Probably can still get some more mileage on it. Crankcase vacuum was fine and the old AOS looks OK but I'd rather replace it now than to deal with smoke, intermix, etc. and scare the sh!t out of myself :)
  12. Anyone has the toque spec for the 3 pulleys? I ended up getting all 3 of them (997...700, 800, 900) and I can confirm that they fit well and they are made of composite material as opposed to metal for the stock ones. They are indeed MUCH lighter!
  13. For MkII AOS specific steps, please check this thread http://www.renntech.org/forums/topic/47759-mkii-aos-diy-sanity-check/?p=262962 With the engine lowered as much as it could, it's not that bad.
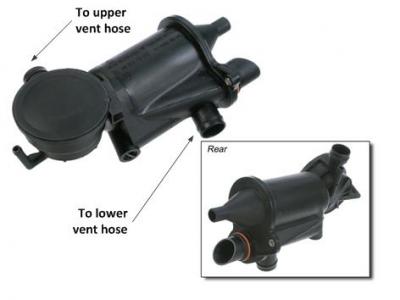
  14. Ok, I just finished this completely and here's my write up. Hopefully it will save the next guy some time. The bottom line is I had to unbolt the AOS first so I could put a socket on the front most intake manifold bolt (not mentioned in other AOS write ups I saw). And you need to get the two AOS bolts from the bottom. [update 3/14/2015] I did it again today 'cause the AOS failed totally after 1,000 miles (24" H2O crankcase vacuum). I followed the same steps and was able to do it in 4hrs this time including a 15min break. Crankcase vacuum is at a nice 4~5" H2O now. AOS removal on a ’03 Carrera Coupe manual transmission 1. Disconnect MAF and remove the airbox, serpentine belt, throttle body, and front intake plenum 2. Push the left rubber sleeve all the way to the left, then wiggle the plenum out 3. Remove the alternator (maybe optional but I removed it to get more room) 4. Remove the vacuum line to the intake plenum and the one to the rear reasonator actuator 5. Remove the vacuum elbow and changeover valve on the left intake manifold 6. Disconnect the brake booster vacuum line from the intake manifold 7. Remove the O2 sensor wires from their guiding rails or clips 8. Lower the engine (jack at its strongest point) till it’s resting on the rear subframe cross member and leave the jack there to support it 9. Disconnect the lower AOS vent hose using BOTH HANDS from the bottom 10. Move the vent line out of the way so it’s not blocking the rear AOS 5mm allen head bolt 11. Remove the rear AOS 5mm allen head bolt using a mini-ratchet 12. Remove the front AOS 5mm allen head bolt (a mini-ratchet with a handle that bends downward) 13. Loosen and move the hose clamp on the hose (away from the AOS) that connects to the very bottom of the AOS 14. Unseat the AOS and push it a little toward the front of the car so you can put a socket on the front most intake manifold bolt (otherwise it’s blocking that bolt) 15. Remove the the front most intake runner bolt, then the remaining 5 intake manifold bolts 16. Seperate the rear plenum and remove it 17. Siphon the coolant from coolant reservoir 18. Disconnect the vertical coolant hose between the alternator and the power steering pump (so you can remove the intake manifold from the car) 19. Remove the left intake manifold 20. Disconnect the upper AOS vent hose 21. Remove the 2 coolant lines from the AOS 22. Remove AOS from the engine compartment AOS reinstall Reverse of the above. After you connect the coolant lines to the AOS and the vertical coolant hose between the alternator and the power steering pump, you can choose to refill the coolant at this point and do a pressure test (before refilling coolant) to 18 PSIG and see if there’s a any leak at the AOS and the coolant line when things are still apart If you use new o-rings on the AOS vent hoses, apply some o-ring grease on them. That will prevent the dry o-rings from being crushed when inserting into the AOS. Torque the intake manifold bolts to 7.5 ftlb To put the rear AOS allen head bolt in place, you need to manipulate the bolt with BOTH HANDS and be careful not to drop the bolt on the cavities of the engine. It can be very difficult to retrieve the bolt. Image courtesy of Atlanta Porsche Parts.
  15. The black bracket is not easy either. You have to slide the tank off the bracket first, then you will see (with an inspection mirror) two up side down screws holding the bracket to the body frame. The tank will be blocking the screws but with patience you should be able to remove them. Reinstall is the reverse but some people were only able to put back one screw, which seems to be enough to hold the tank. With patience, I managed to reinstall both screws.
  16. Have you removed the black plastic bracket that the tank mounts to? That worked for me ('03 C2 so it might be different). Other ways I heard are to disconnect that big coolant pipe you mentioned or to try to push the engine to the right. I would think that also means the engine cannot rest on the cross member.
  17. You're welcome and Merry Christmas to you too!
  18. Hi guys, I just removed my AOS ('03 C2 coupe manual transmission) but I fought hard with two of the bolts - the infamous manifold bolt closest to the front of the car and the rear most 5mm allen bolt of the AOS. Any tips on tackling those? My problem is part of the AOS is sitting almost right on top of the intake bolt. Maybe less than an inch above it making sockets impossible. The 5mm allen can only be reached from the top by feel. I could only put a 10mm box wrench on the intake bolt to back It out blindly (10 degrees at a time all by feel) but when I'm half way, the wrench itself hit the AOS and the bolt can't be unscrewed completely. Using an open wrench may have worked but very difficult doing it by feel. I ended up removing the two 5mm bolts from the AOS so I can lift the AOS and push it out of the way to expose the intake bolt. However, it took me quite some time to find the right extension u-joint combo to remove the rear most AOS bolt. I didn't want to use ball end allen afraid of stripping the 5mm bolt since I don't know how tight it's on. Any better ways? TIA EDIT: see photo below. The circled part sits almost right on top an inch above the front most intake bolt.
  19. I think the easiest will be to get under the car and use a mechanics stethoscope or long screwdriver to poke around the engine, catalytic converters, heatshield, etc. for the source of the noise while someone revs the engine to 4k.
  20. Update: Just got an email from Sunset confirming the 997 parts are indeed the latest for my car.
  21. Loren's observation is correct, the Porsche system shows the updated 997 numbers. Perhaps Sunset is still playing catch up with their online listings. Yeah but when I typed in the rollers with 997 numbers, the Sunset site recognized the parts but gave a warning, something like "Make sure it fits your vehicle". When I click on it, it lets me enter my car year and model but then nothing. It doesn't say if the parts will fit or not. Anyways, I've sent an email to Sunset. Will report back when I hear back from them.
  22. Hi John, It's http://www.porschepartshub.com/ The page I referred to for the pulleys is this http://www.porschepartshub.com/auto-parts/2003/porsche/911/carrera-trim/3-6l-h6-gas-engine/cooling-system-cat/belts-and-pulleys-scat(hope this will work) Parts #8 and #11 which still show 996 numbers...
×
×
  • Create New...

Important Information

We have placed cookies on your device to help make this website better. You can adjust your cookie settings, otherwise we'll assume you're okay to continue.