Jump to content

Welcome to RennTech.org Community, Guest

There are many great features available to you once you register at RennTech.org
You are free to view posts here, but you must log in to reply to existing posts, or to start your own new topic. Like most online communities, there are costs involved to maintain a site like this - so we encourage our members to donate. All donations go to the costs operating and maintaining this site. We prefer that guests take part in our community and we offer a lot in return to those willing to join our corner of the Porsche world. This site is 99 percent member supported (less than 1 percent comes from advertising) - so please consider an annual donation to keep this site running.

Here are some of the features available - once you register at RennTech.org

  • View Classified Ads
  • DIY Tutorials
  • Porsche TSB Listings (limited)
  • VIN Decoder
  • Special Offers
  • OBD II P-Codes
  • Paint Codes
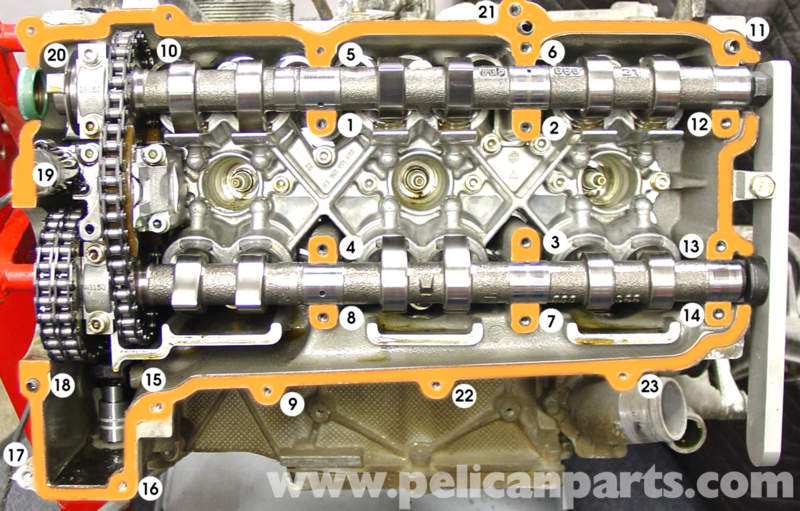
  • Registry
  • Videos System
  • View Reviews
  • and get rid of this welcome message

It takes just a few minutes to register, and it's FREE

Contributing Members also get these additional benefits:
(you become a Contributing Member by donating money to the operation of this site)

  • No ads - advertisements are removed
  • Access the Contributors Only Forum
  • Contributing Members Only Downloads
  • Send attachments with PMs
  • All image/file storage limits are substantially increased for all Contributing Members
  • Option Codes Lookup
  • VIN Option Lookups (limited)

Ahsai

Contributing Members
  • Posts

    2,804
  • Joined

  • Last visited

  • Days Won

    10

Everything posted by Ahsai

  1. Are all the plugs fully engaged? You can pull fuse B1 for a few seconds and reinstall it and seee if that helps.
  2. BTW John, could you please help change the title of this thread to bank 2 instead (if you are able to)? Thanks..
  3. I must admit I've never used cheap torque wrenches. I recommended the Tekton because I happened to have purchased one for my nephew and was impressed by its quality for the price.
  4. "I'm at technologist so I'm used to working with smaller intricate components with a lot of attention to details. I will be very very careful" <- It shows :) "(says the guy that twisted off 2 exhaust manifold bolts).." <- Don't feel bad at all. Quite normal for old and seized header bolts... nothing to do with the mecahnic.
  5. Good points, Schnell. I use a CDI 1/4" drive. If you don't want to spend too much, this one should be good but test it on a test bolt first. https://www.amazon.com/gp/aw/d/B01M12284X/ref=mp_s_a_1_2?ie=UTF8&qid=1501255452&sr=8-2-spons&pi=AC_SX236_SY340_FMwebp_QL65&keywords=in+lb+torque+wrench&psc=1
  6. And must use an inlb torque wrench. Very critical.
  7. Looking good. The saddles are made of alumnum so they shouldn't leave any marks. You should have a few minutes after the sealant is applied so don't rush and make sure you don't miss any spots. If you miss a spot and install the cover, you will need to remove the cover, redo all the cleaning and reapply sealant. Not fun for sure. Also 1mm bead is more than enough and pay special attention to the two places I mentioned before not to clog the oil passages. Btw, forgot to mention you should apply blue loctite 242 or 246 on all the reused bolts. Once the cover is installed, you can rotate the engine further to the correct TDC and make sure the exhaust cam slots are parallel with the cam cover. Good luck!
  8. Excellent! I agree with your logic so I think you are ready to dry fit the cover again. Note it's normal for the cover to rock a bit (even at the correct TDC) because some of the cams could still be pressing on some of the lifters slightly.
  9. "Understanding and repairing things is becoming a lost art in the world today." <- Can't agree more!! There are a few things you can test just to eliminate those: - check crankcase vacuum (using a $35 digital manometer) and make sure it's ~5" of water - check the purge valve you mentioned (check if it's leaking). - check for intake air leak - check fuel pressure at idle
  10. The IAT and coolant temp look consistent (assuming they are clsoe to the ambient temp). Sticky purge valve is possible but it should have tripped an evap code.
  11. To diagnose misfires, the Durametric will be very useful. Most common cause of misfires: bad spark plugs, coils, MAF, intake air leak, fuel pressure. I would not suspect the timng first unless durametric shows > 7 degrees of cam deviation.
  12. Just a few tips when you reinstall the cam cover. Make sure you use as little sealant as possible around holes #12 and #14. There are two very narrow curved grooves around them which can be clgged up by the excessive oozed out sealant. If those grooves are blocked, the green cam plugs will blow out when the engine is ON. Also don't forget to apply just a little bit of engine oil on all the cam journals before you put the cam cover on.
  13. I must admit I cringed at a few places (like when I saw the cams :) ) This is ideally not a job for a rookie but if one has some mechanical sense, be careful and can follow instructions, it should not be a problem. I got the gasket remover from either autozone or O'Reilly.
  14. "...the intake is open on cylinder 5 and the exhaust is open on cylinder 6..." <- Yup excellent observation and that's why I said they didn't look right to me. From the pics the surfaces are not clean enough, not even close. They need to be like bare metal clean. Just use this gasket remover https://www.amazon.com/Permatex-80645-Low-Gasket-Remover/dp/B0018PXX2I It's not harsh and will make the cleaning a lot easier (than scrapping). You're not wasting your time. Patience is the key. The last thing you want is oil leak from the cover after you spend hours reinstall everything...
  15. Something doesn't add up to me. You said the shop said the spark plugs were worn and there was carbon deposit on the coils and yet they didn't even recommend replacing those first? You also said the car needed the coils and spark plugs 500 miles ago so I assume those were not replaced at the time?
  16. The sealant is indicated by a thick black line around all the areas that need sealant. junk.pdf
  17. When I looked at your photo, something doesn't look right to me. I looked back at the previous posts and saw that some instructions were given for bank 1 while you are actually working on bank 2. I went back and corrected those instructions so the next guy will not be misled. Your current cam positions is actually at the wrong TDC. The intake cam slot should point TOWARD the crank for bank 2 (and AWAY from the crank for bank 1). It's not ideal but it's not too bad with the cam lock tool in place. It doesn't matter now that you have the cover opened and the cams' ends supported by the cam locking tool. Would be nice if you can install the saddles to support the cams when it's not being work on until you're ready to apply sealant. Anyways, I think you're ready to seal it back up after some cleaning. I would tighten those cam cover bolts for a few rounds (follow the tightening sequence). Then remove the cam lock tool and rotate the crank 360 to get to the correct TDC, then retighten all the cam cover bolts.
  18. Nice. Please check figure 26 and its description here (but use Dreibond instead). The bead should be about 1mm and no thicker than 1.5mm. http://www.pelicanparts.com/techarticles/Porsche-996-997-Carrera/16-ENGINE-Camshaft_Swap_and_Valve_Train_Repair/16-ENGINE-Camshaft_Swap_and_Valve_Train_Repair.htm Just carefully scrape off the old sealant and clean the mating surfaces so they are free of oil. Then apply the Driebond and within 5 minute close the cover and torque down the bolts (10ftlb each and use an in-lb torque wrench and set it to 120 in-lb). Wait overnight and fill with oil the next day.
  19. Fuel enrichment is there during open loop so everything is nice. Once in close loop, it sounds like to me the engine is starving of fuel. Have you checked the fuel pressure and flow rate? You could check the pre-cat and post-cat sensor voltage to see if the engine is running lean or rich and if close loop control is effective. With non stock injectors and intake, I don't even know how you begin to diagnose with a stock tune. Note that the MAF is coupled to the stock intake so if you change the intake and use the same MAF, it may not be accurate anymore.
  20. Sanity check. Is the slot of the exhaust cam end on the non scavenge pump side vertical? Be very careful before you remove the cam cover so you won't disturb timing. To remove the a/c compressor, there's a third bolt at the back that is very hard to get to. You need to use a long wobble extension (or a flex socket) through the opening between the intake manifold #cyl4&5 (after removing the engine comparment temp sensor sitting there). It will help if you remove the throttle body. Use an inspection mirror to check that bolt first so you can feel where it is. This third bolt slides up and you can slide out the compressor. The bolt is captured by a refridgerant line so it can't be removed from the compressor.
  21. As long as it's pointing TOWARD the crank (it should point away from the crank if you were working on bank 1), I don't think it matters much if it's off a bit (2:45 vs 3). Just curious is there enough space to fit the timing tool? Also suggest the title should be changed to bank 2 for clarity. Maybe the MODs can help if you can't change it?
  22. I agree the bank 2 tensioner (below the a/c compressor) should be removed.
  23. With key ON engine OFF, the MAF voltage should be ~1.0v. At idle ~680rpm, it should be ~1.3v. The MAF reading from Durametric could be a substituted value (when the DME has detected issues with the MAF). You need to remove the MAF and check the resistance like John said. Then with key ON engine OFF, check that you get 12v on pin 2 and 5v reference voltage on pin 4 (on the harness connector side with the MAF removed). Also, only use MAFs from Bosch that is specific for your model and not the cheap Chinese knockoffs.
×
×
  • Create New...

Important Information

We have placed cookies on your device to help make this website better. You can adjust your cookie settings, otherwise we'll assume you're okay to continue.