Jump to content

Welcome to RennTech.org Community, Guest

There are many great features available to you once you register at RennTech.org
You are free to view posts here, but you must log in to reply to existing posts, or to start your own new topic. Like most online communities, there are costs involved to maintain a site like this - so we encourage our members to donate. All donations go to the costs operating and maintaining this site. We prefer that guests take part in our community and we offer a lot in return to those willing to join our corner of the Porsche world. This site is 99 percent member supported (less than 1 percent comes from advertising) - so please consider an annual donation to keep this site running.

Here are some of the features available - once you register at RennTech.org

  • View Classified Ads
  • DIY Tutorials
  • Porsche TSB Listings (limited)
  • VIN Decoder
  • Special Offers
  • OBD II P-Codes
  • Paint Codes
  • Registry
  • Videos System
  • View Reviews
  • and get rid of this welcome message

It takes just a few minutes to register, and it's FREE

Contributing Members also get these additional benefits:
(you become a Contributing Member by donating money to the operation of this site)

  • No ads - advertisements are removed
  • Access the Contributors Only Forum
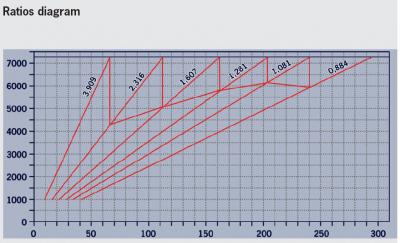
  • Contributing Members Only Downloads
  • Send attachments with PMs
  • All image/file storage limits are substantially increased for all Contributing Members
  • Option Codes Lookup
  • VIN Option Lookups (limited)

Richard Hamilton

Contributing Members
  • Posts

    1,830
  • Joined

  • Last visited

  • Days Won

    13

Everything posted by Richard Hamilton

  1. As I interpret it (and of course I may be wrong) CPs aren't always Ground Points. I think CP means Connection Point, and as Loren says, these are usually soldered (~welded~). Ground points are often shown as GP. If you have a complete set of diagrams for the 2004 986, Sheet 24 shows the location of all the CPs and a grid of where to find them on the car.
  2. There was one important recall on all 993s (including the Turbo) which was W301 - Engine Wiring Harness. It was a Workshop Campaign, and is carried out free of charge. There have been several cases of fires breaking out in the engine compartment caused bythe deterioration of the wiring insulation. I had it done to my old 993, as it had slipped through the cracks with previous owners. That's the only recall listed in POSES that I can see. Check that the recall is stamped in the maintenance booklet.
  3. Check out the "Links" button at the top of the page. There are downloadable PDF catalogues for all models. edit: Link seems to be down - YHPM.
  4. Thank you both for the helpful comments. I think the first thing I need to do is get underneath and check the wastegate linkage and actuator. I found a post here http://www.renntech.org/forums/index.php?s...ost&p=43150 where the same fault seems to have been fixed by freeing up the wastegate flaps. (I can't imagine what sort of lube he used that would last more than 5 seconds though). The diagnostic sheet for P1250 says to check the bypass flap settings, so that's the logical place to start. Unfortunately I can't get on to it until next week, but I will report back. The car is driving fine with normal boost at the moment, so I guess it goes into the restricted-boost program when the error occurs, and resets when the engine is restarted. It's a UK car, so that's probably why I didn't get a CEL, whereas you might on a US car. Thanks for the kind offer Chuck. I might take you up on it if it isn't the wastegate flaps. Does anyone have any links, articles or documents with an explanation of the turbocharging system specific to the 996TT? I know a bit about the basics, but it would be nice to read up on how the whole system works. I have the workshop manuals, etc, but they aren't very good in this respect.
  5. 2000 996 Turbo Tip, UK spec, completely standard, 63000 miles. I had a long-ish drive today – about 190 miles, almost all motorway. On the way back I was cruising at about 3000rpm for about 45 minutes. I pulled off the motorway to a roundabout and onto another major road. As I pulled away the car didn't seem to pick up the revs quite as quickly as normal. Looking at the boost gauge, I was only getting 0.4 bar at WOT and high revs. I normally get up to 0.7 bar. I tried several times, but it wouldn't go beyond 0.4. As I got back towards my office I slowed down to give the turbos a chance to cool down, as I normally do. The engine was running as smooth as silk. On the way home this evening (a couple of hours after the run) I didn't get much of an opportunity to reach high revs at WOT, but I was able to reach 0.6 bar on a couple of occasions. When I got home I did a diagnostic check and it showed P1250 – Boost Pressure Control. (See attached report). It shows a single instance of a boost pressure of 1.68 bar! The diagnostic sheet says to check the adjustment of the bypass flaps, or change the turbocharger. So, two questions: 1) Would the P1250 fault have caused the DME to go into a restricted boost program, and if so would it have reset when I switched off? No doubt I am going to have to get underneath to check the flaps, but has anyone had any experience of this issue? 2) I'm not sure if this is related, but it sounds like the SSSHHHUUUSSSHHH noise at high boost has been getting a little louder than it used to be. Where does this noise actually come from? The diverter valves, the by-pass flaps, or somewhere else? RJH_Error_P1250_140509.pdf
  6. They have one at Silverstone in the UK too: http://www.porsche.com/silverstone/en/courses/ Maybe Leipzig have a similar web site. The UK site has a brochure with prices. It is expensive - a 90 minute session is in the region of £275 (GBP) and an all-day course can cost £800. VIP treatment though, as you would expect from Porsche.
  7. Sounds like the Air/Oil Separator to me. The first thing to do is look inside the throttle body for oil residue - that's a sure sign. Just do a search here for "white smoke" and you will find several pages of info.
  8. Here's what the manual says to do: Calibrate the steering angle sensor with the wheels in straight-ahead position! Note Check the steering angle sensor actual value with wheels in straight-ahead position before calibrating the steering angle sensor! Only recalibrate the steering angle sensor on the measuring platform if the steering angle actual value lies outside the tolerance or is doubtful! 1. Drive vehicle onto measuring platform. Affix measured-value pickups to all wheels. 2. Check wheel alignment values and adjust if necessary.? If the wheel alignment values on the front and rear axles are correct, calibrate the steering angle sensor with the front wheels in straight-ahead position. Calibration description in following text. 3. Connect the Porsche System Tester 2 to the diagnostic socket. 4. Select the "Calibrate steering angle sensor" menu with the Porsche System Tester 2 in the PSM system. Entry to the PSM system takes place through the ABS system (automatic status change after PSM). 5. Confirm calibration start. The procedure can also be interrupted. 6. The PST 2 now requests the 4-digit safety code shown in the display. Note This safety code must be extracted in the Actual Values menu, Safety Code sub-menu! The safety code changes automatically each time provided that PSM is called up again! The calibration procedure will be interrupted if an incorrect safety code is entered! This time-consuming procedure ensures that the steering angle sensor is not calibrated unintentionally! The steering angle sensor can be calibrated several times! The value (the zero position) is stored in the steering angle sensor itself! 7. Input the 4-digit safety code with the cursor keys (4 centre keys on right). Then continue with the (>>) key. Note The final possibility to interrupt the calibration is not to confirm the safety code input! To do this, press the appropriate function key for no! Important for calibration: The wheels of the vehicle must be in straight-ahead position . 8. Confirm safety code input with wheels in straight-ahead position. Display in the Tester display after the safety code input has been confirmed: Steering-angle sensor being calibrated. For safety reasons, read out the current steering angle sensor actual value after calibration. To do this: 9. Leave the PSM system. Then call up PSM again and select the steering angle sensor in the Actual values menu. Required display in the Tester display: 0° ± 3° when the wheels are in straight-ahead position. 10. Repeat the calibration if the value is not correct.
  9. I wouldn't recommend it. There might be a big bang. If you hold the car in first gear with your left foot on the brake and build the revs up a little (but not excessively), when you release the brake and hit the gas it will take off like a scalded cat. Handy at a traffic light Grand Prix. Takes a bit of practice, so try it out somewhere safe first.
  10. Was it a huge plume of white smoke? If so, sounds like the AOS to me too. As has been said, check for oil inside the throttle body.
  11. It is the inner tie-rod p/n 99634732203 Yes - that's the part number for item 6 in the diagram in post #6 above.
  12. With a Tiptronic, you have to remove the engine and transmission together. As Cosmos says, Tiptronics seem to be less prone to RMS leaks, but they aren't immune.
  13. Yes, there is aa joint inside the bellows. Item 6.
  14. There has been a lot of discussion here about this subject, so you might want to try a search. The last update was 08.2007, but this was just a re-label of the 05.2007 update. The latest map disk part number (for Europe) is 997.044.901.50.
  15. Lovely colour - looks fantastic! Don't let it get lost in Lebanon like this one did: http://www.autofarm.co.uk/projects/beirut
  16. I know it's o/t, but what colour is your car? It looks gold in the photo - it would be nice to see a photo of the whole vehicle.
  17. The PET shows a switch for the selector lever, which I think might be the multi-function switch. A friend of mine had one replaced some while ago, so contrary to what the 2002 SIT says, I think it might be available separately now. Perhaps check with your supplier. The UK price is around £95 (about $135) but you could do a price lookup here.
  18. You can get this message when you try and install map or update software which is an earlier version than the currently installed software. If this is the case, then you should be able to fix the problem by installing a later version.
  19. I think that the photos and diagrams are of the ZF tiptronic transmission used in the 98-01 cars. The 2002- cars use the MB transmission, and the multi-function switch is on the bottom of the gear selector lever. Edit: I found this in the 2002 SIT which might be useful to you:
  20. If they want to charge you for it let me know, and I'd be happy to do it for you.
  21. Not sure you needed to do any recalculation. Like I said, the diagram is based on 18" wheels (with 265/40 tyres):
  22. The ratios diagram is for the MY2005 G97/01 transmission, and the SIT also shows a ratio tables and speeds which is based on 18" wheels. I believe the rolling circumfrence of 19" wheels would be very close to the 18" because of the lower profile tyres. You can read the complete SIT, which is a mine of information, by becoming a Contributing Member here. It is worth every cent, just for the SITs and TSBs alone. Sorry for the blatent plug, but :renntech:
  23. Here is the ratios diagram from the 2005 997 Carrera Technik. RPM on the left, and KPH on the bottom: 1KPH=0.621MPH
  24. I'm pretty sure I saw the uption of unlocking the driver's door only when I was coding window operation with the PIWIS tester, so the dealer should be able to program it. I don't know if it is possible to do it yourself. Where are you located? There might be a RennTech member locally who could help you out. Look in the diagnostics forum, as there is a register.
  25. Thanks RFM. At least that's cleared up the mystery. It's a shame though. :(
×
×
  • Create New...

Important Information

We have placed cookies on your device to help make this website better. You can adjust your cookie settings, otherwise we'll assume you're okay to continue.