Jump to content

Welcome to RennTech.org Community, Guest

There are many great features available to you once you register at RennTech.org
You are free to view posts here, but you must log in to reply to existing posts, or to start your own new topic. Like most online communities, there are costs involved to maintain a site like this - so we encourage our members to donate. All donations go to the costs operating and maintaining this site. We prefer that guests take part in our community and we offer a lot in return to those willing to join our corner of the Porsche world. This site is 99 percent member supported (less than 1 percent comes from advertising) - so please consider an annual donation to keep this site running.

Here are some of the features available - once you register at RennTech.org

  • View Classified Ads
  • DIY Tutorials
  • Porsche TSB Listings (limited)
  • VIN Decoder
  • Special Offers
  • OBD II P-Codes
  • Paint Codes
  • Registry
  • Videos System
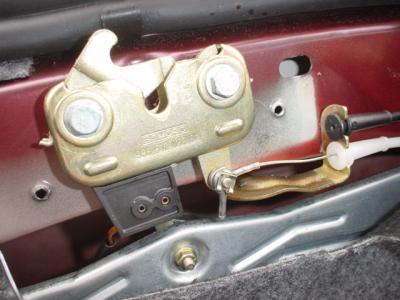
  • View Reviews
  • and get rid of this welcome message

It takes just a few minutes to register, and it's FREE

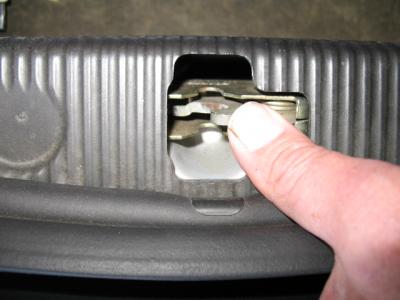
Contributing Members also get these additional benefits:
(you become a Contributing Member by donating money to the operation of this site)

  • No ads - advertisements are removed
  • Access the Contributors Only Forum
  • Contributing Members Only Downloads
  • Send attachments with PMs
  • All image/file storage limits are substantially increased for all Contributing Members
  • Option Codes Lookup
  • VIN Option Lookups (limited)

Tool Pants

Moderators
  • Posts

    4,786
  • Joined

  • Last visited

  • Days Won

    6

Everything posted by Tool Pants

  1. Front trunk strut replacement Got tired of the trunk lid hitting me in the head on my 10 year old Boxstir. Time to replace the struts, but not at Porsche prices. The struts are made by Stabilus. http://www.stabilus.com/default_e.asp The Porsche part number is 996 511 551 01 - same for 996. Dealer has them for $39.28 each. Went to Pep Boys down the street from the dealer because Pep Boys sells Stabilus. Of course Boxster struts were not in stock, but I looked them up in the Stabilus catalog and the front is SG4060 Author Tool Pants Category Boxster (986) - Common Fixes and Repairs Submitted 02/25/2007 12:01 PM Updated 03/10/2017 06:05 AM
  2. After all these years your car may still be in the transit mode. Interior lights do not work unless the key is turned on to save the battery during shipment. With a new car the dealer with a PST2 was to take the car out of the transit mode and put it in the handover mode.
  3. 1997-1999 2.5 did not have e-gas which they call e-accelerator.
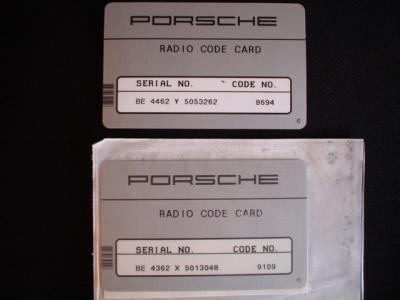
  4. I have 2 code cards that came with used owners manuals I bought off ebay. The top card has 3262 as the serial number and 8694 as the code. The decoder says 8694 is the code. So the decoder agrees with the code card. The bottom card has 3048 as the serial number and 9109 as the code. But the decoder says 8997 is the code. Strange....
  5. But... 2 days ago someone on this board PM me for the code for a CDR210 with a serial number ending in 7910. The decoder says 3111. I told the person that if 3111 did not work to try 3113. Neither worked. The person went on a website and got a code that worked. The code was 3212. The plus 2 theory did not work in this case.
  6. What code worked on your radio?
  7. I have a Becker radio decoder. 4 and 5 digit. It was given to me by people on a UK message board. Thing is, is does not get the correct code all the time. The code is based on the serial number. Math. If Loren is not looking, I will send it to someone who can make it work 100% of the time. Like someone is going to steal a Becker radio.... If your radio serial number ends in 1442 then the junk decoder says the unlock code is 4850.
  8. Try it - maybe you can figure out a way. To compress all the tabs at the same time I have tried wire, hose clamp, and I forget what else. One time there were 3 of us trying to push down all at the same time. With 6 hands we still could not pull the bushing out.
  9. Bluboy911 put a 2002 996 cluster in a 2003 986. http://www.renntech.org/forums/index.php?s...amp;#entry45189 A few years ago I asked Peter if it was possible to used a non MOST cluster in a MOST car and he was not sure if the radio would work. As predicted, Bluboy911 ran into the problem of getting the radio to work, but he got it to work.
  10. I would like to see the machine that pushes those bushings in. I can't get them out with out breaking the tabs. I have tried on several different cars on different days using different methods.
  11. I did not look in PET - it was from my memory. Then I looked at the shop manual, and it is there. What a memory.... When I get a chance I'll have to see what PET says.
  12. I dont think there is a bumper just for the park assist option. I just looked at the shop manual and it says there are markings for where to drill the holes for the sensors. Pull your bumper off and look.
  13. I do not know of a function on the PST2 to disable the remote trunk function, but that may be a Loren question. I cannot understand why this would need to be done - with your style aerokit I can understand the need to disable the moveable spoiler - not the remote trunk unlock. But the spoiler is disconnected by separating the connector. I wonder if your trunk release actuator has been disconnected, or is bad? I have a 1997 and my setup is not like the 2 prior pictures, so I cannot look at my car. Maybe see if you can find a connector (other than the spoiler) that has been disconnected. I have never worked on one so I am not sure exactly where it is located. Trace the cable back. Per the 2000 wiring diagram the actuator has 2 wires. One wire is red/black, so you look for a red with a black stripe. The wiring diagram makes no sense for the second wire, because it is shown as black/black. So I guess you look for a solid black wire. If this helps the parts diagram has your model year actuator as #20. #22 is that part for a newer car. #13 is the motor for the spoiler.
  14. There is a black plastic cover for the latch with 2 screws. Remove the cover and see if the cable for the remote is broken. I think on your year there is a black on top and below that white. You may have to pull back the carpet to see what is going on. In the first pic the black cable is broken. I think the black is for the lever. In the second pic the white is broken. I think the white is for the remote. Or maybe I'm confused because there is also the emergency release cable. When you push the remote button a solenoid pulls on the cable and opens the latch. I think Porsche calls it an actuator. If the cable for the solenoid is broken then that is why your remote does not work. If it is not broken then I would guess a bad soleniod, more so since you do not hear it trying to work. Or, there is something wrong with the control unit under the seat. Also check the fuse.
  15. On the 986 it changed in 2001. On the 996 in 2002. It moved from the middle to the left.
  16. If you have a warranty booklet review it. There are certain items that are covered and some that are not. I am in California and California has a stricter warranty than the federal. I have been told oxygen sensors are not covered.
  17. Make sure your front trunk is closed. Open your rear trunk with the door sill lever. The rear trunk light should be on. Then push the latch down with your finger and close the latch. If you cannot push hard enough with your finger then use a screwdriver. When the latch is closed the trunk light will go out. Then push on your button and watch the latch to see if it unlocks - if not try the other remote. Listen for any noise. If it still does not unlock with the remote then use the door sill lever to lever to unlock it. Report back.
  18. For some reason I have in the back of my mind that the locations are marked inside the cover. If your cover is off take a look.
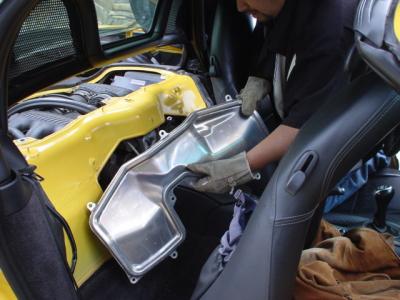
  19. It is not hard to replace the belt. You move the seats forward and remove the access panel. Another thing. After I replace a belt I start the engine with the panel off to make sure the belt is seated and running true. I assumed this was done before the pictures were taken.
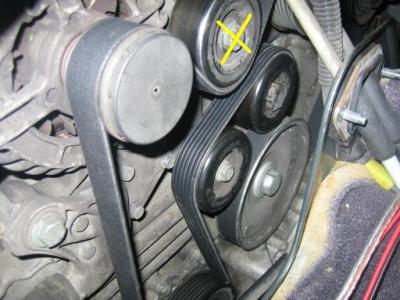
  20. Looks like the belt is seated on the drive pulleys. But it looks like the belt is "walking" off this idler pulley. Remove the belt and unbolt the pulley, and check the condition of the bearings.
  21. What, no battery pictures for 2 weeks? :huh: I was at the Santa Clara Costco looking for tires for my truck. I organized the batteries on the shelf. 48 for $62.99 and 47 for $53.99. I saw this outside the tire install shop. I thought it was an air compressor, but on closer inspection....
  22. I'm lost. The cd changer has a green and blue plug that goes to the back of the radio, in the same row where there is a yellow plug. If you have removed the green and blue cd changer plugs then there is nothing that connects the cd changer to the radio. All I can think of is that you have not turned aux-in on, but you say you have, or did not remove the green plug, but you say you have.
  23. I am not sure what you are trying to do. The cd changer has green and blue plugs to the back of the radio. The aux-in Becker adapter has a blue plug. This adapter occupies the same space as the blue cd changer plug. So you can have the aux-in adapter or the cd changer, but not both at the same time. Perhaps you need to remove the green cd changer plug. Then follow these instructions.
  24. Confirm 15.7 and 16.2, but there is also a taper, so it depends on where you measure the inside diameter. I think I will take some pictures of that condition when I get a chance. Yesterday I did measure the pivot arms, which I call the journals. The brass colored "things" the plastic cup bushings rotate on. Here are those pictures. Sorry for the angle - should have put the camera on the ground. First pic is the long journal that faces the rear of the car when installed. Second pic is the short journal that faces the front of the car, and where the adjustment set screw is typically located.
  25. The knock-offs are all over ebay. I can see slight variations in the ebay pictures. I have put in a lot of B&Ms. The first thing I check is the fit of the cup bushings. They are not always "exact" even with a B&M. So, with the $55 unit, the first thing I did was to check the fit of the bushings, just like I would with a B&M and even the Porsche clone. But I have never seen such a sloppy fitting bushing like the one I measured - I could tell with my eyes the diameter was too large. Proudly made in Asia, maybe. But then I always wondered where the B&M was made since it comes with a tube of lubriplate grease that says made in U.S.A. Like the Germans do not have access to a small tube of lithium grease. Some more pictures from today.
×
×
  • Create New...

Important Information

We have placed cookies on your device to help make this website better. You can adjust your cookie settings, otherwise we'll assume you're okay to continue.