Jump to content

Welcome to RennTech.org Community, Guest

There are many great features available to you once you register at RennTech.org
You are free to view posts here, but you must log in to reply to existing posts, or to start your own new topic. Like most online communities, there are costs involved to maintain a site like this - so we encourage our members to donate. All donations go to the costs operating and maintaining this site. We prefer that guests take part in our community and we offer a lot in return to those willing to join our corner of the Porsche world. This site is 99 percent member supported (less than 1 percent comes from advertising) - so please consider an annual donation to keep this site running.

Here are some of the features available - once you register at RennTech.org

  • View Classified Ads
  • DIY Tutorials
  • Porsche TSB Listings (limited)
  • VIN Decoder
  • Special Offers
  • OBD II P-Codes
  • Paint Codes
  • Registry
  • Videos System
  • View Reviews
  • and get rid of this welcome message

It takes just a few minutes to register, and it's FREE

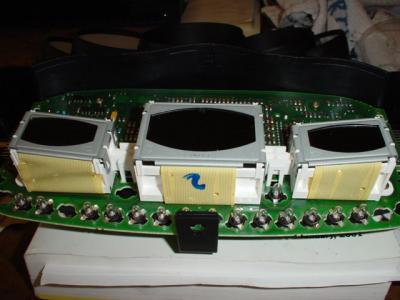
Contributing Members also get these additional benefits:
(you become a Contributing Member by donating money to the operation of this site)

  • No ads - advertisements are removed
  • Access the Contributors Only Forum
  • Contributing Members Only Downloads
  • Send attachments with PMs
  • All image/file storage limits are substantially increased for all Contributing Members
  • Option Codes Lookup
  • VIN Option Lookups (limited)

Tool Pants

Moderators
  • Posts

    4,786
  • Joined

  • Last visited

  • Days Won

    6

Everything posted by Tool Pants

  1. I made a mistake. It is 24 mm on a Boxster. 27 mm is what we use for the Mann oil filter wrench. If you took pictures send them to Loren as he might want to add them to the DIY.
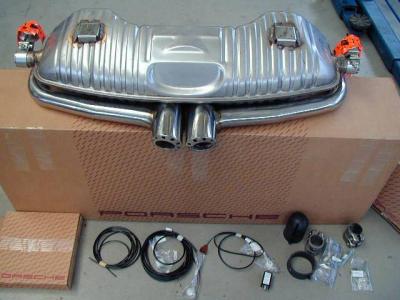
  2. Very good. Your pictures show why the original sport exhaust will not fit on a pre MY03 due to the change of the rear bumper cover despite what others say. The by-pass pipes are now on the side of the muffler so they do not hit the bumper cover lower extensions. I have posted your pictures on the German and UK Boxster boards with credit to you as they have been asking questions about why they cannot get the sport exhaust for the facelift Boxster. Back in January CAR on the German board called Zuffenhausen to find out why the Germans could not order the new style sport exhaust. Zuffenhausen said they were waiting for TUV approval but it had nothing to do with a noise issue. I can tell from your pictures that the same bolt on tip style that started in MY03 is being used, so there are 3 tips that will fit. I hope to hear the new style sport exhaust some day. The original style never had the "bark" that a 996 sport exhaust has. For others, this is the original sport exhaust.
  3. Any stereo experts? On the UK Boxster board rajuk was told this Sony aux-in selector would work with a Becker 32 radio head. I think the 32 is the same as our Becker 220 except the 32 has a dot matrix display. Of course it would work with the proper Sony radio head. I would have to see it to believe it would work with a Becker radio head. http://cgi.ebay.com/ws/eBayISAPI.dll?ViewI...MEBWA%3AIT&rd=1
  4. One of our local Boxster owners bought the Mann wrench sold by Porsche and was charged $25. :angry: I bought mine a few years ago for $6.56. I also have the one made by Hazet which I like better. It is on ebay now for $19. http://cgi.ebay.com/ebaymotors/ws/eBayISAP...&category=43994
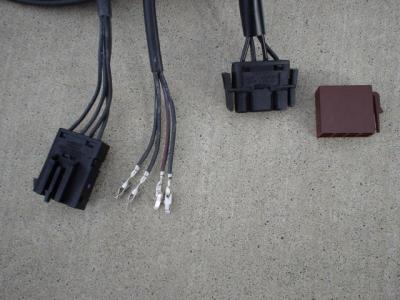
  5. I assume you have the factory rear speaker kit. Plug in the brown connector. Then stick in the 4 pins with the correct orientation. They should just slide in with a click.
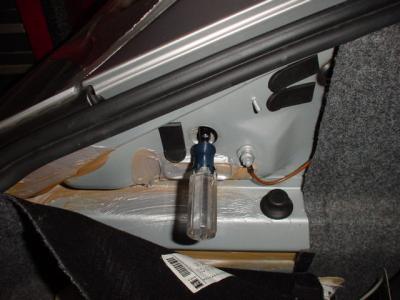
  6. It is in the owners manual. I use a 5 mm six point socket instead of the tool in the kit.
  7. If you have a CDR-23 then you have a 2003/4. If you have the amp in the front trunk you hook up the 4 wires to the amp. Not the back of the radio head. This is the adapter that extends the cable and so you can plug the 4 wires into the amp connector. Let me know if you do not have the amp in the trunk.
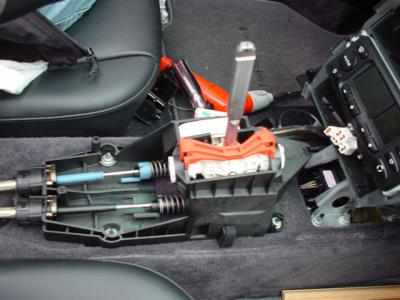
  8. Blue is for reverse. You will not be touching that one. The EVO product will not work with the blue cable connector in any event. The black connector is the one you replace with the metal one. I took pictures of an oem shift lever that was removed for a B&M install so you can see how the black cable connector is connected to the end of the shift lever. It is just a ball joint and comes apart with enough pressure. You can pop it apart with your fingers or lever it off with a large screw driver. If you have problems popping the EVO unit onto the ball joint at the end of the shift lever then you remove the 4 nuts for the shift tower and flip the unit on the side and give the EVO unit a wack with a soft hammer. You first will need to remove the end of the shift cable from the end of the plastic cable connector. Count how many notches are empty first so if you give up you can everything back exactly where it was. There is a spring loaded thing you push to the front - then lift up on the cable to remove it from the connector. None of this will make sense until you remove the console and you can see the parts. If you have the EVO unit how many set screws are used to lock the unit to the shift cable. I can only see one on the EVO site since I cannot rotate the unit.
  9. Since I have the shift cable adjustment tool I would do it with the tool. All you are doing is replacing the black plastic cable connector with the EVO metal one. The dealer uses the tool when replacing the plastic cable connectors so there is no reason not to use it when putting in a metal one. Remove the plastic one and put in the metal one. Snap on the tool to center the shift lever. Tighten the set screw(s) for the metal one that holds it in place on the end of the shift cable. Your done and the shift cable is exactly where it was before you started. I would do it a different way if you were not keeping the stock shift lever. I could have to think how you would do it without the tool, other than by a bit of trial and error. If someone in the San Jose area has one contact me and we will take pictures of putting it in.
  10. Do not know about the Monza unit. With the Becker 210 and 220 series #1 is the less speed sensitive - not most.
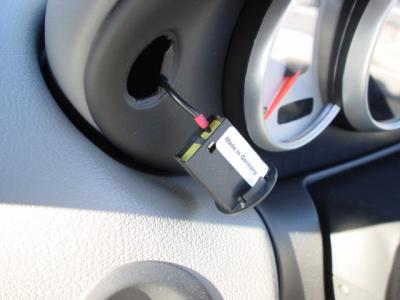
  11. The CDR-23 radio that started in 2003 does not have the GAL function if you have the Bose option. GAL is replaced by AudioPiolt. A microphone in the instrument cluster where we usually have a dummy grill for the cell phone mic we never had in the US.
  12. Blue connector. Slot #9. There should be no wire there on your car.
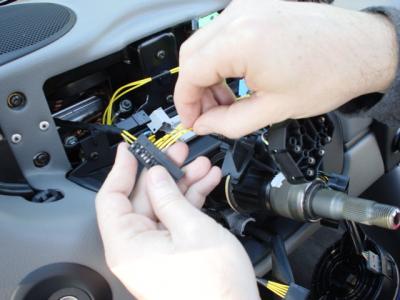
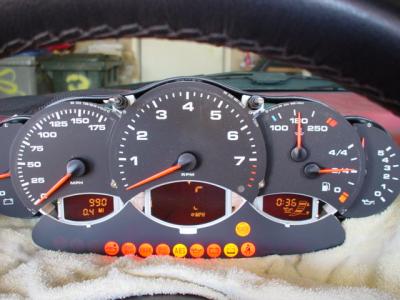
  13. I am not an electrical person so terminating traces means nothing to me. Nothing needs to be done to a 996 cluster for the volt meter to work on a Boxster. For the oil pressure to work you replace the one wire Boxster sender with the two wire 996 sender. These wires run from the sender to the instrument cluster. The Boxster sender has one wire for the idiot light. The 996 has two wires - one for the idiot light and the other for the gauge. So you have to run an extra wire from the sender to the cluster. There are 3 connectors that plug into the back of the cluster. You can insert a wire into the proper connector in the proper slot. On a Boxster the slot is empty for the wire for the oil gauge. Put the new wire into the empty slot, and plug in the 3 connectors into the back of the cluster. The oil pressure gauge will work. If you do not want to run the additional wire then I have said how to do it that way. The 996 cluster is wider due to the additional gauges. You can cut the black plastic surround from the Boxster to fit the 996 cluster. Or you can buy a 996 surround - but then you also need to buy a 996 cap for it. The 996 surround will not fit a Boxster cap. This shows how we add wires to the cluster connector for the trip computer retrofit.
  14. The subject is over as far as I am concerned unless I find a cheap 996 cluster that works. When I saw the 996 cluster had a defective center LCD display I put my Boxster circuit board in the 996 cluster housing with the 996 dials. That is why I have a picture of both clusters apart. The volt meter did not work. So the circuit boards must be different. Then, I thought about removing my Boxster center display and putting it in the 996 circuit board. The display is connected to the circuit board with ribbon wire that is soldered to the board. I was not going to mess around with my Boxster cluster by removing the LCD display since I might have ended up with 2 defective clusters. End of story.
  15. If you have a black 3 spoke vinyl air bag you want to sell, let me know. We have a 4 spoke Boxster owner who has the 3 spoke manual transmission wheel but she needs the air bag. Jeff
  16. This is the brass colored clip that holds the push rod in place for the clam shell. You lift on the top of the clip and then it slides off. Mark was able to disconnect the ball joints with a pry lever so we did not have to remove the clips. The other way to separate the ball joints is a door panel removal tool. I shove it in - between the joints - and twist. The joint then separates. I also use it for the red plastic joints.
  17. The volt gauge worked fine when I plugged in the 996 cluster - nothing needs to be done. The oil pressure gauge did not work because I never hooked it up once saw the LCD display was defective. I contacted 3 VDO repair shops and they cannot get parts to fix the cluster. Don't know the electrical stuff you mention. The 996 cluster just plugs into the 3 connectors for the Boxster. The wiring is the same - except the Boxster does not have the extra wire for the oil pressure gauge. You can add the 'missing' wire to one of the connectors that plugs into the back of the cluster. My cluster is on top and the 996 on the bottom in all pictures.
  18. The 1999-2001 996 cluster just plugs into a 1997-2000 Boxster. Everything works except the oil pressure gauge - but there is a fix for that. This is a 1999 996 cluster on my 1997 Boxster from ebay. The center LCD display was defective so I did not bother to hook up the oil pressure gauge.
  19. This is your typical broken plastic ball joint. These 2 push rods are about $140. They were fixed for free. New and old style transmissions. The very bent V-levers.
  20. I just removed the drive cable from Gary's old style transmission with the vise grip/side cutter method. Worm gear came right off. Also removed the cable from his new style transmission. There is a 1 inch difference in the length of the cable housings. :angry: Cannot just swap the cable housings like we use to do, so we did not have to play around with the worm gear.
  21. There are a few Boxster owners who have 996 clusters. I was going to be one of them but the 996 cluster I bought off ebay turned out to be defective when I plugged it into my car.
  22. We met today to check out the 1998 owned by Gary. Both side vents had been removed as his shop thought that was how to get into the top. Mark pops of the ball joints for the clam shell so we can take a look. The first thing we notice is that parts have been marked left and right so someone has worked on this before - who did not know what they were doing. Both V levers have been bent. Both push rods for the clam shell have a bent attachment point. I bent them back into shape on a vise in the Harley shop, but one was so bent the spot welds broke. Denton's paint guy welded it back together. There were many problems with the prior fix(s) that had been done to this car. The drive cable was not sticking out enough on one side. Then when I pulled on the cable for the other side it pulled out from the transmission. Then Mark noticed one side had the reinforced cable and the other side did not. Something is wrong. One side of the car has the old style transmission and the other side has the new style. We pull out washers, nuts, spacers and other stuff to space out the mounting studs for the old style. I think the prior mechanic used everything he had in the coffee can.
  23. I am on a dial up with 30 minutes of better things to do after I looked at the home page. I have been Boxstering for almost 5 years. I know of no way to "hot wire" a Boxster or 996 or any current Porsche model. It is not going anywhere without the proper key unless it is towed. Save your money - there is no need for this product on a Boxster. I like their claim of a 100% guarantee against hot wiring. Give me the money and I will give you a 100% guarantee against hot wiring a Boxster.
  24. I forgot there is some kind of alarm retrofit kit sold by Porsche. I cannot tell what it does due to the bad description on the parts list. Check with your dealer and maybe they can figure out if this would be something you want or will work on your car. It is called "retrofit kit remote control interior monitoring anti-theft device" with the option code 534. Part number is 000 044 900 29 and it is only listed for a 1997. In the US the alarm system on a 1997 is different than a 1998-2000. For other interested readers :huh: the same kit for a 1998-2000 is 000 044 900 32 - but the option code listed is 535.
×
×
  • Create New...

Important Information

We have placed cookies on your device to help make this website better. You can adjust your cookie settings, otherwise we'll assume you're okay to continue.