Jump to content

Welcome to RennTech.org Community, Guest

There are many great features available to you once you register at RennTech.org
You are free to view posts here, but you must log in to reply to existing posts, or to start your own new topic. Like most online communities, there are costs involved to maintain a site like this - so we encourage our members to donate. All donations go to the costs operating and maintaining this site. We prefer that guests take part in our community and we offer a lot in return to those willing to join our corner of the Porsche world. This site is 99 percent member supported (less than 1 percent comes from advertising) - so please consider an annual donation to keep this site running.

Here are some of the features available - once you register at RennTech.org

  • View Classified Ads
  • DIY Tutorials
  • Porsche TSB Listings (limited)
  • VIN Decoder
  • Special Offers
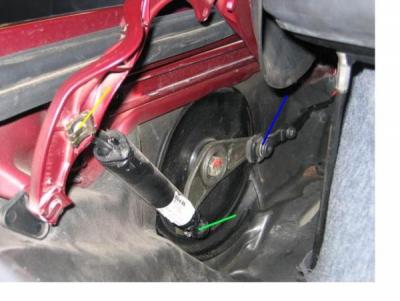
  • OBD II P-Codes
  • Paint Codes
  • Registry
  • Videos System
  • View Reviews
  • and get rid of this welcome message

It takes just a few minutes to register, and it's FREE

Contributing Members also get these additional benefits:
(you become a Contributing Member by donating money to the operation of this site)

  • No ads - advertisements are removed
  • Access the Contributors Only Forum
  • Contributing Members Only Downloads
  • Send attachments with PMs
  • All image/file storage limits are substantially increased for all Contributing Members
  • Option Codes Lookup
  • VIN Option Lookups (limited)

Tool Pants

Moderators
  • Posts

    4,786
  • Joined

  • Last visited

  • Days Won

    6

Everything posted by Tool Pants

  1. Go to the detail day the 15th and about 100 people will show you how to do the swap.
  2. About all I can afford.
  3. There is just one motor. It spins both cables that run to the transmissions on the left and right side. Not common for a motor to fail. You need to figure out what the problem is first. For parts I would try Sunset Imports in Oregon.
  4. The brass colored clips for the clamshell push rod are not painted. The other clips you see are painted in the body color. When you have one transmission moving and the other side does not move, you are going to have bent and broken parts. Something that could be avoided for free by making the cable housing shorter or replacing the cables for $60.
  5. Still cannot figure out the problem. I mentioned one way to adjust the clamshell. But you mention the wedge adjuster. You will just have to visit us Boxsternauts in California.
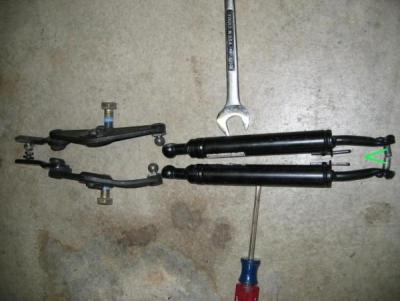
  6. The push rods with the plastic joint on the end are identical for the left and right side. I can see they do not match in your pic but cannot tell from the pic if one or both are bent. Replace both sides with the Porsche parts as I suggested before. List is $48 each. I would like to try Scott's metal joints one of these days, but if the rods are bent then that is not an option. How is the V-lever on the right side? Someone held the top switch down too long while it was making a bunch of noise. :o
  7. You have the typical $2,000 dealer top fix. From your pic it is a $200 fix. Replace the V-lever. It should be flat. The left is obviously bent. Can't tell about the other side due to the angle of the picture. Not worth trying to bend back into shape since full retail is just $41. The mounting ends of the clamshell push rods look bent to me. I put a green line to them. Clamp the mounting end in a vise and bend it back into shape just a hair. They are spot welded to the arm that comes out of the push rod and sometimes the weld breaks. The arm itself has a natural bend to it - so do not confuse the natural bend with the mounting end - since you have nothing to compare it to. They are $70 each but I fixed them on Gary's car.
  8. Here is info on another German company. http://www.audiotec-fischer.com/index2.html
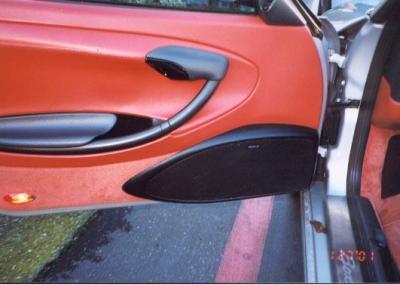
  9. The German company Jehnert makes the HPAS. HPAS was a popular retrofit kit years ago - pre Bose. But if you do not already have the amp in the trunk and the speakers in the door then there is no use for the kit as there is no existing wiring. http://www.jehnert.de/en/ On a Boxster it is simple to put speakers in the doors when it did not come with sound package. Our door cards are flat for the speaker location if the cards do not have speakers. On a 996 you have a storage bin in the door when there is no speaker. That is what Loren has. I do not know if it makes a difference on a 996. Jehnert, TechArt, and other companies I do not remember sell the housing for a speakers in the door card. Then you should have an external amp in the boot to drive the door speakers. You also have to run wires into the door. This is the Jehnert housing on a Boxster
  10. I did not see your picture when I posted. Separate the ball joint where the green line is. Remove the clip where the yellow line is. Remove the rod from the car. Then you can tell if the mounting point for the black push rod is bent. I also inspect the bushing and spacer where the blue line is. The only car I have seen with an issue in that area is Gary's. The 19mm bolt for the V-lever is held in place with blue loctite. I use a 1/2" drive breaker bar.
  11. I assume you are going to replace the cables on both sides. If so, then you have to remove both transmissions. You might as well replace the push rod with the red plastic joint on the end even if it is not broken since you will have the transmission out to replace the cable on the side that works. About a year or so ago Porsche changed the plastic joint. It is now made out of a white plastic material and has a different "feel" to it. I suspect it is more heat resistent. Check the male joint that the female red plastic joint snaps into. Make sure it is screwed in. I would check the mounting ends for the black push rods for the clamshell. Both were bent on Gary's car and I have posted pictures of the bent ends. If the V-lever is bent then a lot of force was put on the black push rods. Remove the inspection plate for the transmission and inspect for broken teeth. I have taken a few transmissions apart and they were never the problem. The V-lever for the left side is 986 561 479 01. Show us some pictures when you put it back together.
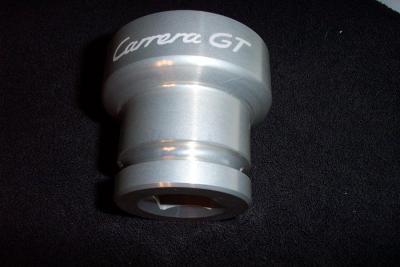
  12. You can use a strap wrench if the cannister is not cranked on very tight. On a few cars I have had to used the metal cup style wrench and a 2 foot breaker bar for leverage to get the cannister off. Some people torque the cannister when putting it back on. You cannot do that with a strap wrench. But all mechanics I have watched screw it back in by hand. Some of us DIYers also do it by hand. I call it the pickle jar effort.
  13. People say they can just pry them off with enough force. You could also grind away the ridge on the bolt that keeps the piece from sliding off.
  14. First, see if the cable is connected to the transmission. Then check the black cable connector in the shift tower.
  15. Do you have any pictures of what is going on as it is hard to understand. The reason the clamshell does not bounce up and down is the black rods that clamp it down to the body. When the top is going down the motor runs for about a second after the clamshell is down so those rods can put tension on the arms for the clamshell. There is a height adjustment for the clamshell. If you remove the black plastic cover on the arm you will see a set screw and a lock nut. Same on both sides. The screw is eccentric. Turn the screw one way and the clamshell moves up - the other way it moves down.
  16. If you are going to the work on cars tomorrow I can copy the shop manual.
  17. Do you have a picture of the container?
  18. The triggering unit is inside the front center console. Pull off one of the carpeted trim panels and you will see it. The shop manual says it is good for 3 events, then must be replaced.
  19. Jean, you can always drop in on us. I'll paint a big white X in the parking lot that you can see from the air. Make sure you put on the parachute if you are going to fly that red crate.
  20. There is only one way I can think up to get a check engine light after a spark plug change. When I remove the coils to get to the plug I first remove the electrical connector to the coil. This was I can remove the coil from the car and inspect it. Getting all 6 connectors back on takes some effort due to clearance issues. If one of the connectors is not properly seated then you will get a misfire and perhaps a check engine light. Since the light is off I would forget it.
  21. Tom on Rennlist with a 2000 2.7 took this good picture of a Boxster. Anyone have a good 996 picture?
  22. At San Jose Custom Cycles again. 1425 West San Carlos Street, San Jose. Start at 10:00 am. Map
  23. Have you jacked up the car first. :P The big nut is for the drive axel and you do not play around with it. If you can see it then the center cap must be off. There are 3 plugs on each side. Once you get the wheel off you will see a black plastic plate held on with 2 black plastic nuts. Remove the plate to give you better access to the front plug. Use a jack stand.
  24. We change them from the side after removing the wheel. Remove your wheel and you will see the black square coils. The plugs are under the coils. Sometimes we even change them in the rain.
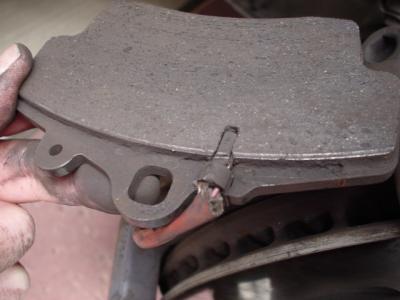
  25. The sensor is a simple loop of wire covered by black plastic. When the friction material becomes thinner and the pads move towards the rotor the rotor grinds away at the wire until you have an open circuit and the light goes on. Some say that if a sensor is worn and gets wet the light will go on. Start the car and then pull up on the hand brake lever. If the light does not come on then you have a bad hand brake switch - a common problem on older cars and there is a new design switch. If pumping the lever does not get the light to come on then it is time to replace the switch. I cannot think of how either things are related to the tank replacement. This is the sensor.
×
×
  • Create New...

Important Information

We have placed cookies on your device to help make this website better. You can adjust your cookie settings, otherwise we'll assume you're okay to continue.