Jump to content

Welcome to RennTech.org Community, Guest

There are many great features available to you once you register at RennTech.org
You are free to view posts here, but you must log in to reply to existing posts, or to start your own new topic. Like most online communities, there are costs involved to maintain a site like this - so we encourage our members to donate. All donations go to the costs operating and maintaining this site. We prefer that guests take part in our community and we offer a lot in return to those willing to join our corner of the Porsche world. This site is 99 percent member supported (less than 1 percent comes from advertising) - so please consider an annual donation to keep this site running.

Here are some of the features available - once you register at RennTech.org

  • View Classified Ads
  • DIY Tutorials
  • Porsche TSB Listings (limited)
  • VIN Decoder
  • Special Offers
  • OBD II P-Codes
  • Paint Codes
  • Registry
  • Videos System
  • View Reviews
  • and get rid of this welcome message

It takes just a few minutes to register, and it's FREE

Contributing Members also get these additional benefits:
(you become a Contributing Member by donating money to the operation of this site)

  • No ads - advertisements are removed
  • Access the Contributors Only Forum
  • Contributing Members Only Downloads
  • Send attachments with PMs
  • All image/file storage limits are substantially increased for all Contributing Members
  • Option Codes Lookup
  • VIN Option Lookups (limited)

Tool Pants

Moderators
  • Posts

    4,786
  • Joined

  • Last visited

  • Days Won

    6

Everything posted by Tool Pants

  1. Take it in to a dealer and see if they will do some "goodwill" since you are just out of warranty, but a lot of goodwill expired in July of last year. If you are not the original owner then have them search the service computer for any prior top repairs.
  2. You remove the trim piece that is shaped like a retangle. It just pulls out but you need something thin to start prying it out. Under the trim is 2 phililps screws. Remove the screws and then the unit slides out.
  3. 2001 is not suppose to have problems like 1997-1999. Do you have a warranty left? If one side is moving then you need to put the top in the service position to see why the other side does not move. It could be the cable, plastic joint, top transmission, or something else. We had a report on this board from a 2001 owner from the UK and one of the two cables broke, and this is rare on any year. There are instructions on this board and in your owners manual on how to disconnect the red plastic joints and the metal joints for the clamshell - it is going to be a bit harder for you because the top is in the closed position. Then you can operate the top manually and get it into the service position. If the plastic joint is broken on the side that does not work then you found the problem, then you need to figure out why. If the joint is not broken then when the top is in the service position disconnect the drive cable from the motor for the side that does not work and operate the cable with a drill that can go forward and reverse. Watch the V-lever on the transmission to see of it moves. If it does not move then your cable is broken or disconnected from the transmission, or you have a bad transmission. All of the above is an educated guess as I cannot see your car. But if you get the top in the service position we can walk you through. In the meantime do not touch the top switch because all you will do is cause more damage. If the clamshell got tweaked then it is easy to twist it back into shape - there is a picture of Mark and I doing just that in the top section of this board. I make the DVDs with the help from a lot of local owners. There is no DVD for top fixes yet, but it is on the list. Jeff
  4. I found those pictures a long time ago on a Japanese Boxster owner's site. He painted all the black plastic in the car silver. He either masked or pulled the buttons off to paint. Porsche does not sell just the faceplate, and the entire unit is very expensive even if you could find it in silver.
  5. Is this the part you want to paint silver?
  6. 997 also has a plastic clutch pedal and a metal brake pedal, and I assume the 987 will as well.
  7. You have to drill holes to bolt on the aluminum "racing" pedals. The clutch is plastic. The brake is metal. You remove the rubber covers to drill for the screws, and they are bolted from the back of the pedals. Normally the rubber covers are removed, but I have seen them with the covers still on. Whatever you want to do. Carcrafter has some metal pedals that they say slide on as a replacement to the rubber covers. Never seen them in person. https://www.carcrafter.com/catalog/default.php/cPath/25
  8. 996 606 124 00 is the first version of the e-gas sensor, and was put in new e-gas cars until January 31, 2000. Then the "improved" second version 986 606 125 00 went into production, and that part number is now superseded by 986 606 125 01, which I will call the third version. If you put in the second or third versions in a car that had the first version then the DME has to be reprogramed. Porsche no longer sells the second version as it has been replaced by the third version. The second and third versions interchange without a reprogram, if the car came with either version. The first version 996 606 124 00 is still being sold by Porsche. It is also used on a pre 2002 996 C4. Aftermarket must have it somewhere...... My guess is 2 hours if you go with a version other than what is on your car. Not that it takes that long if the sensor is your issue, but you know how it is.
  9. http://www.renntech.org/forums/index.php?s...5011entry5011 KarlS did on a 2004 GT3 - TrafficPro. But he did not have the amp or changer in the trunk, so he had no fiber optic cables to the radio head. He had 2 issues but I guess he figured it out.
  10. The low xenon beam rotates up a few degrees to fill in with the high halogen beam.
  11. No. Here is the holding bracket for the coolant lines with the 2 bolts removed. You do not touch any clamps for the front radiator coolant tubes that run from the engine to the radiator. You drop the lines a bit to get that fat fuel filter out from the back after you slide it to the rear. The hard lines have rubber hoses on each end. That is why you can pull down the hard lines a bit without disconnecting a coolant line. Then you slide out that big fat filter to the rear.
  12. There is a bracket with 2 bolts. I had to remove the bolts because the filter is way to large. Then the coolant lines are also attached to the engine and I pulled them off after I removed the rear plastic cover. There was also a gray foam part I removed. Then you can pull the coolant lines down and slide the filter to the rear and out.
  13. Dan Feinberg gave me his set a few years ago after he switched to aluminum. I'll give them to you at one of the local events if I can remember where I put them.
  14. Harness and control unit on ebay for $100. http://cgi.ebay.com/ebaymotors/ws/eBayISAP...B%3AWN%3AMT%3A1
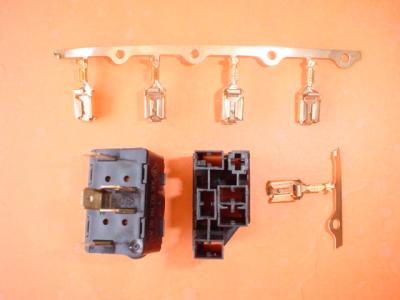
  15. Pat and Raman hooking up the reverse wire on a 1999 with a new TrafficPro. Henry was there to give advice as we had to hook up to the reverse wire for his auto dim mirror retrofit last year. Pull the seat and this is what you see. A control unit and a bunch of wires. With this 1999 it just had an air bag fix so there was aftermarket tape on and over the harness. Remove tape until you find the black wire with a blue stripe. It is not hooked up to anything and should have a black plastic cap on the end. You may also find it under the carpet. This is the cheat way to pull a wire from the back of the radio head over to the reverse wire. But it works. Porsche says to run the wire accross the dash and down to the door sill, then under the carpet to the control unit. The wires are spliced together. The green wire runs under the carpet to the radio connector. A pin is crimped on the other end of the green wire and then the pin is inserted into the proper slot of the connector after you unlock the connector. The pin is not included in the TrafficPro kit, but you can buy it from Porsche. On your TrafficPro display you will see that the reverse signal works by the down/reverse arrows.
  16. So the deed is almost done. Reverse wire for the TrafficPro is hooked up. Before we take a car apart we check to make sure we have the correct parts. Pat bought the factory cd changer kit and included in the kit is the mounting brackets for all Porsche models, LHD and RHD. C4 changer bracket is different than a C2/Boxster. RHD bracket is different than a LHD bracket. You use the bracket you need which is included in the kit and throw the rest of them away. When I looked at the parts I saw the dealer sent two identical brackets for a right hand drive Boxster/C2, instead of one bracket for a LHD and one bracket for a RHD. So someone in the UK has two LHD brackets, and Pat has two RHD brackets. We went forward and installed the changer and it works fine other than it is not mounted on a bracket. So if anyone needs a bracket for a RHD car I know where you can find two of them.
  17. $159 for a 2.5 air flow sensor that my local dealer charges more than double. You should have bought 2 so there would be an extra for the next local 2.5 guy. To remove the 2 anti-tamper Torx screws you need a T20 anti-tamper bit. This bit has a hole on the end. This is my set of bits.
  18. Good to know. When I replaced mine 2 years ago I tried Costco in Santa Clara and they did not have one that would fit. 47 is just a bit shorter but there are several holes for the clamp. I have a Costco battery in my truck and it is made by Johnson Controls.
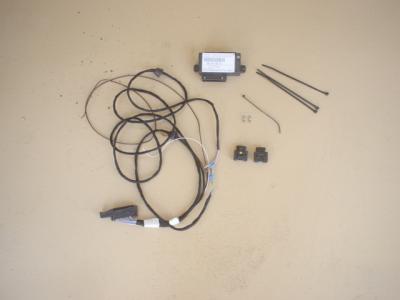
  19. If I remember correctly litronics did not come out until 1999. All Boxster and pre 2002 996 lits are the same and will work on a 2004. There is a retrofit kit for about $1,100 that has all the parts including the headlights. If you buy just the headlights then you just put them in and they will work. If you do not have the separate control unit connected then you will not get the low beam rotation. You can buy the control unit and the wiring harness, and that is in the pic. The control unit mounts in the trunk behind the carpet.
  20. On the back of the fuse cover is a paper of the fuse assignments. Row B number 1 is for the cluster. There are also bulbs in the cluster that can burn out.
  21. There was a card Porsche mailed out to the registered owner in 1999. Peter calls a number and punches in your VIN and a recording says if there are any recalls. And any service advisor can put your VIN in the computer to see if there is an open recall. With that said there are many Boxsters of different years and 996s that have had ignition switch problems and there was no recall. Never understood why the recall was only for a few 1997s since the switch problem continued to 2002. http://www.renntech.org/forums/index.php?showtopic=1313
  22. The storage box between the seats. If you do not latch the lid you get a single beep when you set the alarm. All other entry points are armed after you set the alarm, just not the box. I have been doing this for years. I am usually in a hurry and buy the time I push the alarm/lock button I am walking away from the car so I can't see the lights flash. So I listen for the single beep to let me know the alarm is in fact on.
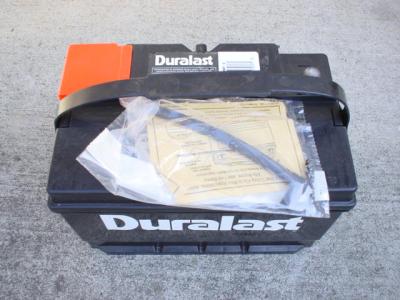
  23. Group size 48 from Autozone, if you have Autozone in your area. The battery is made by Johnson Controls, a very big company. Johnson Controls also makes the group size 48 battery sold by Sears, but when you buy it from Sears it is $90-100. It comes with a vent tube.
  24. The double beep is to warn you there is a fault in the system. My guess is the control unit under the seat or the door lock actuator. Do the doors stay locked when you use dash button. I would have to ask Peter if this is at all related to a bad ignition switch. I trust you know there was an ignition switch recall on some 1997s. I think it was only about 3,000 cars. Recall came out in 1999. My 1997 was on the list.
×
×
  • Create New...

Important Information

We have placed cookies on your device to help make this website better. You can adjust your cookie settings, otherwise we'll assume you're okay to continue.