Jump to content

Welcome to RennTech.org Community, Guest

There are many great features available to you once you register at RennTech.org
You are free to view posts here, but you must log in to reply to existing posts, or to start your own new topic. Like most online communities, there are costs involved to maintain a site like this - so we encourage our members to donate. All donations go to the costs operating and maintaining this site. We prefer that guests take part in our community and we offer a lot in return to those willing to join our corner of the Porsche world. This site is 99 percent member supported (less than 1 percent comes from advertising) - so please consider an annual donation to keep this site running.

Here are some of the features available - once you register at RennTech.org

  • View Classified Ads
  • DIY Tutorials
  • Porsche TSB Listings (limited)
  • VIN Decoder
  • Special Offers
  • OBD II P-Codes
  • Paint Codes
  • Registry
  • Videos System
  • View Reviews
  • and get rid of this welcome message

It takes just a few minutes to register, and it's FREE

Contributing Members also get these additional benefits:
(you become a Contributing Member by donating money to the operation of this site)

  • No ads - advertisements are removed
  • Access the Contributors Only Forum
  • Contributing Members Only Downloads
  • Send attachments with PMs
  • All image/file storage limits are substantially increased for all Contributing Members
  • Option Codes Lookup
  • VIN Option Lookups (limited)

JFP in PA

Moderators
  • Posts

    8,732
  • Joined

  • Last visited

  • Days Won

    199

Everything posted by JFP in PA

  1. Should not make any difference.
  2. The back light switch is part of the main switch sector on the side of the transmission.
  3. Sometimes, it is just that simple..................
  4. Cleaing the cable ends won't do, the corrosion is inside the cable end, between it and the cable (and often in the cable as well). I'm pretty sure there is a TSB on it in the "DIY Tools" archives (contributing members).
  5. These bleeder valves can be "rebuilt" with some relatively cheap OEM parts, and if memory serves, someone did a write up on the process a while back. The biggest potential problem, aside from getting at it, is removing the eight bolts that hold the assembly together, they have a tendency to snap off if they get corroded, and then it is “tank time”.............
  6. With the engine running at idle, the alternator output should be in the 13.8-14.5V range. There is a TSB on the car concerning high resistance cables (both positive or ground) which can cause all sorts of problems (hard start/no start particularly when warm, dimming lights, weird MIL indications such as PSM or ABS faults when none exsist, etc.). Many times the cable ends look awful due to built up corrosion. The cables are not outrageously expensive, but they are a bit of a pain to install because of the way they run around the engine bay.
  7. I think you may have missed the point of some of the responses as well; many people have tried many different exhaust components on these cars, only to discover that the factory pieces are not all that bad. In cases where before and after dyno runs were done by a totally independent and reputable dyno shop rather than the company making the exhaust components, some very expensive hardware has been shown to not only fail to increase power output, but in many cases actually reduced it. Then there is the well-known resonance problems caused by some aftermarket exhausts, which range from merely annoying to headache inducing din. There is absolutely nothing wrong with looking at ways to extract more performance from your car, just be sure to do your own research and take the manufacturer’s claims with a grain of salt………………
  8. Your running voltage sounds a bit low, at speed it should be more like 14V. Suggest having the alternator checked out, could just be a dying voltage regulator, but it could also be something more in the alternator.
  9. The diagram covers "all layouts", so it can be confusing. Yours should be 25 & 26. Not bad to get at, just don't mix the sensors up, they are different (longer or shorter harnesses).
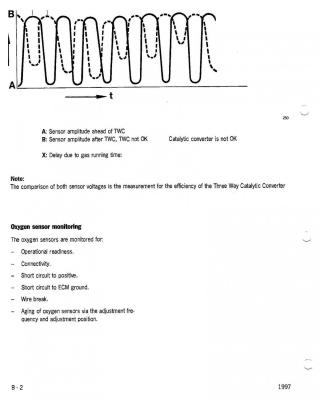
  10. Sorry but the OEM OBD II diagnostics manual for your car lists P0430 as "conversion too low on the three way", or main cat on cylinder bank 4-6 (bank #2), it is not the pre-cat. The OBD II manual's solution in the decision tree if code P0430 persists is "replace three way catalytic converter". Try checking the main cat on bank #2 for temperature, if it is lower than exepected, you are in the market for a new three way on bank #2. You can also reverse the O2 sensors side for side to see if the code changes to a P0420, which would be the same issue, but now on bank #1, which would be indicative of a sensor issue rather than the cat itself. Be sure you test this thoroughly, because the three way is one very expensive part..............
  11. True enough, but a main cat that is running substantially colder than expected is usually a good sign of a problem with the cat. More often than not, when we see a P0430/0420, it traces to an O2 sensor issue more often than the cat itself, which is why I implied that the OP should be sure they check out before even bothering to check the cat temps.
  12. First of all, P0430 on your car is not the pre-cat, it is the larger main cat (called the "three way") on cylinder bank 4-6. Assuming you have tested the O2 sensors before and after the three way, and that they are in working order, the main cat should be running at greater than 386 C (727 F).
  13. Somtimes you just have to "bite the bullet"..............
  14. The first thing I would do would be to get a can of spray electrical contact cleaner and try cleaning out the buckles thoroughly (a build up of crud inside them makes for poor electical contact), that often does the trick, and it is cheap. Just make sure everything is electrically dead first by disconnecting the battery.
  15. Some owners of the early 986's have gone through more than one set of seat belt buckles; it is a commonly known issue.
  16. Which part number in the diagram is broken? The part number you gave is for a $1,500 tank assembly...............
  17. Stant makes both a great kit, and adaptors for just about anything (we have two Stant’s in the shop). Reasonably priced, built like a tank: http://www.stant.com/repository/documents/12270.pdf Late model VW, Audi, and Porsche adaptors are all the same.
  18. No, it should not alter fuel pressure or driving behavior, just the fuel level accuracy and what the trip computer thinks is going on.
  19. Fuel The fuel gauge will not read accurately, can also impact fuel usage calculations in the OBC system for that reason.
  20. Loren would you please describe what means FUEL TANK RE CALIBRATION?Thank you You will need a PIWIS tester to calibrate it.1. Disconnect the battery and cover terminal or battery.2. Remove cap over the fuel level sensor system.3. Remove fuel level sensor. (attached to the fuel pump inside the tank).4. Using a fuel extractor, completely drain the fuel tank through the fuel level sensor opening.5. Make sure that the two recesses on the left and right−hand sides of the tank are emptied completely.6. Reinstall the fuel level sensor and, with "ignition off", fill the tank with 28 liters of fuel.7. Perform tank calibration with the Porsche System PIWIS Tester:· Select vehicle type (997TT)· Select control modules· Select instrument cluster· Select menu item "Tank calibration"· Confirm calibration8. The fuel level sensor system has now been calibrated.Be very careful when doing anything with the fuel system as there is danger of fire or explosion.
×
×
  • Create New...

Important Information

We have placed cookies on your device to help make this website better. You can adjust your cookie settings, otherwise we'll assume you're okay to continue.