Welcome to RennTech.org Community, Guest
There are many great features available to you once you register at RennTech.org
You are free to view posts here, but you must log in to reply to existing posts, or to start your own new topic. Like most online communities, there are costs involved to maintain a site like this - so we encourage our members to donate. All donations go to the costs operating and maintaining this site. We prefer that guests take part in our community and we offer a lot in return to those willing to join our corner of the Porsche world. This site is 99 percent member supported (less than 1 percent comes from advertising) - so please consider an annual donation to keep this site running.
Here are some of the features available - once you register at RennTech.org
- View Classified Ads
- DIY Tutorials
- Porsche TSB Listings (limited)
- VIN Decoder
- Special Offers
-
OBD II P-Codes - Paint Codes
- Registry
- Videos System
- View Reviews
- and get rid of this welcome message
It takes just a few minutes to register, and it's FREE
Contributing Members also get these additional benefits:
(you become a Contributing Member by donating money to the operation of this site)
- No ads - advertisements are removed
- Access the Contributors Only Forum
- Contributing Members Only Downloads
- Send attachments with PMs
- All image/file storage limits are substantially increased for all Contributing Members
- Option Codes Lookup
- VIN Option Lookups (limited)


PAULSPEED
-
Posts
1,401 -
Joined
-
Last visited
-
Days Won
1
Content Type
Profiles
Events
Forums
External Paint Colors
Downloads
Tutorials
Links Directory
Collections
Classifieds
Store
Everything posted by PAULSPEED
-
You could shove some guitar picks between the glass and rubber. After you locate the noise, then cut up a credit card and use the small piece. Paul
-
I could not find an idler pulley in the parts list. Here is a picture of some of the pulleys. Paul

-
A mechanic told me that these cars do not like to sit around. I would run your old gas till your about 1/4 tank. Then fill up with new gas. Run the car till 1/2 tank. Clear the codes. Warm up the car and then get on it. Paul
-
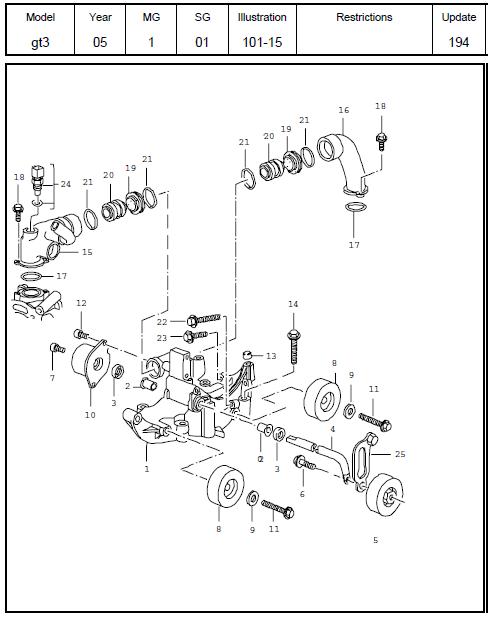
I should not have used the circle clip words. The safetey pin is part 15. Here is a GT-3 set up. Good luck. Paul
-
I am glad your happy!!! Paul
-
Human condition
PAULSPEED replied to Rapewta's topic in 996 Series (Carrera, Carrera 4, Carrera 4S, Targa)
Looking for experience? Over 1,000 Porsche's will be at Laguna Seca in October for Rennsport 4. This is the first Rennsport on the West Coast. The Museum will be moving four cars to the event. Check out the Zone 7 site for a poster. http://www.zone77.org/ Paul -
I perfer NGK plugs over nipadenso. Back in my two cycle days the NKG's would not foul. Just my personal favorite plug in the world. Paul
-
Human condition
PAULSPEED replied to Rapewta's topic in 996 Series (Carrera, Carrera 4, Carrera 4S, Targa)
Clean the egg off as fast as you can. Eggs really damage paint. Paul -
Orientation Light
PAULSPEED replied to allenh5's topic in 996 Series (Carrera, Carrera 4, Carrera 4S, Targa)
Looks like the part 8 is held in with a screw (part 9). The light bulbs I saw are little 3 watt in the sun visors. I would pull the bulbs out and use a little steel wool on the contacts. You may just want to phone Sunset Imports and oder new bulbs. Here is a picture. Paul
-
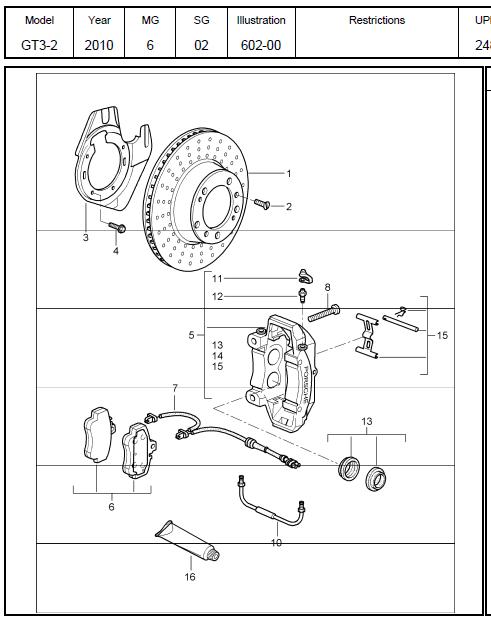
Here is a picture of a 996 GT3 brake pin. It looks standard with the circle clip to hold it on. I would phone Sunset Imports and ask the Porsche guy if the pin is standard. See part 15. Paul
-
Check this story out. You can always go back with out the cap real easy. http://www.renntech.org/forums/index.php/topic/37447-cold-air-intake-without-visual-change/page__p__198101__hl__%2Bred+%2Bsound__fromsearch__1#entry198101 Paul
-
997.1 GT3 tires Continental ExtremeContact DW
PAULSPEED replied to tagman's topic in 997 GT3, GT3 RS
I see what your looking for. I feel you would be better keeping your wear rating between 220 to 260. If your wife is driving, and she pushes it because of someone else, the car could brake loose and spin. Even I have spun the car on the track with the computer on. Good luck on your decision. Paul -
997.1 GT3 tires Continental ExtremeContact DW
PAULSPEED replied to tagman's topic in 997 GT3, GT3 RS
The Pirelli P zero tires have two choices. The Corsa have a hradness of 60 and the Rosso (N1 or N2) tires are 220. I went with the Rosso's and they are holding up pretty good for the street. They do make alot of wheel noise and slide alot on the track. Look at tire rack for some 220 tires. www.tirerack.com Paul -
Console Spring
PAULSPEED replied to PAULSPEED's topic in DIY Articles - Carrera (997-1) - Common Fixes and Repairs
At Sunset Imports. Very good prices. I buy all my parts from Sunset. Paul -
http://www.zone77.org/?q=node/109 Paul
-
Adding a sway bar to the rear took about one hour. Not very hard at all. I did not do the front one. I was told by a race mechanic that you have to remove the radiator hoses to get to the bolts that hold it on. I also heard that you can push the hoses out of the way to get to the bolts. It is not as easy as the rear. Paul
-
I added a rear sway bar to my car. Very easy thing to do. The car tracks alot better. The stock sway bar caused the inside front wheel to raise above the road so it did not help withgrip. I also added some shims to the bottom toe arms to give it a more than stock race setup. This helped with high speed turn ins. The high speed turn-ins are now more crisp then before. Paul
-
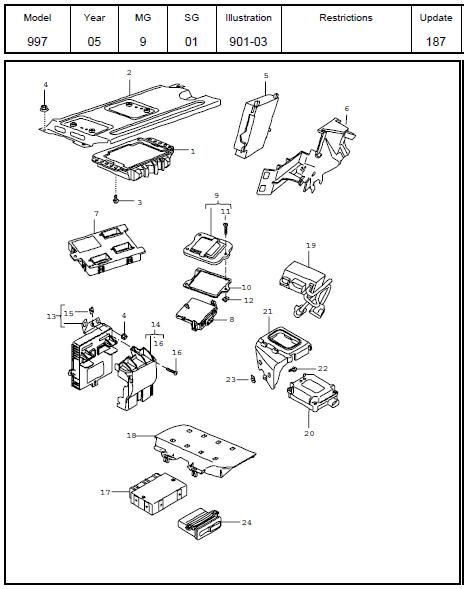
PDC control unit
PAULSPEED replied to braymond's topic in 997-1 Series (Carrera, Carrera 4, Carrera 2S, Carrera 4S)
It is part 24 in the picture. I would assume that it is in the front trunk. Paul
-
Maybe it is part number 10 that needs a turn. Paul
-
Maybe a monsoon that dumps about 5"inches per hour. Paul
-
I think it's if someone shot a load of water thru your air filter. Paul
-
I once read a real good DIY on how to paint your calipers red. It sounds like your dimensions might be smaller. Paul
-
The brake pads are bigger on the S. When I order bakes, I need to tell them that it is for an S car. I have plenty of pads so I just measured them and here are the numbers. The Front ones should measure 5 1/2" and the rears are 4 3/4" inches. Good luck. The hardest part of doing the brakes is removing the wheel. Paul
-
Air conditioner
PAULSPEED replied to oskibear's topic in 997-1 Series (Carrera, Carrera 4, Carrera 2S, Carrera 4S)
I once read that the heater and the air conditioner work at the same time. Maybe the settings are not right on the heater side. Is there any difference in auto mode verses manual mode? Paul -
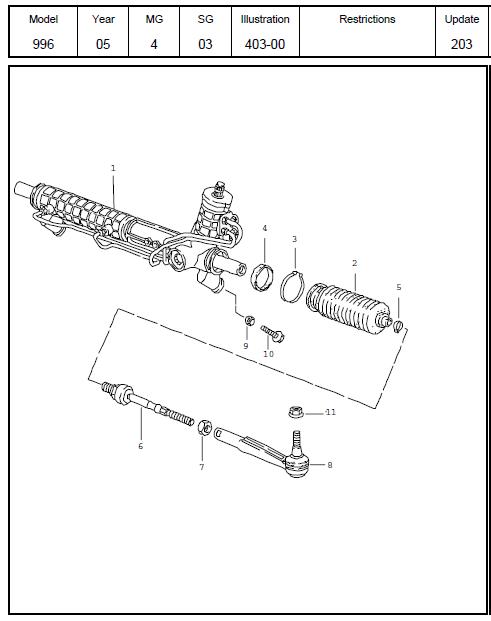
Steering Rack Replacement
PAULSPEED replied to TomCat's topic in 996 Series (Carrera, Carrera 4, Carrera 4S, Targa)
Here is a picture. Paul