Welcome to RennTech.org Community, Guest
There are many great features available to you once you register at RennTech.org
You are free to view posts here, but you must log in to reply to existing posts, or to start your own new topic. Like most online communities, there are costs involved to maintain a site like this - so we encourage our members to donate. All donations go to the costs operating and maintaining this site. We prefer that guests take part in our community and we offer a lot in return to those willing to join our corner of the Porsche world. This site is 99 percent member supported (less than 1 percent comes from advertising) - so please consider an annual donation to keep this site running.
Here are some of the features available - once you register at RennTech.org
- View Classified Ads
- DIY Tutorials
- Porsche TSB Listings (limited)
- VIN Decoder
- Special Offers
-
OBD II P-Codes - Paint Codes
- Registry
- Videos System
- View Reviews
- and get rid of this welcome message
It takes just a few minutes to register, and it's FREE
Contributing Members also get these additional benefits:
(you become a Contributing Member by donating money to the operation of this site)
- No ads - advertisements are removed
- Access the Contributors Only Forum
- Contributing Members Only Downloads
- Send attachments with PMs
- All image/file storage limits are substantially increased for all Contributing Members
- Option Codes Lookup
- VIN Option Lookups (limited)


Halo
-
Posts
52 -
Joined
-
Last visited
-
Days Won
1
Content Type
Profiles
Events
Forums
External Paint Colors
Downloads
Tutorials
Links Directory
Collections
Classifieds
Store
Everything posted by Halo
-
Bumper plugs.... looking for ideas
Halo replied to itzbob46's topic in 986 Series (Boxster, Boxster S)
Good thread, After I was reading this thread, I was at Home Depot. I saw the bin in the hardware section that said "plastic plugs" (it's where they sell the loose hardware) I said to myself "No, this ain't right" but I bought them anyway. They came 2 to a pack and were white. (.54 cents) I put some touch up paint on them and I have to say, not bad. the only thing is that I bought the wrong size 1/4 inch. I should have bought 3/8. I will, at .54 cents you can't go wrong. The way I look at it, it only has to look good from a distance. I will post a picture after I get the new plugs. Thanks again for the insights. -
I finally had to replace the MAF, seems to have fixed it. I will check it with the Durmetric later in the month. thanks everyone for the input. Halo
-
Mine was out about an 1/8th of an inch. At 1/4 inch, I can see your predicament. good thing to keep in mind. Kind regards, Halo
-
SB01box, I aligned the cables with the tool in place. The green tool was already in place when I opened the box. I left it in that postion (opening towards left). A little pull, not much, was used to align marks to original position with green tool in place. I don't notice any longer throws from either gate as pictures indicate. 1st -2nd or 3rd - 4th are the same 5th and reverse, who cares? kind regards, Halo
-
If it shifts fine, then just leave it alone. I reported having to pull the cable a little because that was my experience. aligning the cable marks seems to have to work for others so that is what I went with. (lessons learned) I was also going to realign it with the green tool in place just for fun but why bother, it works. After getting adjusted to the new throws, I really like it more and more. Halo
-
Baconaire, I posted my install pictures here. seems like a hot topic lately. 9x7 OEM shift assy Enjoy, Halo
-
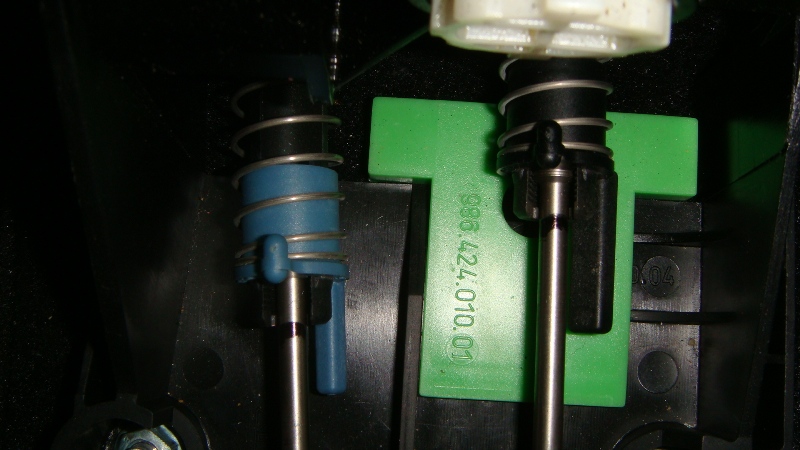
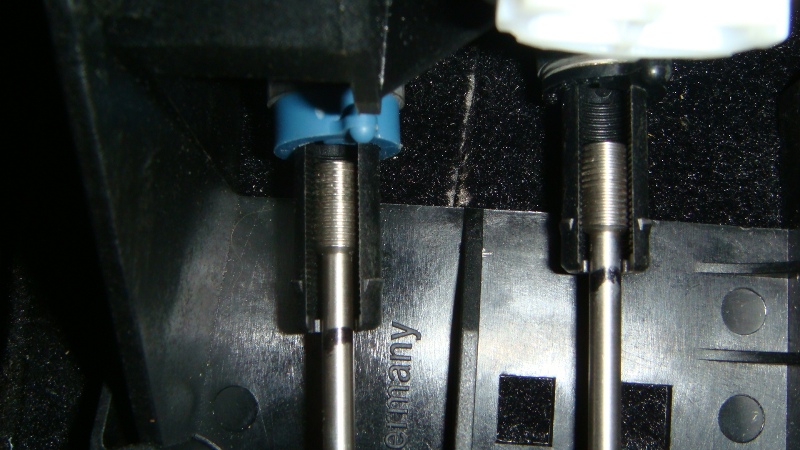
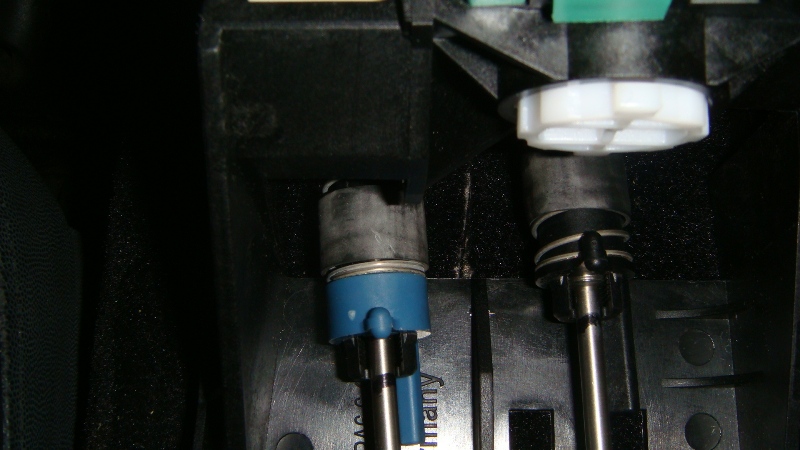
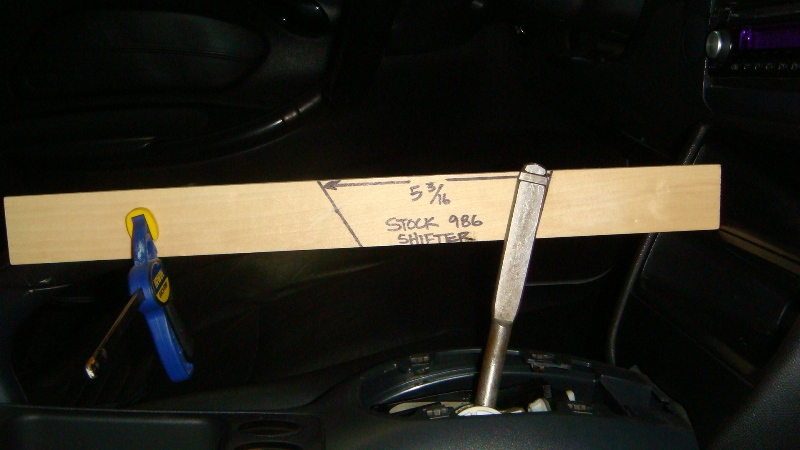
Clickman, here are the photos of my install. once you get the console removed (B&M instructions) you will be staring at your shifter assembly. I marked the cables at the end of each shift link connections. next, I removed the original assembly and popped out the cables from the sockets. now it was time to install the new shift assy. With the "green" shift tool in place snap the cable ends in place. Note: I had to pull the left cable into place a little to match the marks, they just did not align perfectly with the tool in place. Probably about 3/16 difference. I should have taken a picture of it (sorry). but it was not difficult. next , lock the cables into place and test out your shifter before you put everything back together. Now for the results: original shifter throw measured from the top of the stick. I measured from this point of reference because thats where the shift know would located in your hand. (2nd and 4th) Here is the difference. Again measured from the top of the stick. FYI, the stick was in the same position clamped to the hand brake. The "black" lines are the original, the "blue" lines are the new shifter. Now, was it worth it for $161.00, I think so. I did not want to do the shift kit and it was way eaiser and less expensive. I also like the way it shifts, not that much play in the throws. it goes into 1st a little eaiser on the downshift for me. one last thing, it doesn't wiggle that much in netural either. Have fun, Halo

-
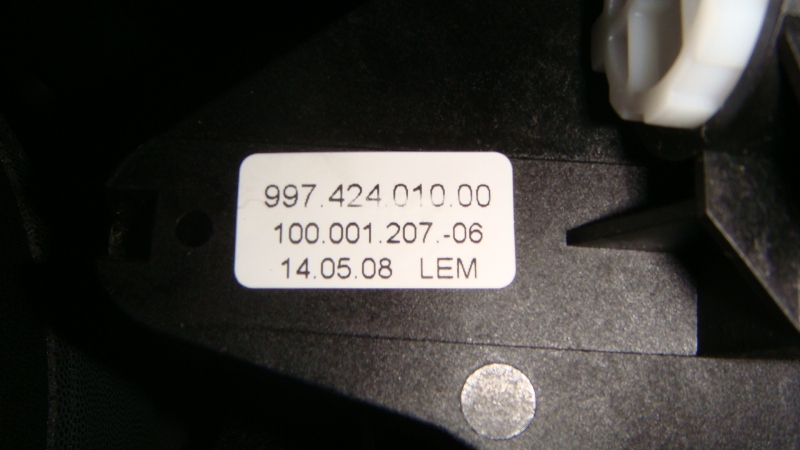
clickman, stay tuned. I also made the switch and installed the 997 (99742401000) OEM shifter. It is exactly the same one you have in the link, only I bought mine from Sunset Imports. I took pictures and measurements to show how much shorter it is than the stock shifter. I have just been busy upgrading my computer to upload my experience. kind regards, Halo
-
Thanks for the input Pokerstar. I cleaned the MAF a while back and all is fine now, it was pretty dirty. I used the MAF cleaner from Pep Boys. no CEL lights yet. kind regards, Halo
-
For the Boxster owners, the photos are now attached. DIY Upgraded Ignition Switch/Lock Installation for 996/Boxster Enjoy, Halo
-
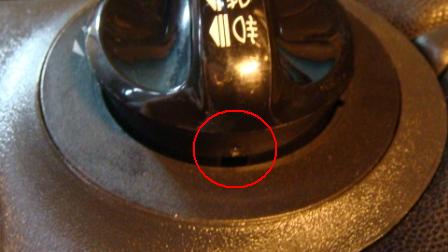
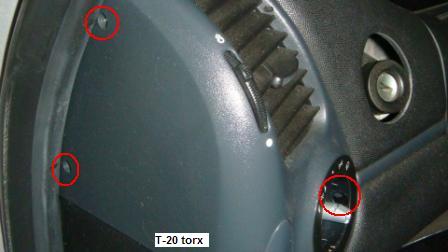
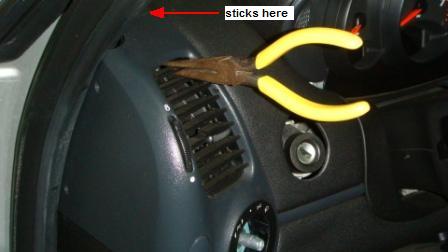
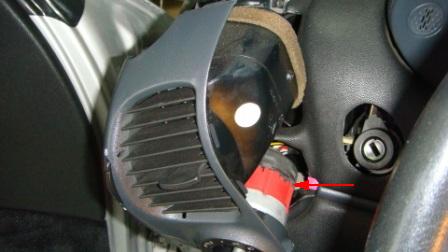
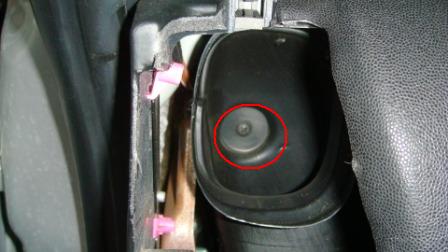
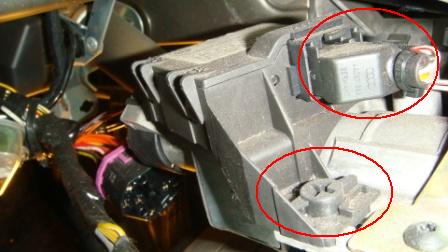
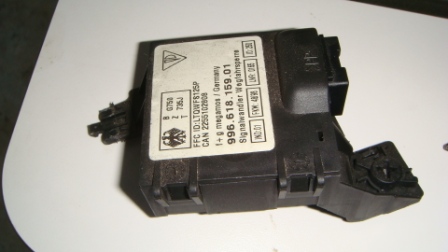
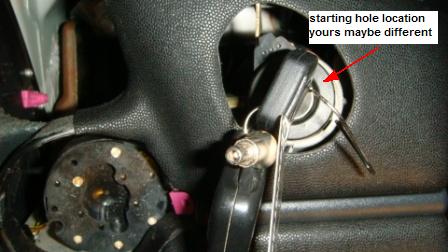
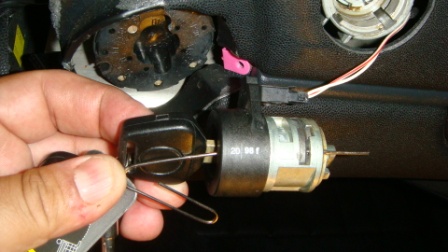
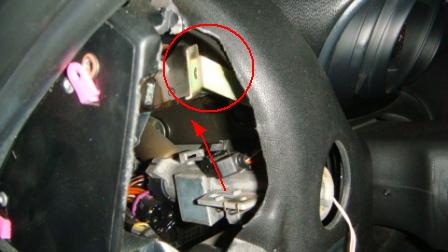
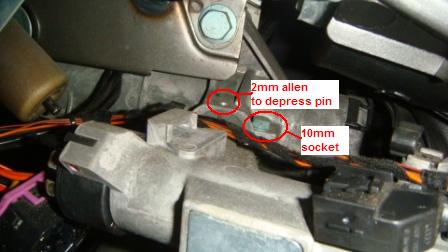
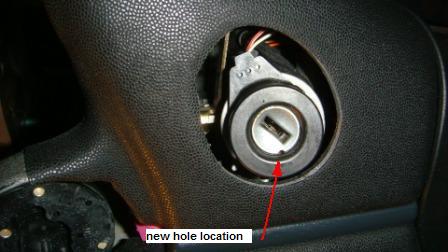
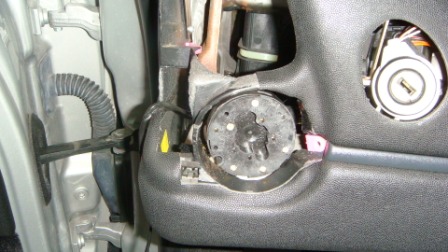
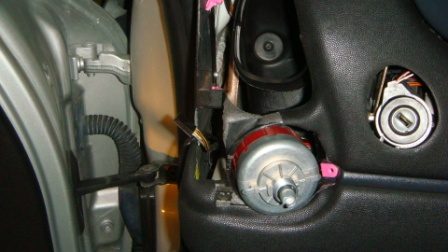
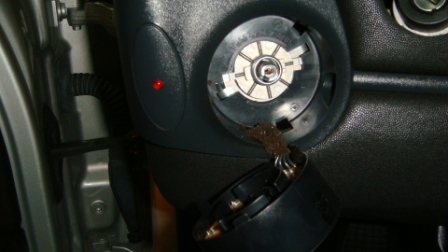
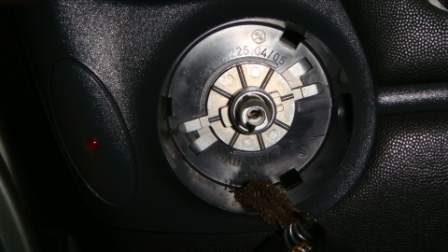
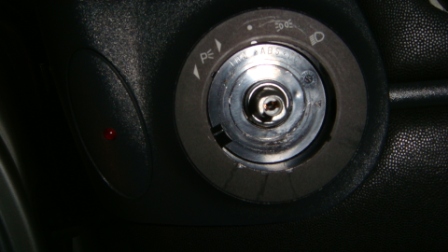
Thanks dmcole for the write up, great job. I would like to incorporate my photos to your words. I hope I don't butcher it. When putting things back together I did something a little different as my light switch did not have enough wire length. First things first: 1) Completely disconnect the battery. I can’t prove that total disconnection was necessary, but I also didn’t have the alarm go off suddenly. Better safe than deaf or shot by the neighbors. 2) Remove the rubber gasket around the ignition key. I could pull mine off just using my fingers. 3) Remove the left hand vent. There’s a nice writeup on this already; so I won’t repeat all of that here. http://www.renntech.org/forums/index.php?a...ost&id=6617 Here are the basic steps from the link: Insert narrow screwdriver into hole under the switch. Turn blade up, not flat. Here is what it looks like from the backside. Remove 3 screws from the above areas. Give a gentle pull from the top. mine was a little stuck. Disconnect plug connection, I had to pry with a screwdriver as my wires were not long enough to let my hands get behind the vent. keep this in mind as we get to the end of this DYI. 4) Once the vent is removed, remove the screw straight in the back back that holds the vent tube in place. 5) Now reach or crawl under the dash and remove the center horizontal vent tube under the steering column and the vertical one you just freed up in the step above. 6) Put on a long sleeve shirt. After working through the vent hole for a couple of hours, my forearm is pretty beat up today. I’ll save you the same realization… You’re now ready to start working on the issue at hand. 1) Reach to the back and disconnect the wiring harness from the ignition switch. It just goes straight off the back; no special clips there and don’t twist it. Looking through the vent hole A little closer look. 2) Remove the immobilizer. It’s the black box on top of the steering lock housing. Unclip the little wiring harness on the front right. This one has a little catch on it so don’t just pull it out. There is a little plastic Phillips head near the key that you give a quarter-turn. Mine had ‘wings’ on the Phillips head that I could turn by hand. Once you’ve turned this, slide the immobilizer straight toward you along the top of the steering lock housing. That will free it up to remove. Here is what it looks like removed. 3) Remove the key cylinder. Around the key hole is a silver beauty ring. Around the edge of that ring is a small hole. Make sure the hole is near the 7 o’clock position instead of near 1 o’clock. Mine had turned 180 degrees at some point and made this cylinder removal impossible until I figured that out. Insert your valet key (it’s just easier, but your regular remote key will work) and turn to position 1. Now stick a straightened paper clip (I used one of the larger, sturdier clips instead of a standard one) in as far as it will go. The cylinder should virtually fall out if you’ve done this right. If you’re having to tug on the key to pull it, try again. Carefully disconnect the electrical clip from the key cylinder. Leave both the key and clip in the cylinder and set the thing aside. My switch was in the 1 o'clock position when I started but went back in at 7 o'clock position.??? 4) Disconnect the steering lock housing mounting screw near the key. This requires the same Torx bit you used to remove the side vent cover. I didn’t have a stubby Tork driver; so I clamped the bit into a pair of needle-nose Vise-Grips to get it loose. Once loosened, I could unscrew it by hand. Once the screw is out, swing the vertical mounting strut up and out of the way. 5) Disconnect the mounting bolt next to the steering column. A small 10mm ratchet worked for me. I didn’t have to put a wrench on the nut, but I had to use a bit of hand work to finally get the nut off and the bolt out. 6) Remove the steering lock housing. The trick here is that there is a spring-button that locks the housing into the steering column. You can see what you’re up against by looking at your replacement part. You depress the spring through a small hole on the steering column. I used a 2mm allen wrench to depress the button so that I could wiggle the housing out. Now you need to prep the new part. 1) Remove all of the clips from the old housing and attach them to the new one. There is a metal clip that secures the mounting screw near the key hole and two plastic wiring guide clips. I removed the plastic clips by punching out the center pins from the bottom (they are small and actually come completely out; don’t lose them) and then carefully squeezing the prongs until the clip came off. Attach them to the new part. 2) Put a little lubricant (just a light surface wiping, nothing more) on the housing surfaces that insert into the steering column. Install the new steering lock housing: 1) If the shiny silver steering lock ‘spear’ is extended from the housing, use a large flat blade screwdriver in the center of where the key cylinder would go and simulate turning the car on. This will retract the spear. 2) Insert the end of the housing into the steering column. This was the hardest part for me. I don’t know if the new part was just thousandths of an inch bigger or what, but it was 20 minutes of wiggling and jiggling that thing to get it in. Don’t forget that you will have to depress the little spring pin once it gets to the flange. I wasn’t sure I heard the spring pin pop into place in that hole; so I crawled under the dash to inspect it to be sure I seated the thing completely. 3) Replace the mounting screw near the key hole. By the way, I never replaced the 10mm bolt at the steering column. I couldn’t figure out how to restart the nut on the bolt, plus with that spring pin engaged, I can’t see how the housing could ever come out under normal use. 4) Reconnect the wiring harness to the ignition switch in the back. 5) Reconnect the immobilizer and its wiring clip. 6) Push the key cylinder in firmly (aligning it in the little guide on the top left of the steering lock housing) and pull the paper clip. It should be secured. Remove the key. Reconnect the tiny wiring clip to the key cylinder. 7) Reconnect the battery. 8) Start the car at this point to ensure that you’ve done everything right. If the car won’t start, something didn’t get reconnected properly or you have a different issue. Note: it is not necessary to have the headlight switch reassembled to start the car. If the car starts at this point, start replacing the rest of the stuff you pulled out. Start with the vent tubing. It was helpful to loosely attach the vertical tube with its screw before reconnecting the horizontal tube underneath. Once done underneath, tighten the vertical tube and replace everything else. Be very careful with the headlight switch reattachment as that lighted ring looks pretty fragile and the little bulbs have to fit exactly right into the plastic ring that covers it. Start ‘er up and hope that the new part is a thousand times more reliable than the one you replaced. Additions: Below are a couple of steps that I went through to put back the vent and light switch back together. I removed the switch from the vent and attached it back onto the plug. Insert the switch through the vent assy and twist to lock into postion. make sure that you connect the remaining ring plug and replace vent and screws. reattach the ring and put the nut and knob back on. now go get some Band-Aids to cover your banged up knuckels. :lol: BTW the part cost me $135 but if you plan in advance you can get much cheaper at Sunset Imports. I am not sure what I would have saved in labor. It was a fun project that took me a bit longer due to photos and dinner. (4 hrs) Enjoy, Halo
-
Loren, finished the DYI last night, took a bunch of photos of the steps that were involved and some that were not covered. my question is, should I create a PDF or would it be better to add the photos right into the thread? I would post in the my experience in the original location "DIY Upgraded Ignition Switch/Lock Installation for 996/Boxster" please advise, Halo
-
Thanks Loren, I looked at the TSB for the replacement number and I am going to attempt to replace the whole switch assembly. charging the camera battery to post any additional photos if possible. Halo. :renntech:
-
My ignition switch finally failed. when I try to turn off the car to positon 0, it feels mushy, not a positive click. I can remove the key but the car remains on. I had to disconnect the battery or it would go dead. I searched this site and found the following resolutions. 1. replace the ignition switch with a $15 part. 2. replace the entire assembly with the new assembly, $120+ (was an older thread) I went to a local independent service/parts/dealership and they told me that if the switch did not turn to the position 0 that I might have to replace the entire assembly. but he could order the part or the entire assembly for me during the week. I recently bought the Bentley manual that will arrive on Tuesday. Can anyone tell me if this manual covers changing out the entire assembly if required? I am going to attempt the switch first. if that does not work, I want to be sure that I can start my car into the service bay the event that it is something that will require some type of special tools or something. From what I have read, no special tools are required. just getting under the dash will be the hard part. probably removing the driver seat will be required too. Kind regards, Halo
-
UPDATE: to quote myself ftom an earlier thread, "I am also wondering if faulty ignition switch can cause this anomaly? Funny things have been happening at start up i.e. turn the key, wait 3 seconds and it fires up but not all of the time, only once in a while. One morning it sounded like the battery was going die, which was a first. " well, my ignition switch died. so after all it may have been a little of both things going wrong at the same time MAF (dirty) and ignition switch (failure). BTW, CEL lights have not returned after cleaning. Halo
-
Okay, I just ordered a 997 shifter assembly today from Sunset Imports ($161) as well as some other parts. They said that customers have been ordering these quiet a bit latley. He has heard from customers claiming a smoother shift than the stock shifter. like Baconaire said "Looking for smoothness more than anything" and a little shorter throw wouldn't hurt. I'll probably put it in next month while I am on vacation. I'll post my results. Halo
-
ekam or anyone else, Do you know if the part you referenced from Suncoast is OEM or aftermarket (looks to be OEM)? The reason I ask is that I cannot figure out why a complete 997 assembly is cheaper than a B&M shifter only? Seems like too good to be true. I am looking to replace my boot and shifter soon. While I am at it, I might as well try the 997 shifter as I am also in search of smoothness and shorter throws is a plus. I know nothing of Suncoast as I usually order from Sunset Imports. I have heard good feedback from both vendors on this site. Kind regards, Halo
-
Loren, thanks for the quick reply. The oil filler tube was replaced at 60k, probably not that. I'll take a closer look at the AOS to see if anything is leaking or appears to be starting to. The MAF was pretty dirty. I followed the procedure on Mike Focke's site, cleaned it, put it back in. The wife and I just got back from a 40 minute, after dinner run on Pacific Coast Highway......no CEL lights. Kind regards, Halo
-
UPDATE: here are my findings. After searching other posts, it seems like I should start by cleaning my MAF sensor and see if it comes back. As for my air bag light, the software allowed me to clear it without doing anything (cleared, no faults) if it comes on again, I guess I'll have to clean the contacts and reset. My battery, it is on 3.5 years old on a 85 month Interstate, I guess the previous owner did not want to mess with battery issues either. Going to Autozone to have it tested to see how much life I have in it, while I pick up some Contact/MAF cleaner.
-
software and cable arrived today. I will post my findings. Halo
-
I am usually a voyeur on this site (only 5 posts) but I thought my recent experience might have happened to someone else. I bought a used MY99 Boxster about 2 years ago and really haven’t done much to it other than the scheduled maintenance, new tires, aftermarket stereo/speakers upgrade and DIY brake job. This past Saturday I got my first check engine light. Not to panic, I told myself, now I have to purchase the Durametric software & cables to check the codes. As soon as I got home I made the purchase. I have been procrastinating this purchase for a while as I also have an airbag light on too. (not the first time, dealer replaced harness during 45K maint.) I went to lunch today and guess what, NO check engine light? Will the Durametric be able to detect past events? I am also wondering if faulty ignition switch can cause this anomaly? Funny things have been happening at start up i.e. turn the key, wait 3 seconds and it fires up but not all of the time, only once in a while. One morning it sounded like the battery was going die, which was a first. I am not sure if these two events are related. I'll keep you posted. Kind regards, Halo
-
Going to do the same thing soon. Did you disconnect the battery before you cleaned the connections? I have an aftermarket stereo, so no worries there. Kind regards, Halo
-
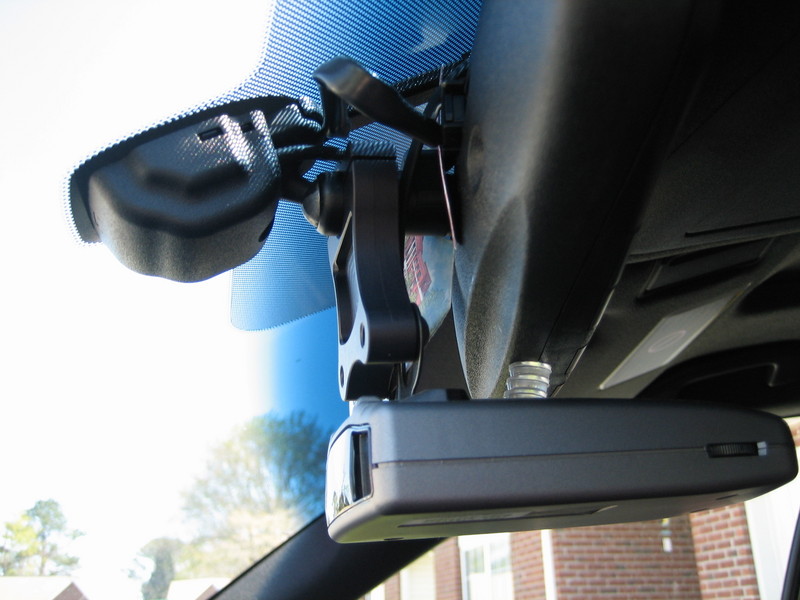
here is something I found from another thread on another site. I am not sure if the mounting pattern works for you but it's a thought. http://www.countryjoycrafts.com/ConnectorF...darDetector.htm here is what it looked like on this guys car. Kind regards, Halo
-
I think you posted in the wrong topic. Kind regards, Halo
-
I just glued mine shut using "canopy" glue. This is used to secure clear plastic canopy on an RC airplane. it goes on white and dries clear and best of all no rattles. when I take it in for service, the remind me that they are broken and I remind them they are now fixed. I have no need to see myself in a mirror. Kind regards, Halo