Welcome to RennTech.org Community, Guest
There are many great features available to you once you register at RennTech.org
You are free to view posts here, but you must log in to reply to existing posts, or to start your own new topic. Like most online communities, there are costs involved to maintain a site like this - so we encourage our members to donate. All donations go to the costs operating and maintaining this site. We prefer that guests take part in our community and we offer a lot in return to those willing to join our corner of the Porsche world. This site is 99 percent member supported (less than 1 percent comes from advertising) - so please consider an annual donation to keep this site running.
Here are some of the features available - once you register at RennTech.org
- View Classified Ads
- DIY Tutorials
- Porsche TSB Listings (limited)
- VIN Decoder
- Special Offers
-
OBD II P-Codes - Paint Codes
- Registry
- Videos System
- View Reviews
- and get rid of this welcome message
It takes just a few minutes to register, and it's FREE
Contributing Members also get these additional benefits:
(you become a Contributing Member by donating money to the operation of this site)
- No ads - advertisements are removed
- Access the Contributors Only Forum
- Contributing Members Only Downloads
- Send attachments with PMs
- All image/file storage limits are substantially increased for all Contributing Members
- Option Codes Lookup
- VIN Option Lookups (limited)


vza
-
Posts
454 -
Joined
-
Last visited
-
Days Won
1
Content Type
Profiles
Events
Forums
External Paint Colors
Downloads
Tutorials
Links Directory
Collections
Classifieds
Store
Everything posted by vza
-
Hi all, Thought I posted this but don't see it anywhere. I'm deleting headlight washers on my 08 project boxster. I just unplugged and removed the headlight washer pump. Will I get any error messages. Also...Need to glue/tape my thresholds down. Porsche had this amazing double sided tape that made it hell to remove the thresholds. What can I use to install them ...was thinking of this stuff called Goop ...works on plastic and fiber glass or 3m 5200 marine adhesive. Also...need a diagram of frunk lock and cable routing solenoid install. I forgot how it all went back. Thanks V
-
Hi All, Adding a center radiator to 08 Boxster (I thought) and having problems with getting the correct parts. I have the following parts BUT can't find the correct trim piece that fits on the bumper that snaps into the retaining frame that sits behind the bumper. The trim piece is too small for the retaining frame but the retaining frame fits the air duct coming from the radiator. Here are my part #'s. Thanks V Radiator 997 106 037 02 Air Duct 987 575 323 01 Retaining Frame 987 555 501 01 Trim(too small) 987 505 551 00 G2X The Radiator comes up for a Boxster, Air duct and retaining frame comes up as a Cayman and the Trim comes up as a Boxter. Apparently there is no trim piece for the Cayman.
-
HVAC Display 08 Boxster
vza replied to vza's topic in 987-1 Boxster Convertible Top Issues and Solutions
Do you know if it would effect any HVAC controls if I left in the display with the incorrect graphics. -
HVAC Display 08 Boxster
vza replied to vza's topic in 987-1 Boxster Convertible Top Issues and Solutions
This is the part off of ebay. Not sure if that would help. Thanks V https://www.ebay.com/itm/266159555586 Also purchased Allway part from Amazon had the same results. They're pix show the HVAC with 'Auto' climate control my unit dosent have auto, maybe that's the issue. -
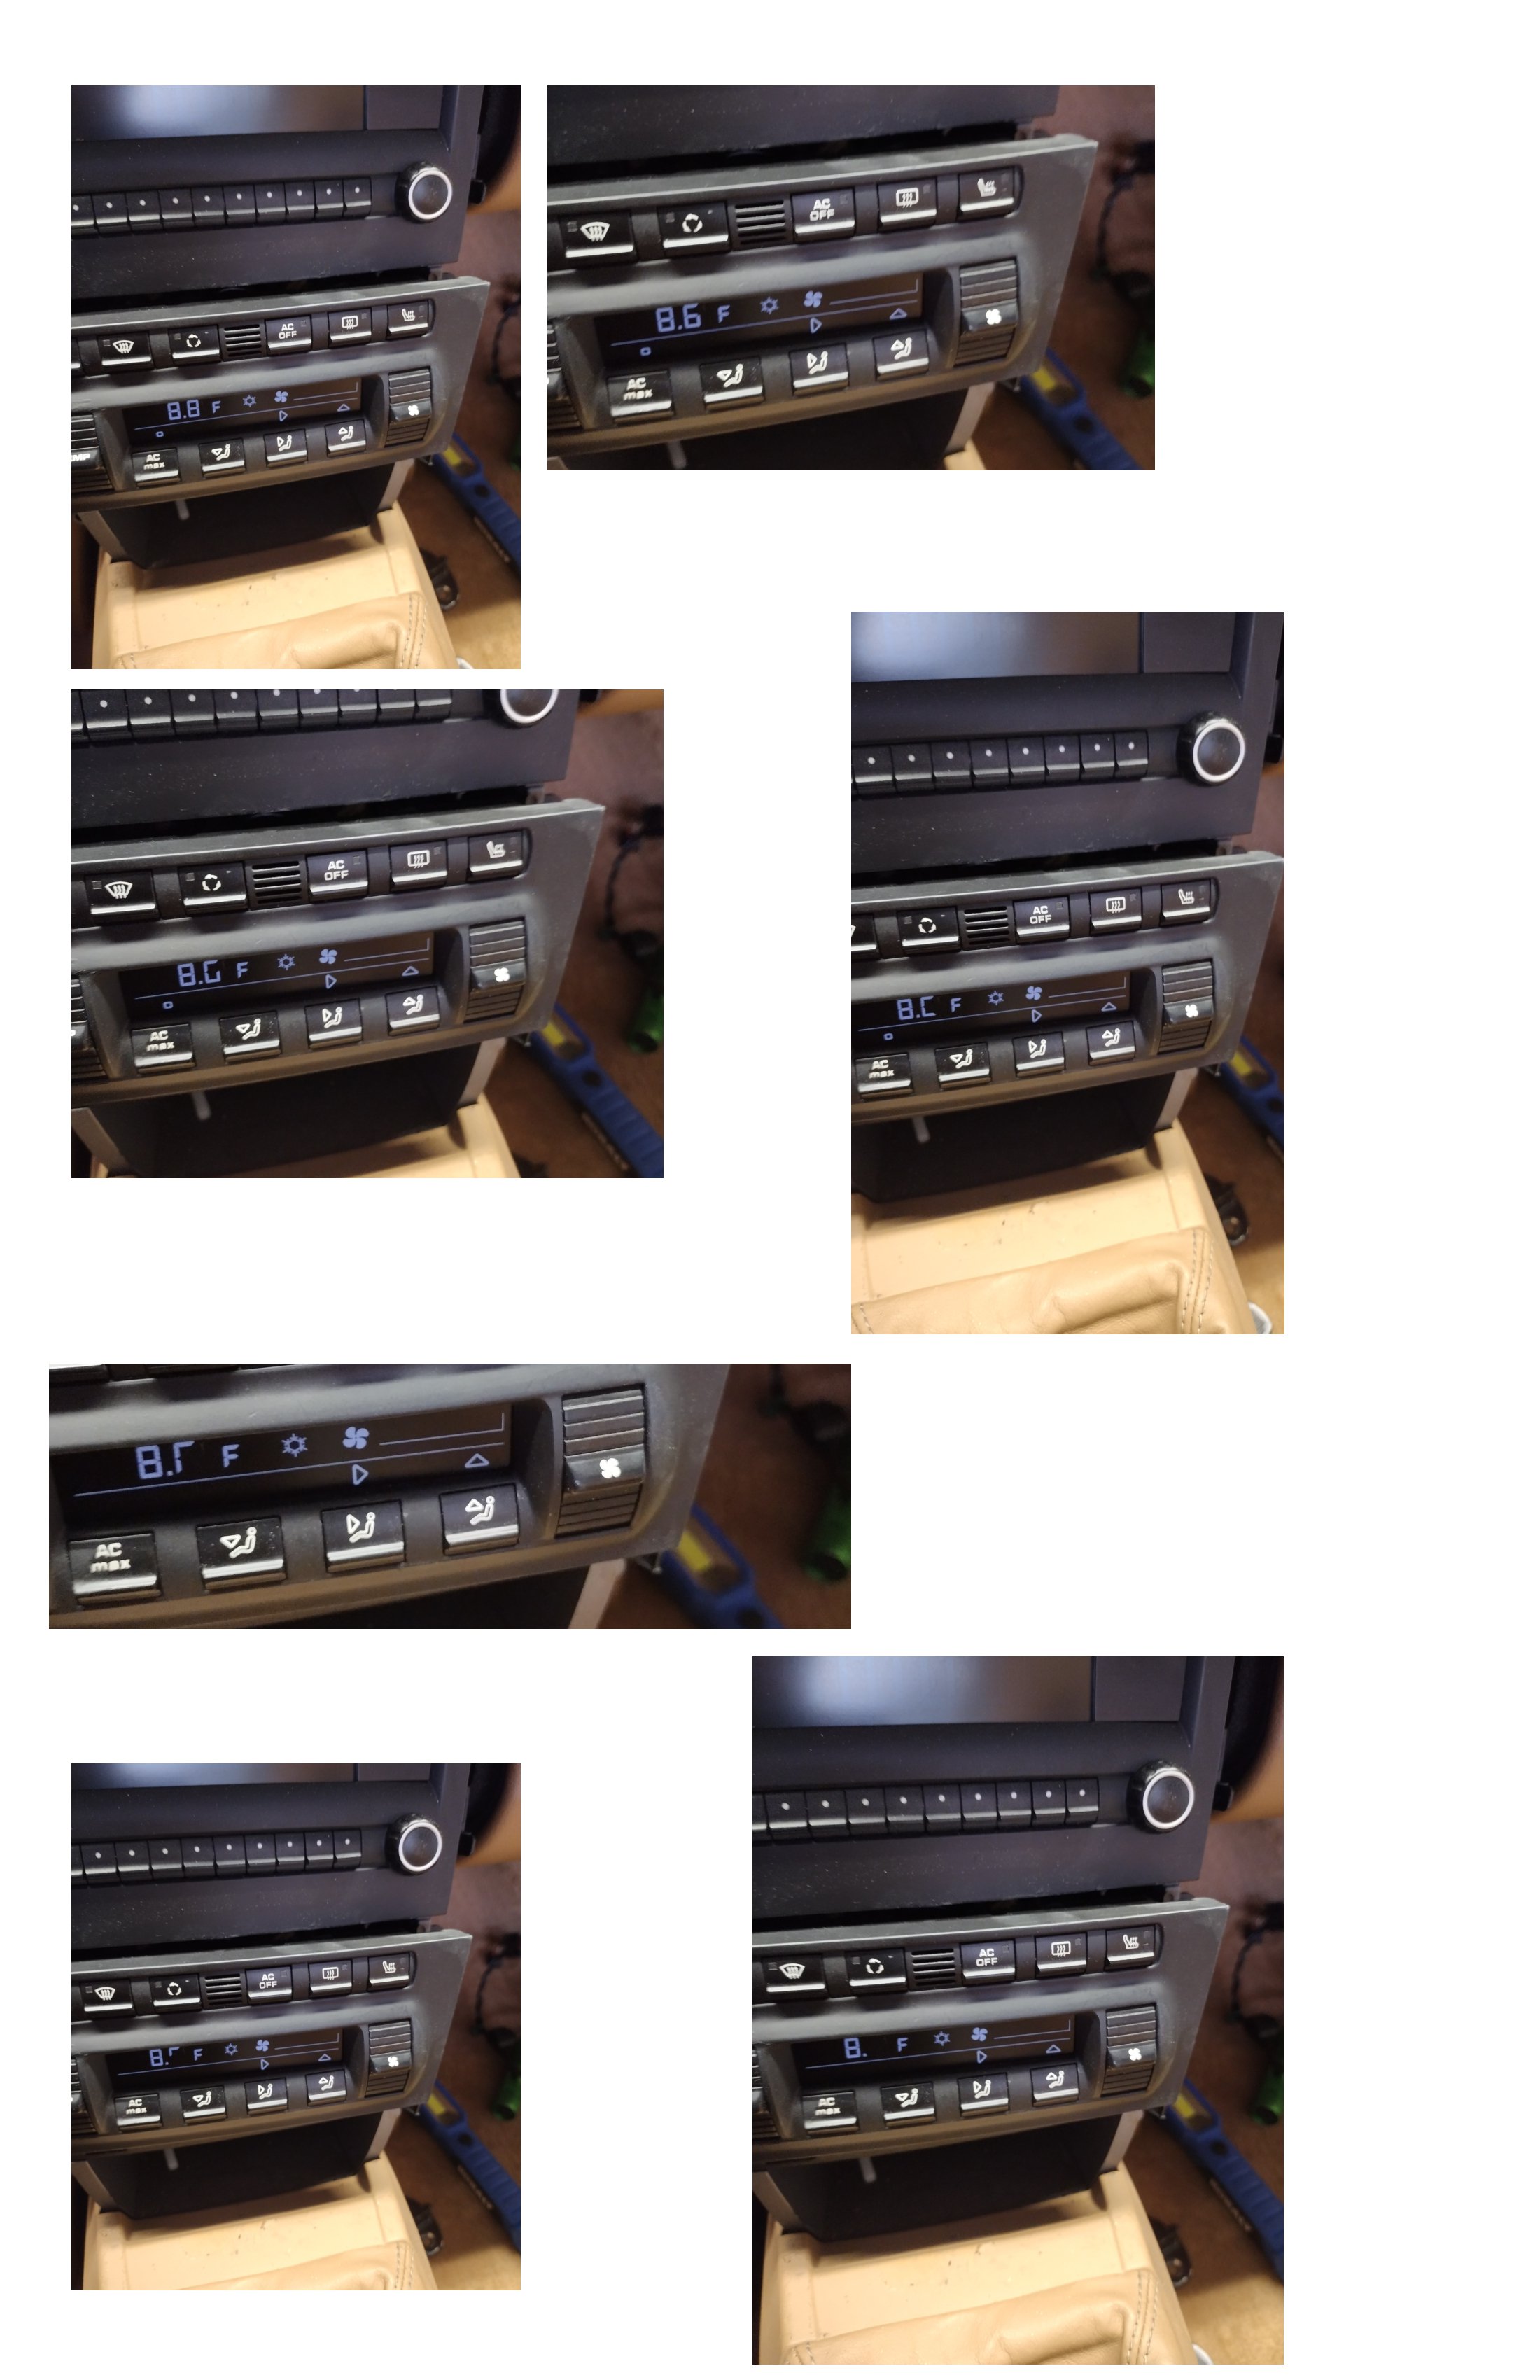
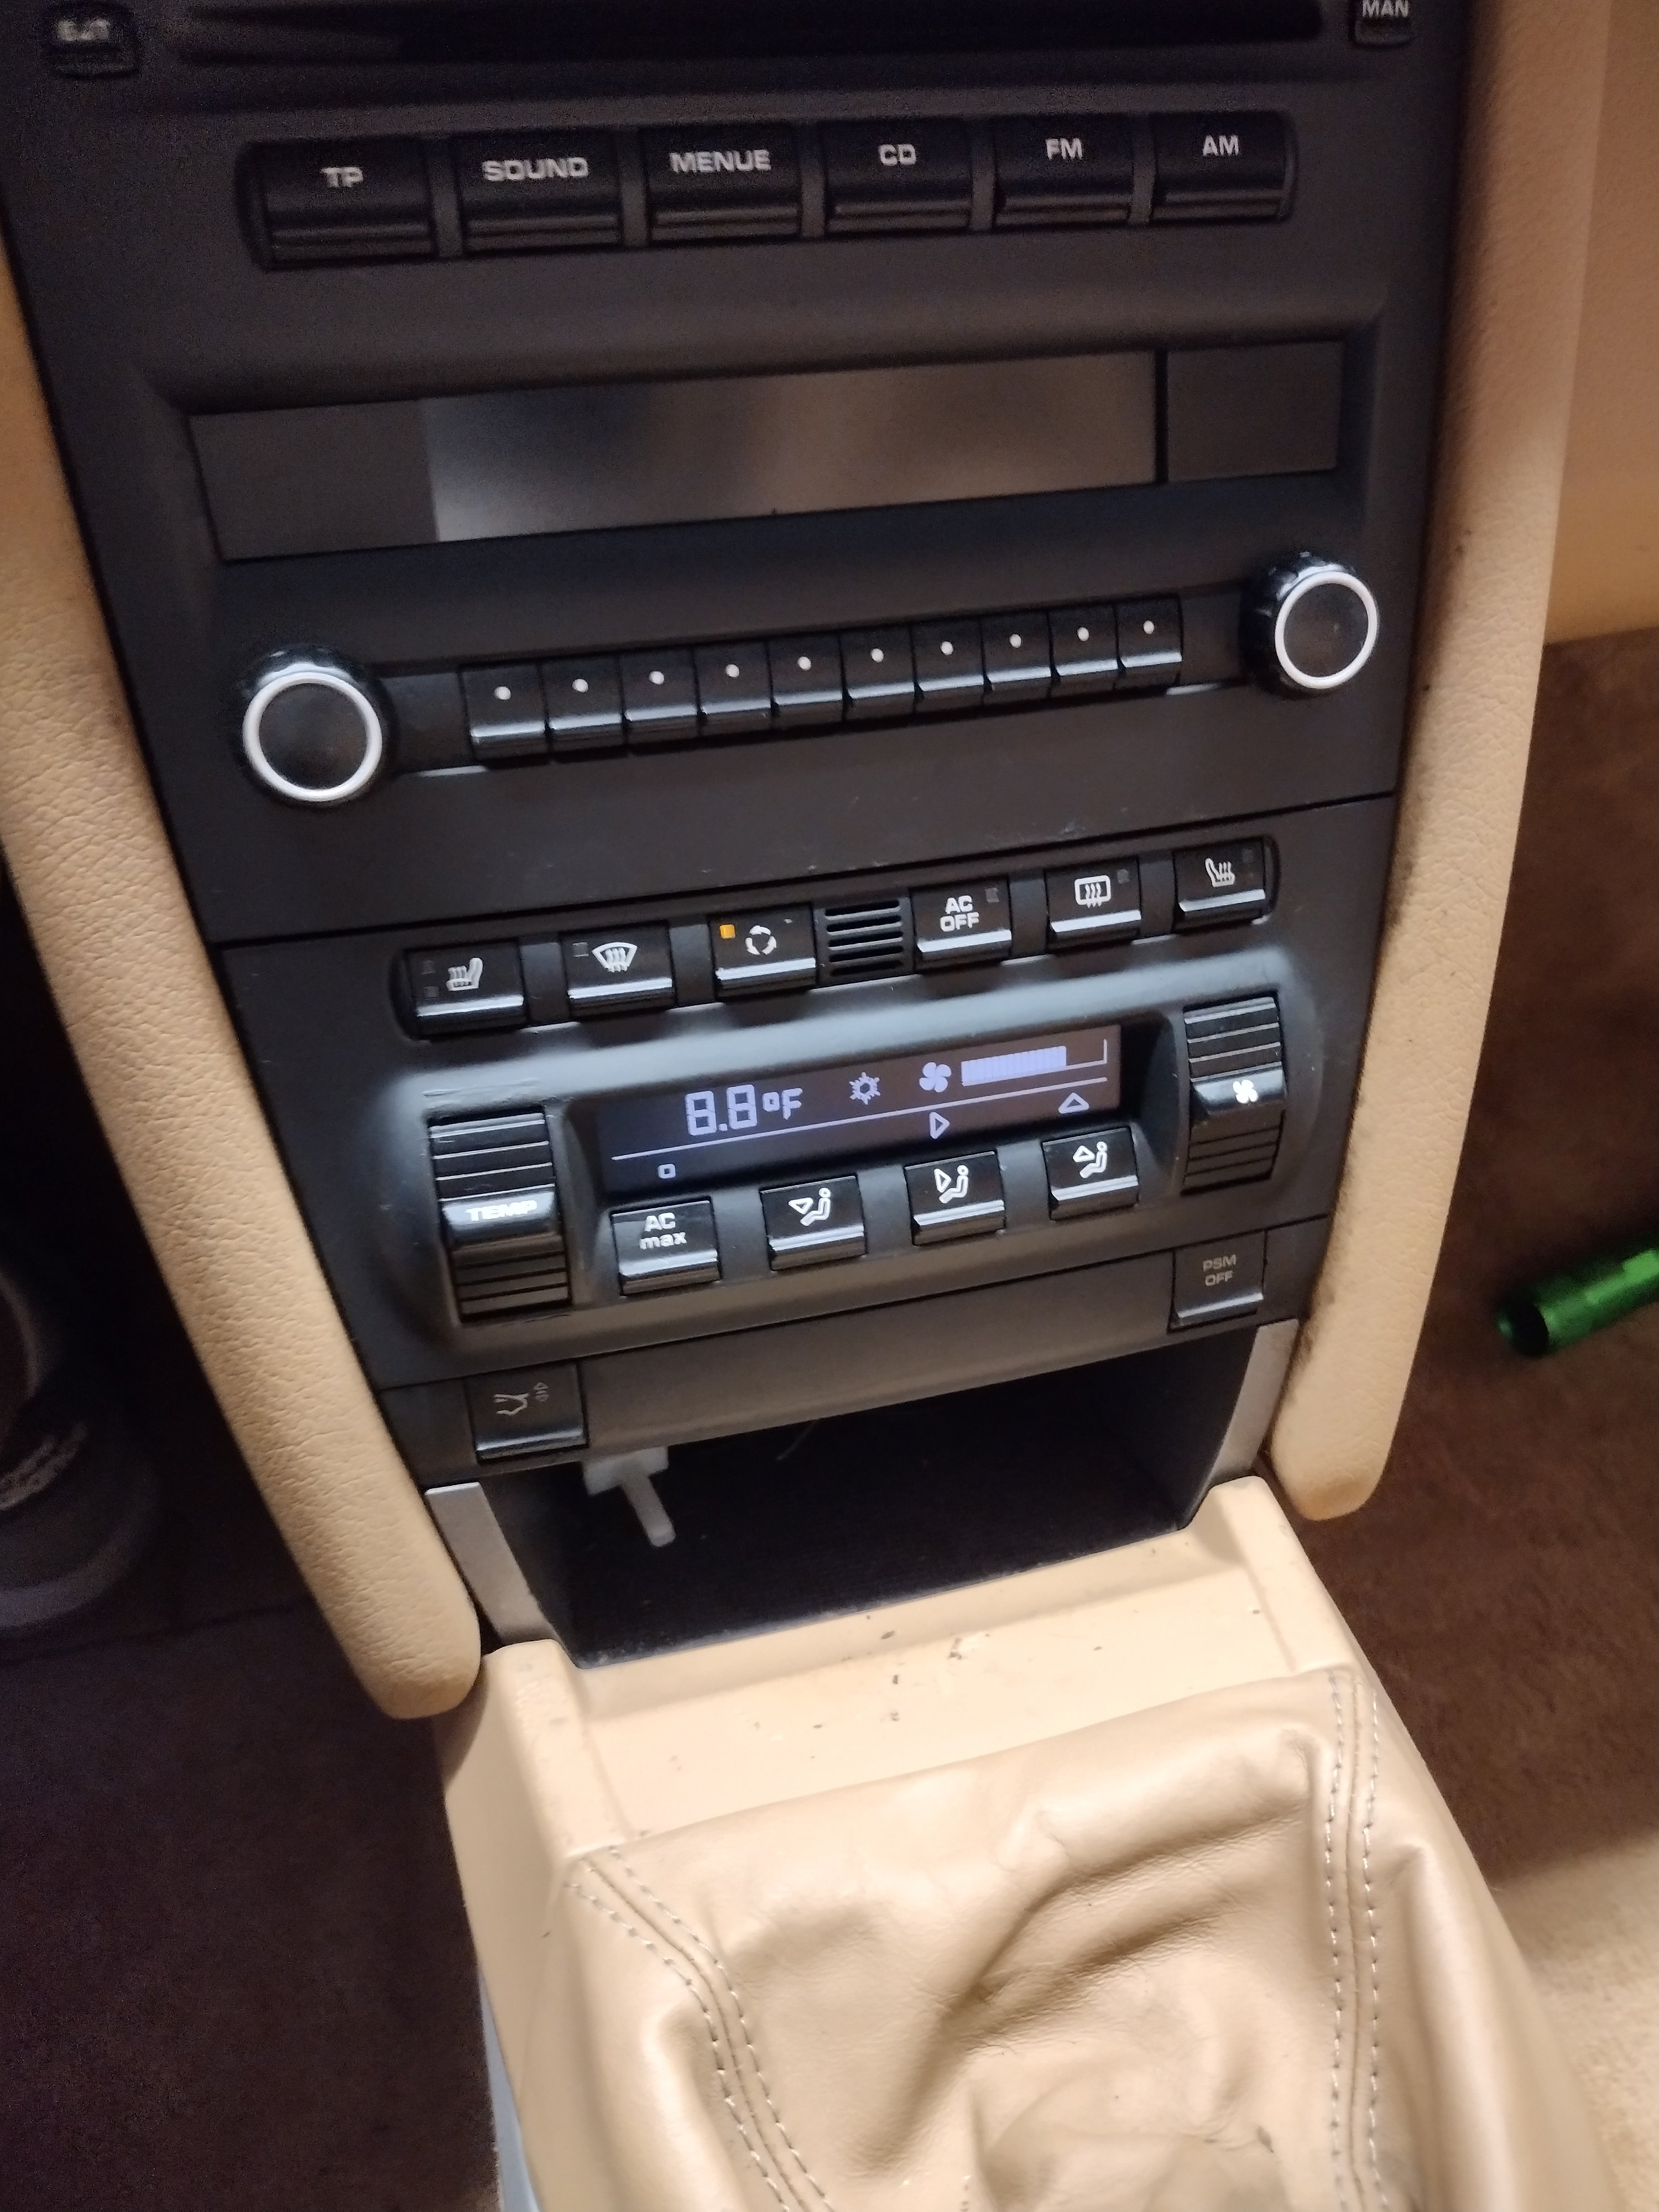
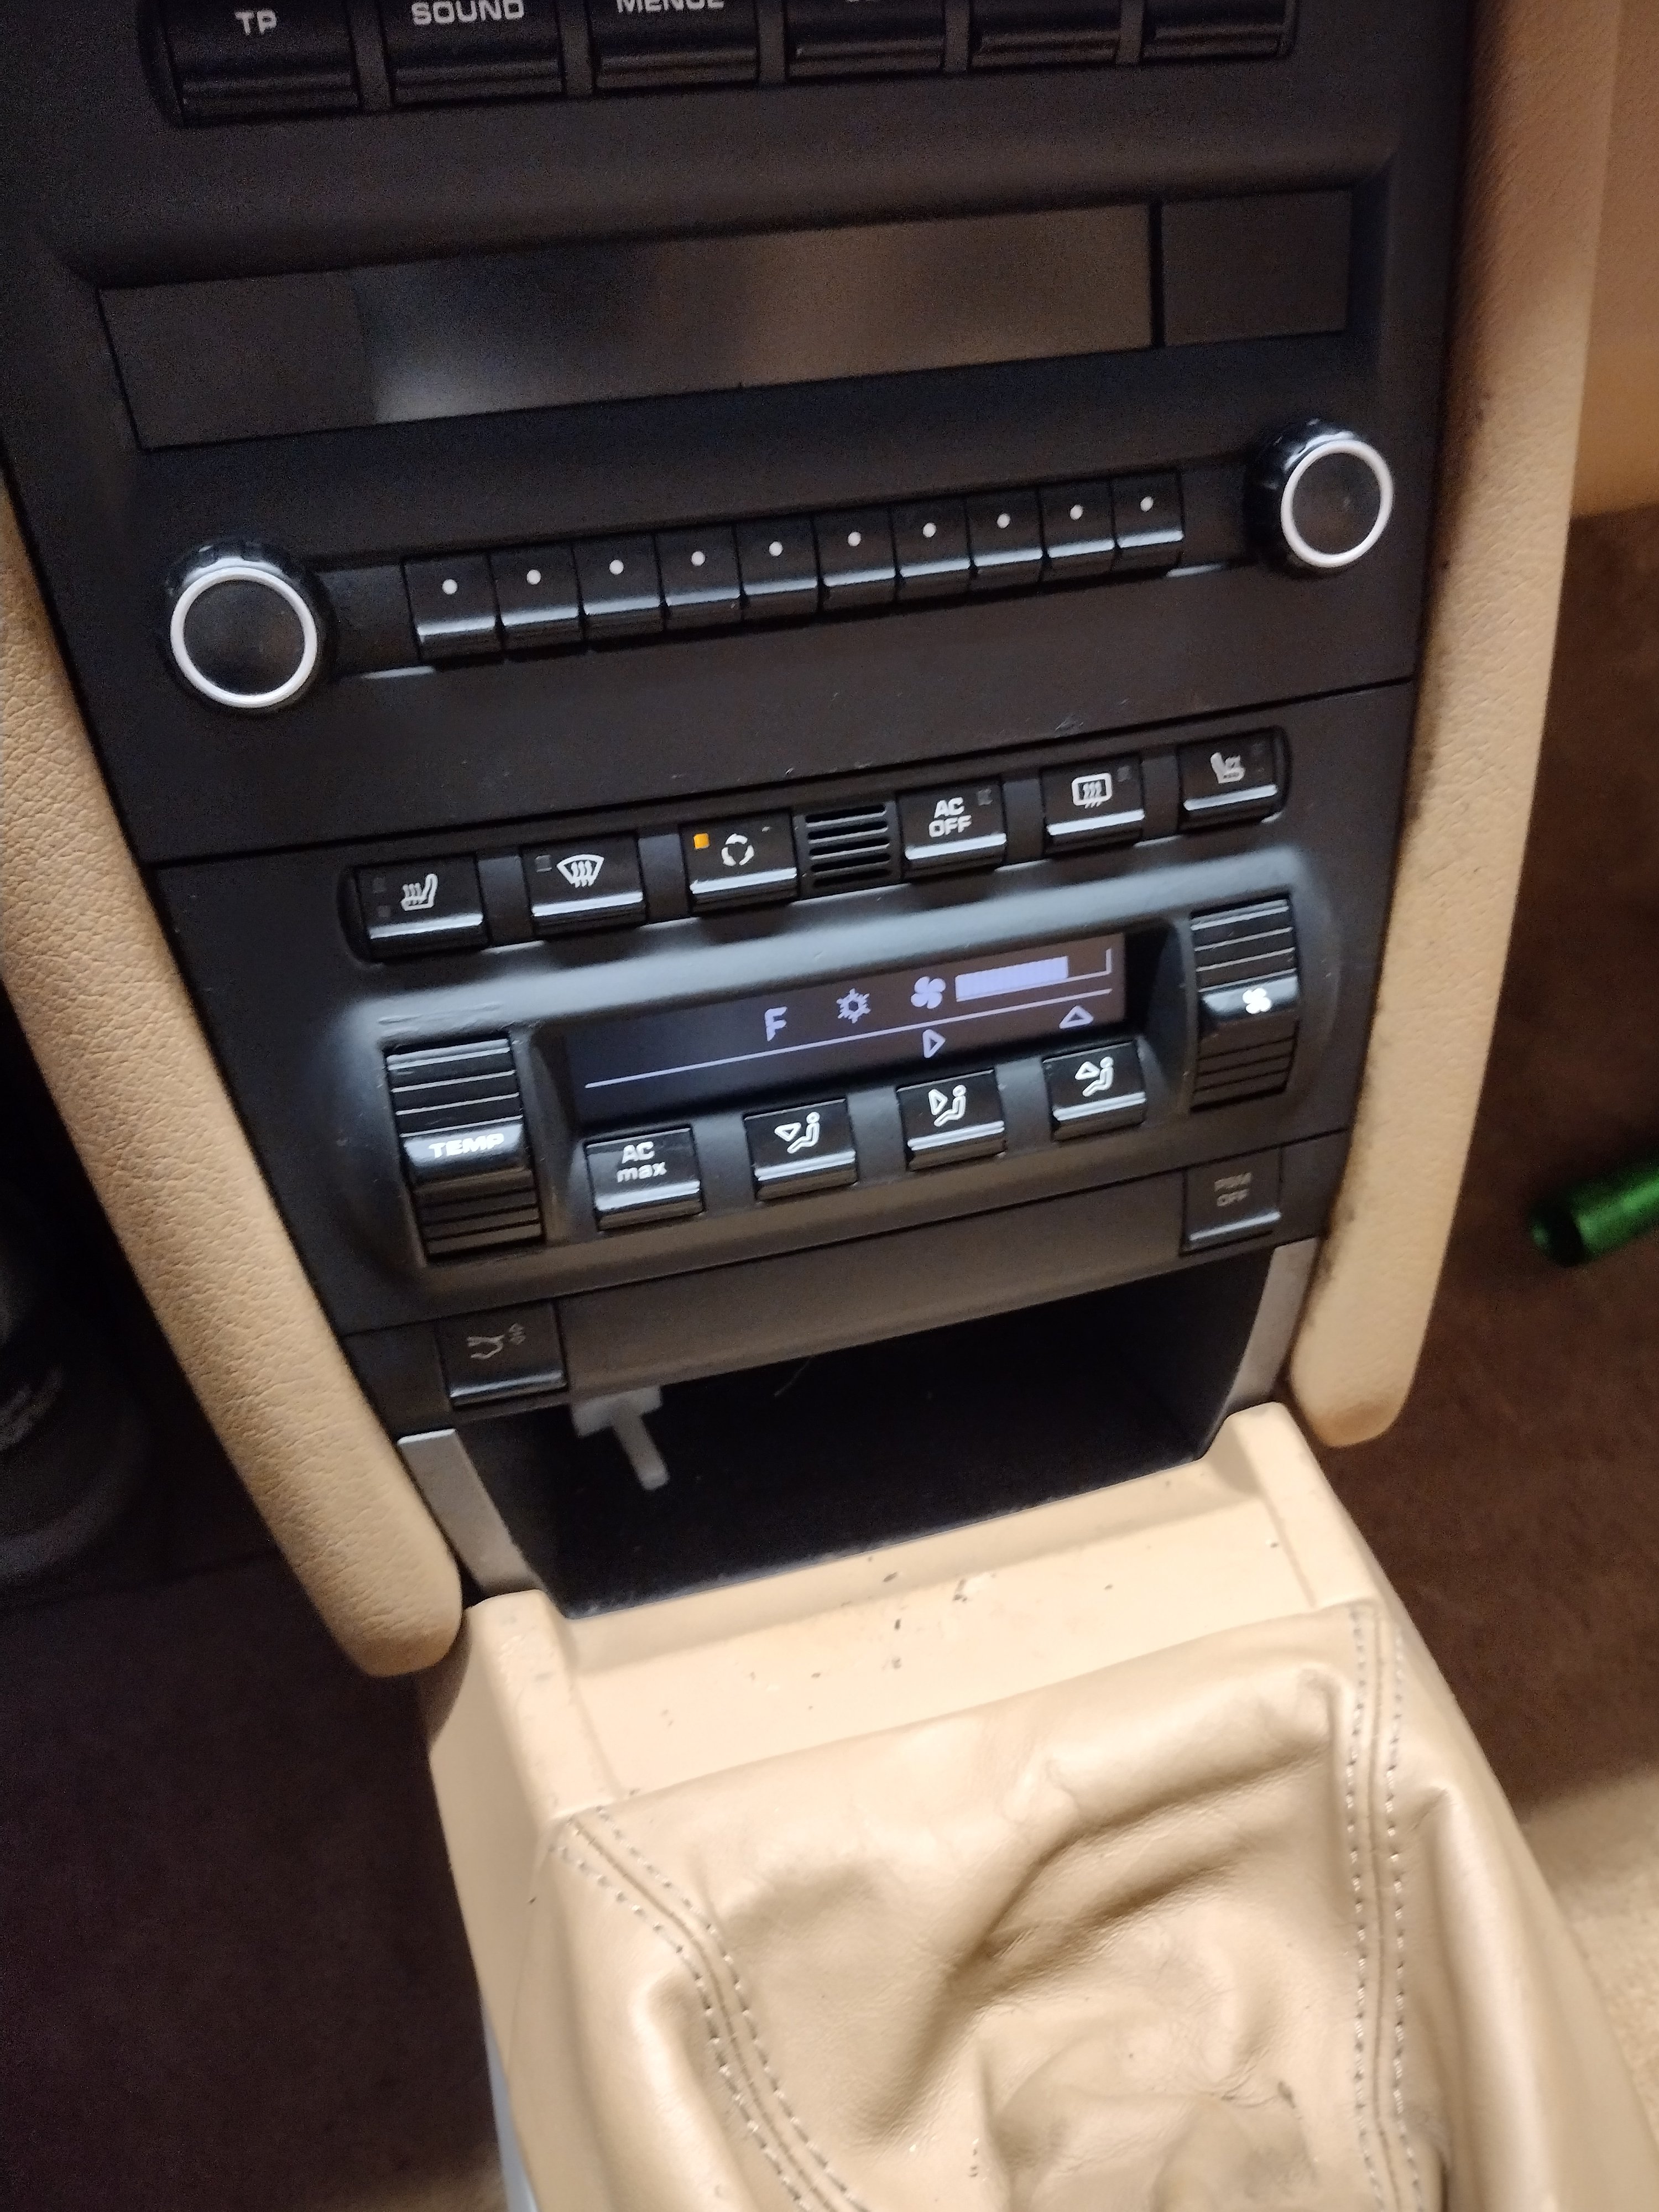
Anyone know why my replaced HVAC display has the incorrect graphics. The temp is not shown as increment bars. It shows a number(temp in Degrees) then takes away a line at each lowered increment. See pics. You can see the #8 disappearing as I toggle down on the temp. This is the 2nd display I've tried, both do the same. Loren mentioned the temp sensor which is attached at the bumper....pointy black sensor. Any info would be appreciated. Thanks V

-
08 Box HVAC Display
vza replied to vza's topic in 987-1 Boxster Convertible Top Issues and Solutions
Umm....what temp sensor. Well it worked on the old one(one of the few that worked on the display) Why does the thermostat for the AC need a temp sensor....curious. I'm saying when you use the temp button on the left and increase the temp 8.6 shows up and when you toggle down the 8.6 disappears like in the pix. Thanks V -
Hi All, Recently moved to working on the interior of my project car. I replaced the display on my HVAC controller and all is fine with the exception of the temp display. It dosen't show a progress bar Like the fan display(bar of lines showing intensity). Instead it shows 8.8F when temp is high and nothing when temp is lowest. Is it defective or just not compatible. Thanks V
-
The most difficult part is finding all the torx screws that holds the dash. Hard to find ones are: 2 inside the defroster vents L and R. One(4 total) at topside and behind each AC vent. The bottom dash driver side is removed by getting the screws near the Headlight switch I missed and broke the tabs here. Two on L and R side of center console. Console is not removed. There are 2 pins in the console that go through dash grommets so the console is unscrewed to allow it to be pitched forward to free the pins. Remove the cup holder and glove box and there are a handful in there. Remove the R side airbag and the black metal bracket at top of glove box. Remove both L and R sun visors and plastic trim on the sides of the windshield. Remove steering wheel and upper/lower cowling around steering column. Remove trim on dash and trim under Speedo cluster and cluster cover after removing the cluster. When dash is finally loose, remove wires to tweeters, alarm thingy on top center of dash and center speaker, wire to hazard lights and door lock button. All in all about 18 to 22 screws if I recall. First time it will be 8 hrs, if you do it again about 2 hours. Have fun. I did take vids but need to edit before posting. V
-
Hi all, I have some bubbling on a white cluster faceplate that I disassembled and put pinholes in and tried to flatten out. Didn't really work. I read this is an after market faceplate that I can peel off and have the OEM black underneath. Is this correct. Also, when reassembling the pointer/needles I may have not positioned them correctly. Where are they supposed to be when the car is off. Any trick to aligning them correctly. OK....answered my own question. Removed the white face sticker to reveal the silver face sticker which was just as bubbly. Thanks V
-
Thanks...wound up figuring it out and got it done. Little easier than 986.
-
Anyone know of a tutorial on replacing a dash on 08 boxster. Thanks
-
Hi All, Workin on my project 08 Boxster w 2 deployed air bags. I recently learned your supposed to replace the dash when replacing the passenger airbag. Ugh...i had a dash out already. I was getting the aluminium dash cover (aluminium cover on underside of dash)to bend back....maybe able to make it look good.. Any work around for this issue ? Thanks v
-
Thanks
-
Thanks for getting back John. I checked it again high was 225 which is in the range from what you said. Low was 35 to 45 but the needle kept fluctuating back and forth back and forth keeps moving no pause. Is my low side too high? I was going to add a bit more but didnt get a chance. AC was blowing 58 on a 90 degree day
-
Finally got back to my ac. Installed new condenser hose, expansion valve and receiver/dryer. 30oz of 134 and a little less than an oz of ac oil. It was 82 degrees my low read 45psi high was 230. Are these good readings? AC was approx 56 with the doors off( doin body work)
-
Hi All, Full AC recharge 08 Boxster. Replaced AC condenser line, Expansion valve and receiver/Dryer and need to know how much AC oil to add. Full 6.6oz or less. Also ....is 30 oz of 314 the max or can a little more or less go in. I have an 18oz can that I used a bit of(maybe 2 or 3 oz) and full 12 oz can.Thanks V
-
Just checking ..987.1 model year is 2006-08. Buying an 06 fender want to be sure it will fit my 08 boxster. Thanks V
-
Ok,unplug clip from low pres. switch and just jump the 2 terminals on the connector(wire side) assuming there are only 2.
-
I can't get the compressor to run and charge the system. Is it because of the low pressure switch. How do I charge if the compressor dosen't run? Thanks V
-
Yes but don't I have to charge the system so I could charge it with with leak dye so I can find the leak. Then repair the leak evac system and add oil and coolant
-
Hi all, 08 boxster. AC compressor does not come on. Seemed to have no psi when I went to add coolant. Added coolant to 25 psi but compressor remained off. Please advise how to troubleshoot. Keep in mind I'm doing this in cold weather. Thanks v
-
Hi all, So I need the part that part number 997 505 531 00 is bolted to. It's a sheetmetal part that maybe tack welded or just glued in with panel adhesive. I thought the part was 997 501 631 00, that's what I thought I read on the panel. With research I found it maybe PN# 997 501 931 01. It has holes for rubber grommets that hold the frunk release cables. Any help would be appreciated. Thanks V Bump...answered my own question the incorrect # I had is the cast # the correct PN 997 501 931 01 GRV.
-
08 boxster center radiator upgrade
vza replied to vza's topic in 987-1 Boxster Convertible Top Issues and Solutions
Ok ...so it just sits in the bumper cut out... no finishing trim or anything. PN's 987 505 551 00 987 505 555 00 987 505 751 00 are these the parts associated with the trim for the bumper cover? Thanks Loren -
08 boxster center radiator upgrade
vza replied to vza's topic in 987-1 Boxster Convertible Top Issues and Solutions
Ok I have that... I called it the shroud. There's no trim piece that attaches it to the bumper? Thanks v -
Hi all, Picked up used center radiator for an upgrade for my 08 boxster. I have the radiator, 2 hoses, bracket, aluminum support and the shroud. My question is if there's a trim piece that holds the Rubber shroud to the bumper or does it fit thru the opening of the bumper without any extra hardware. Thanks v