Jump to content

Welcome to RennTech.org Community, Guest

There are many great features available to you once you register at RennTech.org
You are free to view posts here, but you must log in to reply to existing posts, or to start your own new topic. Like most online communities, there are costs involved to maintain a site like this - so we encourage our members to donate. All donations go to the costs operating and maintaining this site. We prefer that guests take part in our community and we offer a lot in return to those willing to join our corner of the Porsche world. This site is 99 percent member supported (less than 1 percent comes from advertising) - so please consider an annual donation to keep this site running.

Here are some of the features available - once you register at RennTech.org

  • View Classified Ads
  • DIY Tutorials
  • Porsche TSB Listings (limited)
  • VIN Decoder
  • Special Offers
  • OBD II P-Codes
  • Paint Codes
  • Registry
  • Videos System
  • View Reviews
  • and get rid of this welcome message

It takes just a few minutes to register, and it's FREE

Contributing Members also get these additional benefits:
(you become a Contributing Member by donating money to the operation of this site)

  • No ads - advertisements are removed
  • Access the Contributors Only Forum
  • Contributing Members Only Downloads
  • Send attachments with PMs
  • All image/file storage limits are substantially increased for all Contributing Members
  • Option Codes Lookup
  • VIN Option Lookups (limited)

Loren

Admin
  • Posts

    37,523
  • Joined

  • Days Won

    569

Everything posted by Loren

  1. Folks please READ the 3.4 liter Engine Swap PDF referenced in post 7 above. There is only one engine carrier for a 3.4 liter -- and the engine mount is the same for all 3.4 and 3.6 liter cars. The A means the part has been replaced with an updated version.
  2. :welcome: I assume you cleaned and inspected the contacts on the removable face plate? If you have done that then I doubt there is any hope other than replacement. Maybe borrow a face plate from another Carrera or Boxster owner and see if that fixes it. There are some CDR-220's on ebay but I doubt you want to pay the dealer price ($800-$1000) for a new one from Porsche. Maybe time for a 3rd party radio if that is the case.
  3. For your Audi have a look here
  4. You don't have the exact same problem - kevinkw's manual switch works fine. If the manual operation does not work then either there is a connection problem (fuse, wires, connector corrosion) or the spoiler is jammed and binding or in a rare case the motor is bad.
  5. 2 red wires )same place and one black wire - pretty hard to get wrong. Check your chassis grounds and your ignition switch.
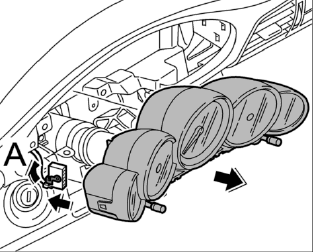
  6. 997 Cluster Removal 1. If a new instrument cluster should be installed, read out the values if possible from the instrument cluster. 2. Loosen the steering wheel adjustment, put the steering wheel in the front-most and lowest position and lock the steering wheel adjustment. 3. Unscrew the two fastening screws 1. 4. The instrument cluster is also secured in the dashboard with two retaining clips. Therefore, pull the instrument cluster abruptly forward and if necessary push instrument cluster away from dashboard from underneath. 5. Release electrical connector on instrument cluster A and unplug it. 6. Pull out instrument cluster at the sides and to the left. Installation is the reverse.
  7. Yeah, if you do a search here they were posted quite a while ago. Here are a couple... Also, I have but have not posted GT3, GT3 RS, Forty fast years (911), Targa, and early and late C4's. I didn't see C4S but it just may be in a different place. MY02-on Carrera coupe up to model year 2001 Loren Can you post location of 997 Carrera 4 S positions. Thanks I have added it to the original post.
  8. Did you look in the Boxster section? It's pinned there. Boxster logo placement
  9. I currently have the exact same issue....only my seat is stuck at it's furthest back point and it it impossible to remove the back bolts....or at least it seems. Any help here people?? Thanks, Alan :o Did you check the fuse?
  10. You do realize the Cayenne has a headlight/front end electronics control module (black box)? I think this will make it very hard to add any features.
  11. Please read this and follow the instructions... Lost Radio Code - FAQ, PLEASE READ THIS FIRST
  12. View this tutorial Removing and installing ballast resistor for the radiator fan motor Note: Part numbers sometimes change without notice. Always double check with your supplier that you have the latest part numbers. Tools you will need: Crimping tool Soldering Iron Hot airgun (or hair dryer) Parts For MY99-MY01 use: 996.616.101.00 For MY02 and newer use: 996.616.141.00 Heat shrink tubing (fairly large) Electrical tape (optional) Note: The ballast resistor is available as a spare part and can be replaced by crimping it onto the old wires. 1. Dis Author Loren Category Carrera (996) - Common Fixes and Repairs Submitted 08/21/2008 04:16 PM
  13. Note: Part numbers sometimes change without notice. Always double check with your supplier that you have the latest part numbers. Tools you will need: Crimping tool Soldering Iron Hot airgun (or hair dryer) Parts For MY99-MY01 use: 996.616.101.00 For MY02 and newer use: 996.616.141.00 Heat shrink tubing (fairly large) Electrical tape (optional) Note: The ballast resistor is available as a spare part and can be replaced by crimping it onto the old wires. 1. Disconnect the battery and cover the terminal or battery. 2. Unclip ballast resistor from the holder from below. 3. Cut off wires approx. 30 mm behind the old ballast resistor. 4. Slide heat-shrink tubing over the wires to the plug connections (2x) and to the fan motor (1x). 5. Shorten wires of the new ballast resistor to approx. 30 mm and strip approx. 5 mm of insulation off all wire ends. 6. Using a commercially available crimping tool, join the wires with crimp connectors. 7. After crimping, solder the crimp connectors. Slide heat-shrink tubing over the crimp connectors and then shrink the tubing with a hot airgun. 8. Carefully route the wires and, if necessary, fix in place with plastic tape.
  14. http://www.renntech.org/forums/index.php?s...ost&p=10388
  15. I would look for bad grounds or pinched wires near the top.
  16. :welcome: Please try our search feature - this has been covered many times...
  17. pls uploadddd... i really want to try it :drive: :thankyou: We do not share copyrighted materials here. At registration you agreed to "You agree not to post any copyrighted material unless the copyright is owned by you or by this bulletin board." Any copyrighted materials will be removed.
  18. I would clean the area the best that I can - then drive the car and see if you can find the actual source point.
  19. Find someone with small hands to retrieve the items. If that does not work you will likely have to remove the seat. If you are going to unplug any connections under the seat then disconnect the battery - otherwise you WILL get an airbag light.
  20. Scouser has updated his outstanding VIN Decoder. The VIN Decoder is here. Changes: 3.03 21/Jul/08 Row 997 GT3 new 3.04 05/Aug/08 RoW 944 S2 Cab update (3) 3.05 20/Aug/08 Fixed bug in USA spec Cayenne 9PA->4 was Row Spec only. Many thanks to Scouser for his continued efforts, work, and updates to this fine tool! :clapping:
  21. Exchange price on a Porsche factory rebuilt engine (with two year warranty) is $10,660.69 (MSRP). And, I think his labor time is quite high too (book time is about 15 hours). You might want to talk to another shop.
  22. If the clutch is not completely disengaging or the slave is leaking back then it could be the cause. If you did not have the problem before the damage then the most likely cause is air trapped in the system.
  23. Try 9308 or 9306 Thanks Loren, Neither of the codes worked - unless I have to push additional buttons befoe/after entering the code. Any suggestions? Thanks again! Lost Radio Code - FAQ, PLEASE READ THIS FIRST
×
×
  • Create New...

Important Information

We have placed cookies on your device to help make this website better. You can adjust your cookie settings, otherwise we'll assume you're okay to continue.