Welcome to RennTech.org Community, Guest
There are many great features available to you once you register at RennTech.org
You are free to view posts here, but you must log in to reply to existing posts, or to start your own new topic. Like most online communities, there are costs involved to maintain a site like this - so we encourage our members to donate. All donations go to the costs operating and maintaining this site. We prefer that guests take part in our community and we offer a lot in return to those willing to join our corner of the Porsche world. This site is 99 percent member supported (less than 1 percent comes from advertising) - so please consider an annual donation to keep this site running.
Here are some of the features available - once you register at RennTech.org
- View Classified Ads
- DIY Tutorials
- Porsche TSB Listings (limited)
- VIN Decoder
- Special Offers
-
OBD II P-Codes - Paint Codes
- Registry
- Videos System
- View Reviews
- and get rid of this welcome message
It takes just a few minutes to register, and it's FREE
Contributing Members also get these additional benefits:
(you become a Contributing Member by donating money to the operation of this site)
- No ads - advertisements are removed
- Access the Contributors Only Forum
- Contributing Members Only Downloads
- Send attachments with PMs
- All image/file storage limits are substantially increased for all Contributing Members
- Option Codes Lookup
- VIN Option Lookups (limited)

-0001-0001.png.112c13ee97acfad0cb1e70d195cc9a0e.png)
Loren
-
Posts
37,551 -
Joined
-
Days Won
578
Content Type
Profiles
Events
Forums
External Paint Colors
Downloads
Tutorials
Links Directory
Collections
Classifieds
Store
Everything posted by Loren
-
-0001-0001.thumb.png.17f5bb25bf8ec261a17c21e6321c8492.png)
help with central console
Loren replied to a topic in 996 Series (Carrera, Carrera 4, Carrera 4S, Targa)
Yes the plastic outside pieces are the same. If there is a PCM present the the mounting rack (52) is different. -
996 Cab
Loren replied to antonio_spain's topic in 996 Series (Carrera, Carrera 4, Carrera 4S, Targa)
Thanks! Changing from a mid-engined car to a rear engine car is a bit different. The Boxster (like the 914 before it) are great handling cars and... because of their great balance very forgiving to drive. Now, your new Carrera is a little tougher since it has a weight bias over the rear wheels. To compensate for the weight bias Porsche has fitted the Carrera with a tire/wheel combination that promotes understeer -- mainly for safety. Tire pressure changes on a Carrera will have a greater affect on how the car handles and feels than it did on the Boxster. I believe that tire pressures need to be dependent on your driving style. So, there is not a tire pressure that works for everyone. The factory says front 36 and rear 44. I found that to not be the optimum pressure for my driving (I drive pretty hard and aggressive). I found the car too loose at those high pressures. After I experimented with lowering the pressures I have settled on 32 front and 36 rear (cold). Again, your pressures may vary but I would try to keep a 4 psi difference between the front-rear to keep the car in balance. I would not go much below these pressures and certainly not below 30. I guess the bottom line is try a few different pressures and record you results (an autocross or closed track session is good for this) and then settle on the pressure that you feel most comfortable with (and gives the fastest times!). -
help with central console
Loren replied to a topic in 996 Series (Carrera, Carrera 4, Carrera 4S, Targa)
I am not sure about your question... If you mean the plastic pieces that surround the radio, climate controls, PCM, etc. then yes. The top plastic piece is one part and each of the two side pieces can be changed. -
Factory Carpet
Loren replied to Mike in CA's topic in 996 Series (Carrera, Carrera 4, Carrera 4S, Targa)
Here is a pic of what Mike is talking about... it is actually the DME cover. I think I would just go to a carpet store and find the closest match. Will you be taking the bar out between events? -
Thanks! More questions for you... 1. Do you want all 4 off the ground at the same time (like for brake bleeding, etc.)? Or, are you just changing tires? 2. Do you have aerokit flairs on your rockers (it makes a difference)?
-
Gary, See my first post... there is a tolerance code on each spring that is used to define the proper compensation plate. You won't know what that is until you get the springs. Plus -- there is a 50-50 chance that it is the same as what you already have. If not, you will need to get the correct one. Most installation/alignment shops can take care of this for you. BTW... who are you buying this from? Gert at Carewal.com has done many of these. I recommend him.
-
MY02 Coupe -- 2 wheel drive -- 6 speed -- RoW M030 Sport Suspension Parts: Front 996 343 041 18 -- Shocks 996 343 531 19 -- Coil Spring (set of 2), color coded Green/White 996 343 701 04 -- Stabilizer (swaybar) (23.6 mm) 996 343 511 00 -- 3.0 mm compensation plate or 996 343 511 01 -- 6.5 mm compensation plate Rear 996 333 051 22 -- Shocks 996 333 531 26 -- Coil Spring (set of 2), color coded Green/White 996 333 701 17 -- Stabilizer (swaybar) (19.6 mm) 996 333 105 03 -- Additional Spring (bump stop 13 mm shorter than stock) 996 333 511 02 -- 0.5 mm compensation plate or 996 333 511 03 -- 4.0 mm compensation plate
-
Gary, 1. There are different suspension parts for almost all model differences (i.e coupe, cab, 4 wheel drive, 6 speed or automatic). To get the right suspension parts I will need to know: model year, body style (coupe or cab), 2 wheel or 4 wheel drive, and 6 speed or Tiptronic. The differences are subtle in most cases but I think you do want the suspension parts Porsche designed and tuned for your car. 2. Yes, there are spring compensation plates. The spring compensation plate you need is easy to identify because Porsche uses a color code on the spring itself. For example, on the front springs you will find two bands of color (like green - white) together that tell you what spring model version (like RoW M030). There is also a third color band (on a different coil) that tells you the tolerance group the spring is in. This code stipulates the spring compensatotin plate to use. For the front is: White = 3.0 mm compensation plate or Green = 6.5 mm compensation plate. On the rear the color codes are: White = 0.5 mm compensation plate or Green = 4 mm compensation plate. FYI... the shocks also have a color code that tells which suspension they belong with. For the front shocks (White dot = standard suspension RoW/USA; and Green dot = sport suspension RoW/USA). For the rear shocks (Brown dot = standard suspension RoW/USA; Grey dot = sport suspension USA; and Green dot = sport suspension RoW).
-
Yes. If you follow the belt down to the carpet there is a large bolt under a plastic cap. Remove the plastic cap and then remove the bolt (remember the order of any washers or spacers). This should allow you to manipulate the belt through the rose.
-
Optima Battery
Loren replied to Unitah's topic in 996 Series (Carrera, Carrera 4, Carrera 4S, Targa)
Pics would be great and if you have any dimensions on the mounting plate that would be really helpful too. Thanks! :cheers: -
-
This likely needs some testing but give it a try (if you want). Door Panel Removal/Install Instructions
-
Is it the lead that plugs into the relay sockets?
-
Yes you can likely get it in Savanna. But, as Gert said we need to know the type of seats (sport, comfort, or standard). p.s. We know your car is a MY99 Cab ;)
-
(Cab only)
-
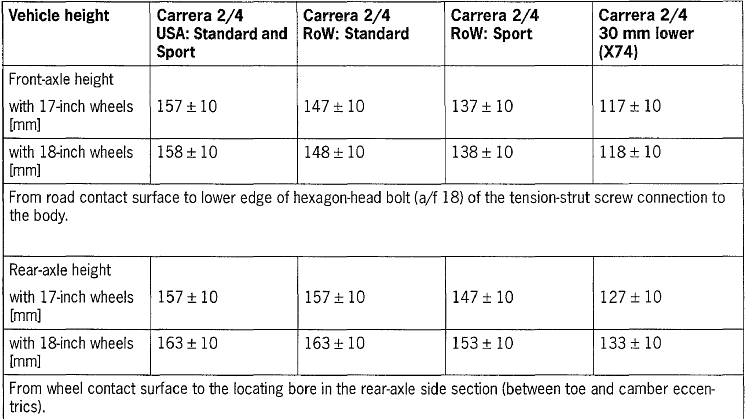
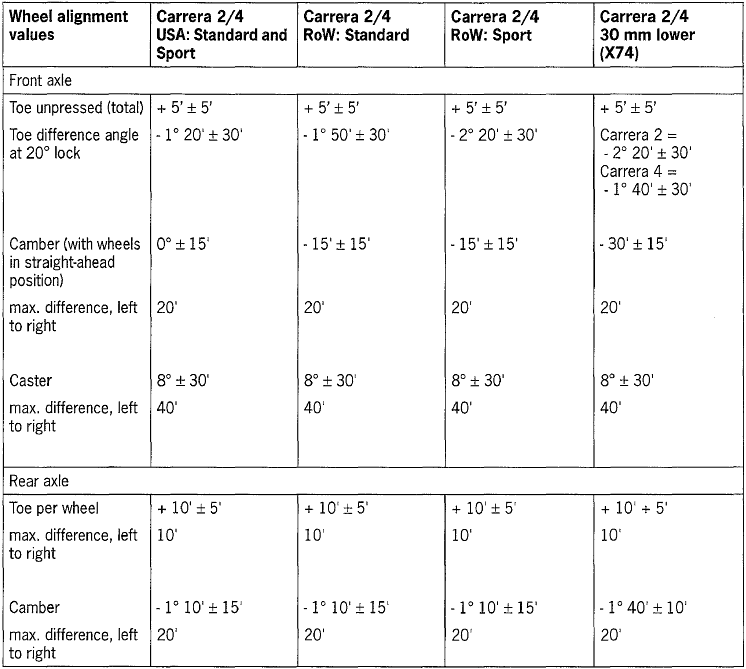
Note: - The following values relate to the empty weight, i.e. full fuel tank, vehicle with spare wheel/collapsible wheel and tools, but without driver and without additional weights. - X74 = 30 mm lower. This can be identified by 1 yellow mark on the shock absorber. Note: - The following values relate to the empty weight, i.e. full fuel tank, vehicle with spare wheel/collapsible wheel and tools, but without driver and without additional weights. - X74 = 30 mm lower. This can be identified by 1 yellow mark on the shock absorber. - A caster adjustment is normally not necessary and is therefore not present! If required in a customer service matter, a caster adjuster may be installed (Serv. No. 40 19 23/Installing caster eccentrics). - The toe-difference angle value is also influenced by the vehicle height! For this reason the measured result must be evaluated accordingly! No action is necessary in the case of small deviations from the toe-difference angle required value, as long as the value to the right and the left is almost the same.

-
Joel Reiser just answered this question at the PCA website. (BTW... 986 and 996 use the same coolant). Here is what he had to say about coolant:
-
The front bumper removal and installation is covered in my DIY for the 3rd Radiator Install. This should have everything they need. Be sure and get some before and after pics! :jump:
-
Model -- Manual -- Tiptronic Boxster -- 2811 -- 2936 Boxster S -- 2911 -- 2993 Carrera (Coupe) -- 2959 -- 3080 Carrera (Targa) -- 3119 -- 3240 Carrera (Cab) -- 3135 -- 3256 Carrera 4 (Cab) -- 3267 -- 3388 Carrera 4S -- 3240 -- 3361 GT2 -- 3168 -- n/a GT3 -- 3043 -- n/a TT -- 3388 -- 3487 Carrera GT -- 3042 -- n/a Cayenne S -- n/a -- 4949 Cayenne TT -- n/a -- 5192 Note: all are MY03 except GT3 and C GT which are MY04
-
Chad, Here is a link to a large (2.5 MB) PDF file for steering wheel removal and OBC hack. You may not need the OBC hack but the steering info is good. Steering Wheel and OBC Hack
-
The tank is on the right (passenger) side of the car. My understanding is you would need to drain the oil from the bottom of each turbo and that it is an 8 mm hex bolt. Sorry, I do not have a picture or diagram. I'm trying to arrange to take pics with a local guy on his TT oil change. BYW... even after draining all three there is still 4 liters of oil in the engine.
-
IMHO Yes. Here is why I think so... The X51 beefs up the engine, oil system and cooling. Here is a short list: - new intake manifold with modified cross-section (material: sand cast aluminium ); - new intake pipe supports adapted to the form of the intake manifold; - new exhaust manifolds with larger cross-section and optimized flow behavior; - new cylinder heads with optimized, CNC-milled inlet ducts; - new camshafts with larger valve stroke on the inlet side and modified inlet and outlet timing; - inlet valve springs adapted to the enlarged valve stroke; - modified partition box in the oil pan; - modified maps for the DME control module. - new underside panel in the transmission area; - additional radiator in connection with modified front spoiler, except on the 911 Carrera 4S (996). or you could always go with the new GT3 where you get the base for the R and RS racer cars... or better yet a cup car ;) wait I guess that is not streetable... darn :rolleyes:
-
Oil Change Instructions
Loren replied to Loren's topic in 996 Series (Carrera, Carrera 4, Carrera 4S, Targa)
JayM, I sent you (via email) a link to a draft of TT oil change instructions. Have a look and tell me where it can be improved. Thanks! :beer: -
Ben, 3.4 liter or 3.6 liter? Option on a new car? or add on to existing car? :huh:
-
Optima Battery
Loren replied to Unitah's topic in 996 Series (Carrera, Carrera 4, Carrera 4S, Targa)
Jonathan, Here is an online source I found. Not the least expensive but they do have stock and free shipping. 1st Optima Battery Sales