Welcome to RennTech.org Community, Guest
There are many great features available to you once you register at RennTech.org
You are free to view posts here, but you must log in to reply to existing posts, or to start your own new topic. Like most online communities, there are costs involved to maintain a site like this - so we encourage our members to subscribe or donate. All subscriptions and donations go to the costs operating and maintaining this site. We prefer that guests take part in our community and we offer a lot in return to those willing to join our corner of the Porsche world. This site is 99 percent member supported (less than 1 percent comes from advertising) - so please consider an annual subscription or donation to keep this site running.
Here are some of the features available - once you subscribe RennTech.org
- View Classified Ads
- DIY Tutorials
- Porsche TSB Listings (limited)
- VIN Decoder
- Special Offers
- Paint Codes
- Registry
- Videos System
- View Reviews
- and get rid of this welcome message
It takes just a few minutes to register, and it's quality Porsche information at a low cost.
Contributing Members also get these additional benefits:
(you become a Contributing Member by subscribing or donating money to the operation of this site)
- No ads - advertisements are removed
- Access the Contributors Only Forum
- Contributing Members Only Downloads
- Send attachments with PMs
- All image/file storage limits are substantially increased for all Contributing Members
- Option Codes Lookup
- VIN Option Lookups (limited)

-0001-0001.png.112c13ee97acfad0cb1e70d195cc9a0e.png)
Loren
-
Posts
37,902 -
Joined
-
Days Won
651
Content Type
Profiles
Events
Forums
Exterior Paint Colors
Downloads
Tutorials
Links Directory
Collections
Classifieds
Store
Everything posted by Loren
-
-0001-0001.thumb.png.17f5bb25bf8ec261a17c21e6321c8492.png)
TSB's for convertible top?
Loren replied to wlee69's topic in 996 Series (Carrera, Carrera 4, Carrera 4S, Targa)
All Contributing Members have access to all the TSBs. As well they can view and post in the Contributors Only Forum. They can now can send attachments with PMs (Personal Messages) and image storage limits are raised. RennTech.org email addresses are available to Contributing Members and, they can have their own personal RennTech.org Blog. -
The red rear brake calipers for the Boxster are 996 352 421 13. They are the exact same size as the 996 standard brakes - just red. Boxster S front rotors are 318 mm, rears are 299 mm - same as the 996. I have no idea what you mean by width.
-
ROW suspension for C4S
Loren replied to CO996C4's topic in 996 Series (Carrera, Carrera 4, Carrera 4S, Targa)
I already answered this here. The MY02 C4S does use a different kit (according to the Porsche parts list) than the MY03 and later cars. -
I think this have been covered here many times... Try using the search function and search all forums for ipod.
-
996.351.425.xx and 996.351.426.xx are front calipers (left and right) for a 996. The xx would designate whether the car is a C2 (2WD) or C4 (4WD). 996.352.425.xx and 996.352.425.xx are rear calipers (left and right) for a 996. The xx would designate whether the car is a C2 (2WD) or C4 (4WD). Factory front pads are: 996 352 949 02 Factory rear pads are: 996 352 939 03 The Boxster S uses the same front calipers as a 996 except the are red.
-
Recall on 04 996
Loren replied to stan's topic in 996 Series (Carrera, Carrera 4, Carrera 4S, Targa)
It is more likely a "Workshop Service Action" which is a voluntary service action as opposed to a government "recall". I see if I can get a copy of the workshop service action bulletin. -
airbag deactivation
Loren replied to docstarr's topic in 997-1 Series (Carrera, Carrera 4, Carrera 2S, Carrera 4S)
Are you talking about the "Porsche Child Restraint System". If so what part number did you purchase. -
Indeed!
-
And more Porsche, Penske Motorsports To Run Together With New Prototype In American Le Mans Series
-
MAF stock screens
Loren replied to CO996C4's topic in 996 Series (Carrera, Carrera 4, Carrera 4S, Targa)
I removed mine (both screens) 3 years ago. I disconnected the battery at the time and had the DME relearn the air flow. Zero problems. -
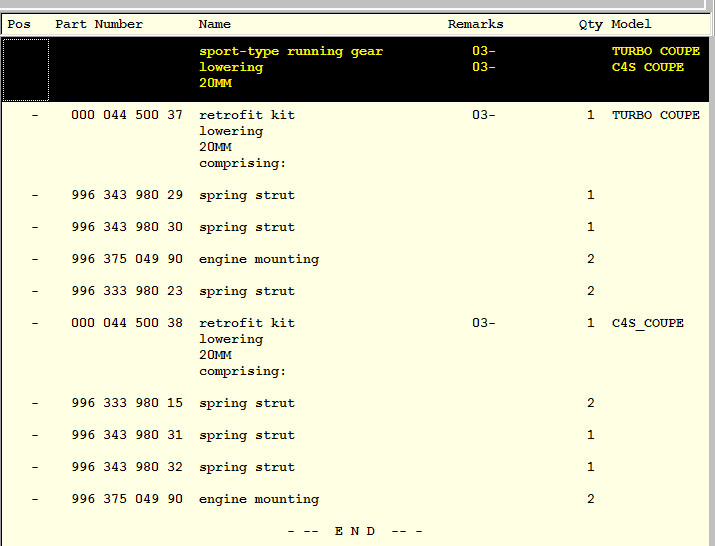
000-044-500-28 is a 10 mm RoW sport kit for a (coupe, 4WD, 6 speed). I think the MY02 C4S must be different. This the MY03 C4S page from the (Feb 2005) RoW tequipment parts list:

-
The factory side skirts used in the narrow body Aerokits were all the same from MY01 on. I think the parts kits only come with the complete aerokit package - so you will need to order them too. 996 559 983 04 Left sill cover (in primer w/double stick tape) 996 559 984 04 Right sill cover (in primer w/double stick tape) Two parts kits 000 044 801 65 Various bolts and nuts
-
Wow! Did the flywheel bolts perhaps come loose and the timing ring hit something (as it wobbled)?
-
1. No this is an RoW 20 mm lowering kit. All parts for the X73 package are marked X73 in the parts list. 2. There is a left and right front strut in that kit.
-
PSE Part Numbers
Loren replied to sentipede's topic in 996 Series (Carrera, Carrera 4, Carrera 4S, Targa)
It is hard to say what the differences are in the later ones. Could be just a vendor change. No one has ever proven any performance differences with any of them even over stock. -
:lol: ... no need to Google it it's right here
-
Aftermarket Rims
Loren replied to Avantgarde's topic in 9PA, 9PA1 (Cayenne, Cayenne S, Cayenne Turbo, Cayenne Turbo S)
The difference (I believe) is between the standard power steering and the optional (Option 1N3) Variable Assist Power Steering - Servotronic speed sensitive power steering. This shows as available on all Cayenne models. -
Item 27: 996 701 801 00 Left spacer retail $0.89 996 701 802 00 Right spacer retail $0.89
-
Tell us which items numbers you need (I assumed a US car but you didn't say).
-
More Codes Please ...!
Loren replied to Peter Bull's topic in 996 Series (Carrera, Carrera 4, Carrera 4S, Targa)
I am not sure what the "SM" code (next to your paint code) stands for on your code tag. For instance my car has a Boxster Red interior and the code on my tag is "MA". Perhaps someone else here knows? -
More Codes Please ...!
Loren replied to Peter Bull's topic in 996 Series (Carrera, Carrera 4, Carrera 4S, Targa)
:oops: forgot the X45 X45 - Instrument dials in interior color Sorry, I meant a pic of the interior. Is there more than one color used or special order trim? A pic would really help -
More Codes Please ...!
Loren replied to Peter Bull's topic in 996 Series (Carrera, Carrera 4, Carrera 4S, Targa)
XRB - 18" Sport Classic 2 Wheels 236 - 18" Tires 689 - Prep for CD Changer 695 - CD Radio CDR 22 I have no idea what SM refers to. Do you have a pic? -
PSE with an .04 part number?
Loren replied to PorschePRH's topic in 996 Series (Carrera, Carrera 4, Carrera 4S, Targa)
Yes, 000 044 200 21 will work on either a 3.4 or 3.6 liter car. -
stinky AC/ventilation
Loren replied to karlooz's topic in 996 Series (Carrera, Carrera 4, Carrera 4S, Targa)
I sent you a PM... -
PSE with an .04 part number?
Loren replied to PorschePRH's topic in 996 Series (Carrera, Carrera 4, Carrera 4S, Targa)
Yes, 04 replaced the 03. The 03 is no longer available to order. I haven't seen one yet. Speculation would lead one to believe there was a vendor/design change when they did 997 PSE. The 997 exhaust is supposed to made of thin wall tubing and also supposed to be lighter. Perhaps they applied that to the new 996 mufflers? We can only hope...