Welcome to RennTech.org Community, Guest
There are many great features available to you once you register at RennTech.org
You are free to view posts here, but you must log in to reply to existing posts, or to start your own new topic. Like most online communities, there are costs involved to maintain a site like this - so we encourage our members to subscribe or donate. All subscriptions and donations go to the costs operating and maintaining this site. We prefer that guests take part in our community and we offer a lot in return to those willing to join our corner of the Porsche world. This site is 99 percent member supported (less than 1 percent comes from advertising) - so please consider an annual subscription or donation to keep this site running.
Here are some of the features available - once you subscribe RennTech.org
- View Classified Ads
- DIY Tutorials
- Porsche TSB Listings (limited)
- VIN Decoder
- Special Offers
- Paint Codes
- Registry
- Videos System
- View Reviews
- and get rid of this welcome message
It takes just a few minutes to register, and it's quality Porsche information at a low cost.
Contributing Members also get these additional benefits:
(you become a Contributing Member by subscribing or donating money to the operation of this site)
- No ads - advertisements are removed
- Access the Contributors Only Forum
- Contributing Members Only Downloads
- Send attachments with PMs
- All image/file storage limits are substantially increased for all Contributing Members
- Option Codes Lookup
- VIN Option Lookups (limited)

-0001-0001.png.112c13ee97acfad0cb1e70d195cc9a0e.png)
Loren
-
Posts
37,883 -
Joined
-
Days Won
645
Content Type
Profiles
Events
Forums
Exterior Paint Colors
Downloads
Tutorials
Links Directory
Collections
Classifieds
Store
Everything posted by Loren
-
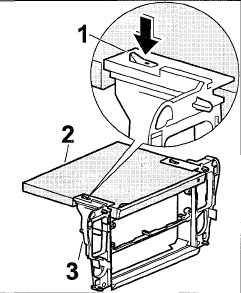
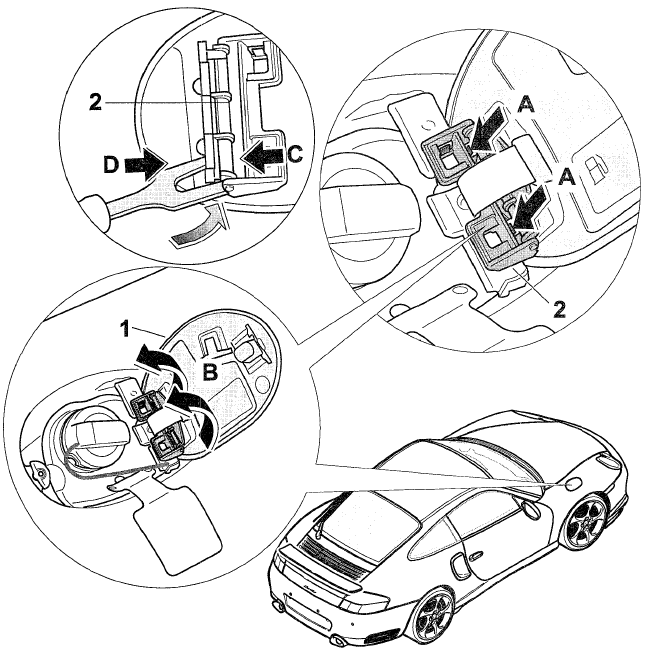
-0001-0001.thumb.png.17f5bb25bf8ec261a17c21e6321c8492.png) Removing cup holder 1. Removing cover and central vent for the dashboard 2. Press metal clip 1 arrow and hold. Pull the cup holder 2 out of the retaining bracket 3.
Removing cup holder 1. Removing cover and central vent for the dashboard 2. Press metal clip 1 arrow and hold. Pull the cup holder 2 out of the retaining bracket 3.
-
Rear Decklid fitment options
Loren replied to Lizard1's topic in 996 Series (Carrera, Carrera 4, Carrera 4S, Targa)
As long as neither car is a C4S then I think it should fit. -
MOST CD Changer Kit Part Numbers (996)
Loren replied to Loren's topic in 996 Series Part Number Requests
That section of the 997 service manual is not out yet. I have a preliminary copy of the manual and it is only about 20% complete. If you tell me your cars options (Bose, no Bose, Nav, no Nav. PCM (GSM) phone, no PCM (GSM) phone, etc. I can check the parts list and see which cables it calls out for those options (for RHD). I assume you want to add the CDC-4 CD Changer? -
C4S and C4 rims
Loren replied to a9jlu's topic in 996 Series (Carrera, Carrera 4, Carrera 4S, Targa)
C4 is a narrow body and C4S is a widebody. The offsets will be different. If you have a C4S look for TT (or C4S) wheels. -
If you could choose only four of the different forum skins, which would they be? Default (current Blue) Refault Blue (blue) Ashes to Ashen (Black) Bloody Knows (Red) Bubblegum Shoe (Pink) Olive You (Green) Orange You Glad (Orange) Plum It (Purple) Tanned Hide (Beige) Please vote by hitting reply and stating your four choices.
-
2002 996 (USA) OBD-II pins 1, 3, and 9
Loren replied to wrljet's topic in 996 Series (Carrera, Carrera 4, Carrera 4S, Targa)
You are correct A3 goes to all "other" controllers. The only info I have seen describes the interface to the DME for "generic" scanners - not the other controllers. -
2002 996 (USA) OBD-II pins 1, 3, and 9
Loren replied to wrljet's topic in 996 Series (Carrera, Carrera 4, Carrera 4S, Targa)
A1 (black/red wire) goes to Fuse B10 A3 (orange/blue) goes to all the cars controllers A9 (violet green goes to the automatic Exhaust Gas Recirculation examination pin A6 (IN SIGNAL) and to pin D17 on the DME (IN SIGNAL)
-
Ignition Problems -Cars shuts completly off running random
Loren replied to scherb's topic in 986 Series (Boxster, Boxster S)
Read the whole thread here for some tips and where to buy just the switch. The actual instructions are here. -
porsche police car
Loren replied to a9jlu's topic in 996 Series (Carrera, Carrera 4, Carrera 4S, Targa)
Yeah, don capecod posted another pic of the same car here. -
tiptronic shift lever locking
Loren replied to Chris Adams's topic in 996 Series (Carrera, Carrera 4, Carrera 4S, Targa)
Do you mean ignition switch? There was no recall on the switch just a Service Bulletin. They just go bad and Porsche has now changed the design so if you need a switch they now have to replace the lock also. You can still find the old switch at some Audi or VW dealers - 4A0 905 849 B. -
Ignition Problems -Cars shuts completly off running random
Loren replied to scherb's topic in 986 Series (Boxster, Boxster S)
Time for a new ignition switch. -
How to remove gas tank cover?
Loren replied to loday22's topic in 997-1 Series (Carrera, Carrera 4, Carrera 2S, Carrera 4S)
-
As I recall the usual causes are a bad cylinder head temperature sensor or a bad O2 sensor. Either way the cars computer reads the engine temperature so that it can adjust the fuel mixture as it warms up. It also looks at the O2 sensor readings to make fuel adjustments.
-
Rear Wheel Camber
Loren replied to dphil66's topic in 996 Series (Carrera, Carrera 4, Carrera 4S, Targa)
Negative camber is used to increase handling and safety. By increasing camber you are inducing a small amount of understeer which makes the car more stable and easier to control in high speed turns and to some degree low speed turns. Most serious autocrossers or racers are running -2 to almost -3 degrees in the front and -2 to -2.5 in the rear. Yes, the tires wear faster but the car drives like it is on rails. A 2:1 rear to front replacement is not unusual for a rear engine/rear wheel driven car performance car. For safety sake I would highly recommend staying within the factory specs for alignment. -
Removing Shift Knob
Loren replied to crunch03's topic in 996 Series (Carrera, Carrera 4, Carrera 4S, Targa)
Lift the shift boot and remove the allen screw that holds the knob on. -
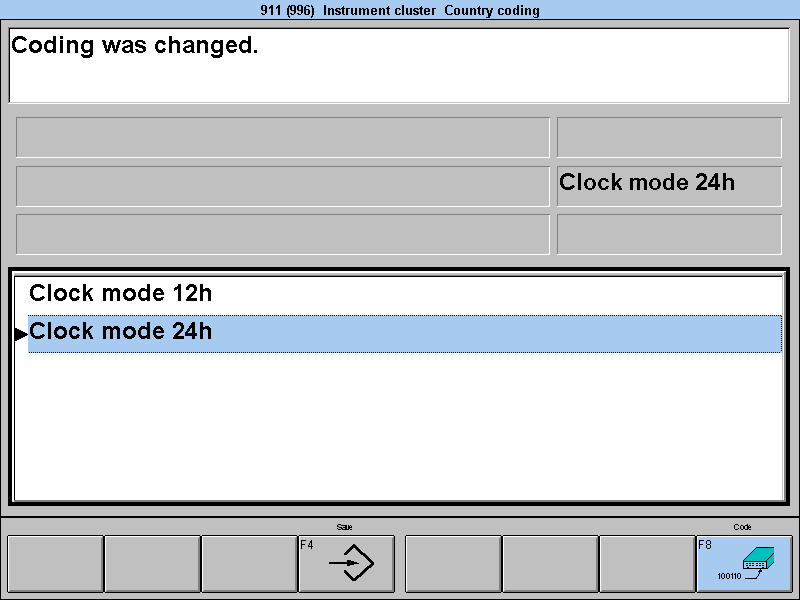
You will need to find a dealer or shop with a PST2 (or PIWIS) system tester. Good repair shops have these. It is much more than software. They are hardware and software that only works on Porsches. Shops pay between 4000 and 20,000 USD for these testers.
-
Then you will need a PST2 (or PIWIS) to change it. Where are you located?
-
Need trunk and engine release lever part #'s
Loren replied to SMR996's topic in 996 Series Part Number Requests
Those levers are no longer available. A few dealers had stock of the (Boxster) black levers but they were almost gone too. Your options are to find the black ones and repaint them silver with a clear coat - or leave them black. Or, take yours out and paint them - they will need to dry overnight. The are removal/install instructions in the DIY Articles section. Hood/Trunk Latch Release Removal/Install -
996 107 237 52 Bellows - retail $11.43 (as of Oct 2005) Get new clamps too. 999 512 630 00 Hose clamp 32 x 12 retail $2.60 (as of Oct 2005) 999 512 551 00 Hose clamp 30 x 12 retail $2.37 (as of Oct 2005)
-
Need trunk and engine release lever part #'s
Loren replied to SMR996's topic in 996 Series Part Number Requests
Model year please? -
Sony Santana CD not working in PSM
Loren replied to lennesq's topic in 987-1 Series (Boxster, Boxster S)
... which doesn't seem to apply to Porsche or BMW CD Players, but on the same token, does by the aforementioned account. Astonishing :cursing: Those would be the security issues - the CDs still have some problems on CD players. -
Sony Santana CD not working in PSM
Loren replied to lennesq's topic in 987-1 Series (Boxster, Boxster S)
Sony recalls risky 'rootkit' CDs and from sonybmg.com -
PCM 1 CD Drive Repair
Loren replied to dphil66's topic in 996 Series (Carrera, Carrera 4, Carrera 4S, Targa)
Sure, post the pics and/or submit it in the new DIY Article forum (Carrera (996) Fixes and Repairs). I am sure their is interest! -
We have just finished a complete redesign of the DIY section. This replaces the old DIY Section (which is no longer available). The DIY Articles now reside in special Forums. Authoring works very much like a normal posting in the forum. Now any RennTech.org member can author a DIY article. New DIY Articles will be reviewed by staff before they become visible to all users. Approval should occur within 24 hours or submission unless there are problems with the content. Here are the Rules/Guidelines for DIY Articles: Please, for consistency, performance and quality follow the guidelines below: - Make sure you are posting in the correct model and subforum. - Use images - they are worth 2000 words. - Do not use offsite image links. Please attach images to the post so the page will load quickly. - Size your final images to be 800 x 600 or smaller. The site will automatically create a thumbnail image. - Use the spelling checker to catch typos and misspelled words. - We have added a new special BBCode to add highlighted tables. Good for adding a list of items or a legend. You can also see usage on the BBCode help list. The code is used like: [TABLEBOX]your table data[/TABLEBOX] - All new DIY Articles will be reviewed by staff before they become visible to all users. This should occur within 24 hours or submission (we have to sleep too).
-
Note: Part numbers sometimes change without notice. Always double check with your supplier that you have the latest part numbers. Parts you will need: 1 ea 996 110 131 71 Air Filter or equal (BMC or K&N Filter) Tools you will need: 10 mm socket or wrench Regular screwdriver Phillips screwdriver Remove the complete air cleaner assembly. Remove the hexagon-head bolt M6 x 34. Remove the hose clamp on the throttle body. Pull off plug from hot film mass air flow sensor and completely remove air cleaner assembly. (10 mm wrench) Remove the captive fastening screws (9 ea.), remove air cleaner. Clean air cleaner housing and air cleaner cover. Insert new air filter insert. Reinstall in reverse order.