Jump to content

Welcome to RennTech.org Community, Guest

There are many great features available to you once you register at RennTech.org
You are free to view posts here, but you must log in to reply to existing posts, or to start your own new topic. Like most online communities, there are costs involved to maintain a site like this - so we encourage our members to donate. All donations go to the costs operating and maintaining this site. We prefer that guests take part in our community and we offer a lot in return to those willing to join our corner of the Porsche world. This site is 99 percent member supported (less than 1 percent comes from advertising) - so please consider an annual donation to keep this site running.

Here are some of the features available - once you register at RennTech.org

  • View Classified Ads
  • DIY Tutorials
  • Porsche TSB Listings (limited)
  • VIN Decoder
  • Special Offers
  • OBD II P-Codes
  • Paint Codes
  • Registry
  • Videos System
  • View Reviews
  • and get rid of this welcome message

It takes just a few minutes to register, and it's FREE

Contributing Members also get these additional benefits:
(you become a Contributing Member by donating money to the operation of this site)

  • No ads - advertisements are removed
  • Access the Contributors Only Forum
  • Contributing Members Only Downloads
  • Send attachments with PMs
  • All image/file storage limits are substantially increased for all Contributing Members
  • Option Codes Lookup
  • VIN Option Lookups (limited)

Loren

Admin
  • Posts

    37,507
  • Joined

  • Days Won

    568

Everything posted by Loren

  1. View this tutorial Manual Transmission Oil Change Instructions Note: Part numbers sometimes change without notice. Always double check with your supplier that you have the latest part numbers. Parts you will need: 3-4 liters 999 917 546 00 (Shell) Shell Transaxle (75W-90) or Mobil Mobilube PTX (75W-90) Approved Manual Transmission Oils 000 043 204 20 Mobil (Mobilube PTX) - 20 liter container 000 043 204 19 Shell (Transaxle) - 20 liter container 999 917 546 00 Shell (Transaxle) - 1 liter container Note: All are synthetic GL4 and GL5 rated ( Author Loren Category Carrera (996) - Maintenance Submitted 11/15/2005 02:04 PM Updated 03/22/2017 05:41 AM
  2. Note: Part numbers sometimes change without notice. Always double check with your supplier that you have the latest part numbers. Parts you will need: 3-4 liters 999 917 546 00 (Shell) Shell Transaxle (75W-90) or Mobil Mobilube PTX (75W-90) Approved Manual Transmission Oils 000 043 204 20 Mobil (Mobilube PTX) - 20 liter container 000 043 204 19 Shell (Transaxle) - 20 liter container 999 917 546 00 Shell (Transaxle) - 1 liter container Note: All are synthetic GL4 and GL5 rated (or "non-conventional processing") oils. GL oils have good light running properties because of their light low-temperature viscosity as well as a high level of temperature stability. Tools you will need: Tire ramps or jack 17 mm allen for the fill plug 16 mm triple square with a hole in the middle for the drain plug Note: Most later cars have an 10 mm allen type plugs - we recommend checking before you start. 3 quart oil catch pan Torque wrench (optional) Drain Transmission Oil Transmission oil should be changed when the engine/transmission has reached normal operating temperature. CAUTION - oil will be hot, take adequate precautions to avoid being burned. Use ramps or jack up the vehicle at the points provided. Remove underside panels to access the transmission. (Boxster owners you need to loosen the diagonal braces and then remove the transverse strut member. A little more work on a Boxster. When you put them back they need to have the bolts torqued to 48 ft lbs. (65 nm). See images Image 1 Image 2 Image 3 Image 4 Image 5 ) (images courtesy of scherb) Place oil collection pan under the transmission (at least 9 quarts). Always dispose of the waste oil in accordance with local legal requirements. Unscrew oil filler screw (1). Unscrew oil drain screw (2) and drain transmission oil. Wait about 20 minutes for all the old oil to drain. Fill Transmission Oil Clean oil drain and oil filler screw. Screw in oil drain screw. Tightening torque: 22 ft-lb. Fill with gear oil up to the bottom edge of the oil filler opening. Screw in oil filler screw. Tightening torque: 22 ft-lb. Install underside panels. Model/Capacity (approx.) Manual Transmission 911 Carrera (G96/00) - 2.7 liters 911 Carrera 4 (G96/30) - 2.7 liters GT3 - 3.3 liters Boxster (G86/00) - 2.25 liters Turbo - 3.0 (to 3.8) liters Front-axle Final Drive 911 Carrera 4 (Z96/00) - 1.5 liters Turbo - 1.5 liters
  3. View this tutorial Spark Plug Change Instructions Note: Part numbers sometimes change without notice. Always double check with your supplier that you have the latest part numbers. Parts you will need: 6 ea 999 170 207 91 Spark Plugs (Beru 14FGR 6KQU) MY99-MY01 or 6 ea 999 170 223 90 Spark Plugs (Beru FGR 5KQE0) MY02 Tools you will need: Jack 19 mm socket for wheel bolts Snap-On S9706 Spark Plug Socket Snap-On FXW4 (4 inch) Extension (or any 3/8" drive extension that allows at least 16 degrees of offcenter movement) Author Loren Category Carrera (996) - Maintenance Submitted 11/15/2005 01:40 PM Updated 01/11/2011 12:15 PM
  4. Note: Part numbers sometimes change without notice. Always double check with your supplier that you have the latest part numbers. Parts you will need: 6 ea 999 170 207 91 Spark Plugs (Beru 14FGR 6KQU) MY99-MY01 or 6 ea 999 170 223 90 Spark Plugs (Beru FGR 5KQE0) MY02 Tools you will need: Jack 19 mm socket for wheel bolts Snap-On S9706 Spark Plug Socket Snap-On FXW4 (4 inch) Extension (or any 3/8" drive extension that allows at least 16 degrees of offcenter movement) 3/8" Ratchet 5 mm hex allen socket or 5 mm allen wrench Torque wrench Note: Most find that removing the muffler first (a 15 minute job) will make spark plug replacement much much easier (and faster). Jack up the vehicle at the lift points provided and remove the rear wheel (you will need to do this for each side).<br></li><li>Remove the 2 fastening screws (M6 x 20) of the shields on the cylinder heads and remove the plates. Disconnect connection cable of the ignition coils. Check for damage and replace if needed Remove the two fastening screws (M6 x 25) of the plug coils and remove the 6 plug coils. You may find it easier to remove the top 5 MM socket cap screws first. Then remove the bottom screws. Unscrew the spark plugs using the spark-plug wrench. Remove the spark plug and install the new plug by hand. Do not use any anti-seize or any other lubricant on the plug threads! Use the socket extension minus the ratchet to get the plug started. Always turn the plug counterclockwise until you feel it seat. This insures that the plug is in the threads on the cylinder head so there is no concern about cross threading it. Then turn it clockwise until it is as tight as I can get it by hand. IF YOU CAN'T TURN IT BY HAND THEN IT IS NOT THREADED PROPERLY When the plugs are hand tightened, attach the ratchet and tighten it a little. Then use the torque wrench to finish the job. Tighten new spark plugs to 22 ft-lb. Push on plug coils and tighten the fastening screws (M6 x 25) to 7.5 ft-lb. Reinstall the bottom screws first and then top. Subsequently push on the connecting cable of the plug coils. Refit the two shields and tighten the fastening screws to 7.5 ft-lb. Re-install the wheel(s) and lower vehicle. Torque the wheels bolts to 96 ftlb. (130 Nm)
  5. View this tutorial Pollen Filter Change Instructions Note: Part numbers sometimes change without notice. Always double check with your supplier that you have the latest part numbers. Images are for LHD cars - RHD cars will be on the opposite side. Parts you will need: 1 ea 996 571 219 03 Pollen Filter (Charcoal activated filter) Tools you will need: T25 Torx drive Remove T25 Torx screw that holds the panel cover in place (passenger side front trunk). Remove the panel cover. Remove the particle filter upw Author Loren Category Carrera (996) - Maintenance Submitted 11/15/2005 01:31 PM Updated 06/14/2010 09:31 AM
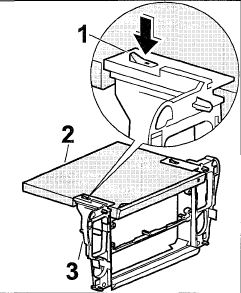
  6. Note: Part numbers sometimes change without notice. Always double check with your supplier that you have the latest part numbers. Images are for LHD cars - RHD cars will be on the opposite side. Parts you will need: 1 ea 996 571 219 03 Pollen Filter (Charcoal activated filter) Tools you will need: T25 Torx drive Remove T25 Torx screw that holds the panel cover in place (passenger side front trunk). Remove the panel cover. Remove the particle filter upwards and out of the housing guide. Insert a new particle filter into the housing guide. Check that the filter is correctly fitted and in the correct installation position. Replace the panel cover. Tighten T25 Torx screw that holds the panel cover in place.
  7. View this tutorial Air Filter Change Instructions Note: Part numbers sometimes change without notice. Always double check with your supplier that you have the latest part numbers. Parts you will need: 1 ea 996 110 131 52 Air Filter or equal (BMC or K&N Filter) Tools you will need: 13 mm socket or wrench Regular screwdriver Phillips screwdriver Remove hexagon-head bolt M6 x 34. (13 mm wrench) Loosen the hose clamp on the throttle body and remove the connection of the sucking jet pumps (not present on ea Author Loren Category Carrera (996) - Maintenance Submitted 11/15/2005 01:24 PM
  8. Note: Part numbers sometimes change without notice. Always double check with your supplier that you have the latest part numbers. Parts you will need: 1 ea 996 110 131 52 Air Filter or equal (BMC or K&N Filter) Tools you will need: 13 mm socket or wrench Regular screwdriver Phillips screwdriver Remove hexagon-head bolt M6 x 34. (13 mm wrench) Loosen the hose clamp on the throttle body and remove the connection of the sucking jet pumps (not present on early cars). Pull connecting plug off the mass air flow sensor by squeezing the connector clips. Then unclip the cable on the air cleaner housing. Subsequently unclip the oil filler snorkel. Remove the whole air cleaner housing out of the engine compartment. Unscrew the 7 (phillips) fastening screws on the air cleaner housing and remove the upper part of the air cleaner. Subsequently remove the cleaner element. Clean air cleaner housing. Insert new filter element and replace the upper part of the air cleaner housing (BMC filter shown). Tighten the 7 fastening screws. Place the air cleaner housing in the engine compartment again. Make sure that the rubber mount of the air cleaner housing is still seated in the body. Tighten the air cleaner housing with the fastening screw M6 x 34, the screw is tightened with 7.5 ft-lb. Clip in oil filler neck again.. Reconnect the intake pipes on the throttle body. Retighten the hose clamp. Subsequently insert the connection for the sucking jet pump (again, if present) and mount the spring band clamp. Fit the connecting cable and clip into the holder on the air cleaner. Push the connecting plug on the mass air flow sensor.
  9. You could use the phone prep - if it is not already in use. It has both switched and unswitched power, ground and a telephone mute wire.
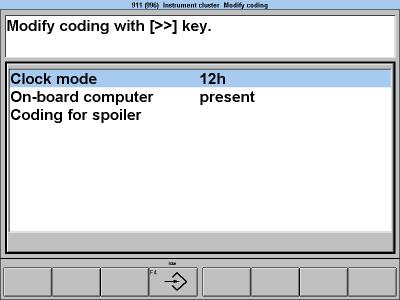
  10. If you have a MY02 or newer (you did not say your model year) then you can change it with the On-Board Computer (if you have that option). Otherwise it needs to be changed with a PST2 or PIWIS tester.
  11. View this tutorial Oil Change Instructions Note: Part numbers sometimes change without notice. Always double check with your supplier that you have the latest part numbers. Parts you will need: 1 ea 996 107 225 60 (for 3.6 liter engines) or 996 107 225 53 or 996 107 225 52 (for 3.4 liter engines) Oil Filter (with O-ring) 1 ea 900 123 106 30 Aluminum Sealing Ring 9 ea 996 106 665 55 Mobil 1 0W-40 or equal Approved Oils as of April 2007 The list is now very long (for worldwide coverage). Here is a short list of p Author Loren Category Carrera (996) - Maintenance Submitted 11/15/2005 10:58 AM Updated 11/26/2012 04:13 PM
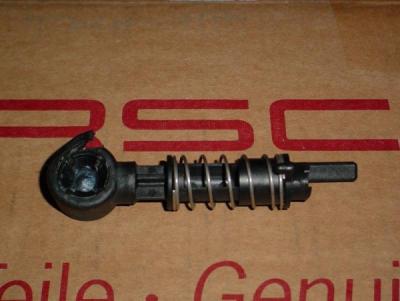
  12. Note: Part numbers sometimes change without notice. Always double check with your supplier that you have the latest part numbers. Parts you will need: 1 ea 996 107 225 60 (for 3.6 liter engines) or 996 107 225 53 or 996 107 225 52 (for 3.4 liter engines) Oil Filter (with O-ring) 1 ea 900 123 106 30 Aluminum Sealing Ring 9 ea 996 106 665 55 Mobil 1 0W-40 or equal Approved Oils as of April 2007 The list is now very long (for worldwide coverage). Here is a short list of popular oils (US/Canada): Castrol Syntec 5W-40 5W-40L Mobil 1 0W-40 (factory fill) Mobil 1 5W-40 Mobil 1 5W-50 ChevronTexaco Havoline Ultra 5W-40 Tools you will need: Tire ramps or jack 8 mm allen wrench or allen hex socket Oil filter wrench (p/n 000 721 920 40) (tool 9204 about $7 to $22 at your dealer) 27 mm socket (or a wrench big enough to fit the oil filter wrench) 9 quart oil catch pan Torque wrench (optional) Locations shown on Carrera - Boxster will be turned 180 degrees. Oil should be changed when the engine has reached normal operating temperature. CAUTION - oil will be hot, take adequate precautions to avoid being burned. Use ramps or jack up the vehicle at the points provided. Remove the oil drain screw and collect the engine oil in a disposal container (at least 9 quarts). Always dispose of the waste oil in accordance with local legal requirements. Wait about 20 minutes for all the old oil to drain. Then clean the oil drain screw and screw it back in with a new aluminum sealing ring. Tightening torque is 37 ft-lb. Remove the oil filter housing with the oil filter wrench and unscrew the housing. Remove oil filter housing vertically downward. Drain remaining oil into a disposal container. Remove the filter element. Remove the filter downwards, drain and dispose of it in accordance with local legal requirements. Note: If the spindle/spring assembly sticks to the filter - remove it and push it back into the filter housing.<br /> Clean the oil filter housing 1 thoroughly inside and outside and replace the O-ring 3. The O-ring should not be levered off or on with a sharp object (e.g. screwdriver). A sharp object will damage the O-ring. Install the new filter element. Lightly apply oil to the O-ring and housing threads. Install oil filter housing and tighten to 19 ft-lb. Fill with engine oil after a draining time of approx. 20 minutes. Model/Capacity in Liters (US quarts) (approx.) 911 Carrera (3.4 liter engine) 8.50 liters (8.98 US quarts) 911 Carrera (3.6 liter engine) 8.25 liters (8.71 US quarts) Boxster 8.50 liters (8.98 US quarts) Note: Based on RFM's excellent recommendation we are suggesting that folks that do their own oil changes upgrade their oil drain plug to a stainless steel version of the drain plug. The original version is aluminum and strips very easily so this stainless steel version should eliminate that from happening. 900.219.015.00 SS Drain Plug -- US MSRP $21.40 -- Sunset Imports price $12.80
  13. 987 631 446 02 Right Rear Light Housing - retail $233.72 (as of Oct 2005)
  14. Richard sent me the manual he had which is a MY00 Owners Manual. It should be pretty close to a MY97 manual. It is now here in the Porsche Manuals section.
  15. Did you look at TSB 12/05 9153 Satellite Radio Installation Instructions (I No. QV4/QV8) (dated 9-19-2005)? "See page 17-18 of this bulletin for Sirius Satellite Radio activation instructions."
  16. I have seen no TSBs on this - and actually would not expect to. My former daily driver, a Lexus, and current daily driver a Mercedes both have windshield pits. I am afraid it is a fact of life if you drive a car daily in any traffic at all.
  17. The cables are not installed in your car as it requires fiber optic cables that match the options your car has. You will need to buy the correct cables from the dealer. The cable, options and part numbers are all covered in the Installation TSB (available to view for Contributing Members). You will also need to have a dealer, independent shop, or race shop with a PIWIS (not PST2 in this case) "turn on" the CDC-4 function once everything is hooked up.
  18. Yeah, I haven't gotten to the Cayenne DIY pages yet. Here is a quick summation: The front and rear pads are very similar to the Carrera - remove the pin and pad sensors, pull the pads out. The rotors are similar also. One screw and tap with a hammer. And for the rear you need to back off the parking brake shoes inside the hub. Again, pretty much like the Carrera - just bigger. Be sure that you don't get the rotors mixed up as they are marked L (left) and R (right). If you do this and can take some pics that would be great. I'd rather have pics in the DIY than diagrams. Thanks!
  19. This is not unusual at all. The way the OBD II computer works it can detect a problem and store it as a "pending fault". It continues to check and monitor conditions and if the conditions that cause the fault are corrected then the CEL is never turned on. Likewise, if a fault has turned on the CEL and that condition has been corrected it will turn the CEL off itself after a certain number of prescribed conditions have been met (drive cycles). For the same reasons if you have an O2 sensor failure, and you then replace the O2 sensor. Then you turn the CEL off with a scan tool and go to get your car smog checked it will fail - because the drive cycle test in the DME has not been met. Sometimes for certain faults this can take a couple of weeks of starting stopping and driving the car without the same fault happening. I think you can thank the EPA for that one - it keeps people from cheating on their smog tests.
  20. The signal comes in through the phone prep connector and goes to the radio (Yellow/Black) wire. If you look at both the radio wiring diagram and the telephone wiring diagram you will see both ends of the Yellow/Black wire. Here is Gary's iPod install you can see where the connector is in the front console. If you need more pics from his iPod install look here.
  21. Drive Block? Try locking the car with key. Wait a couple minutes then unlock it with the key.
  22. It should come from a 4 pin connector behind the center console for telephone prep. No idea why it is disconnected unless there was a different radio in the car at some time.
  23. Should be a yellow wire with a black stripe. http://www.renntech.org/forums/index.php?s...indpost&p=30114
  24. I would think the manufacturer of these systems would have recommended locations?
×
×
  • Create New...

Important Information

We have placed cookies on your device to help make this website better. You can adjust your cookie settings, otherwise we'll assume you're okay to continue.