Jump to content

Welcome to RennTech.org Community, Guest

There are many great features available to you once you register at RennTech.org
You are free to view posts here, but you must log in to reply to existing posts, or to start your own new topic. Like most online communities, there are costs involved to maintain a site like this - so we encourage our members to donate. All donations go to the costs operating and maintaining this site. We prefer that guests take part in our community and we offer a lot in return to those willing to join our corner of the Porsche world. This site is 99 percent member supported (less than 1 percent comes from advertising) - so please consider an annual donation to keep this site running.

Here are some of the features available - once you register at RennTech.org

  • View Classified Ads
  • DIY Tutorials
  • Porsche TSB Listings (limited)
  • VIN Decoder
  • Special Offers
  • OBD II P-Codes
  • Paint Codes
  • Registry
  • Videos System
  • View Reviews
  • and get rid of this welcome message

It takes just a few minutes to register, and it's FREE

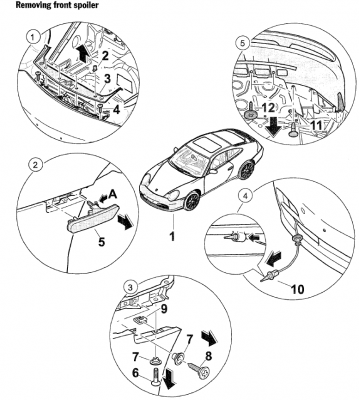
Contributing Members also get these additional benefits:
(you become a Contributing Member by donating money to the operation of this site)

  • No ads - advertisements are removed
  • Access the Contributors Only Forum
  • Contributing Members Only Downloads
  • Send attachments with PMs
  • All image/file storage limits are substantially increased for all Contributing Members
  • Option Codes Lookup
  • VIN Option Lookups (limited)

Loren

Admin
  • Posts

    37,562
  • Joined

  • Days Won

    581

Everything posted by Loren

  1. These are the correct shocks for a 40th Anniversary car. 996.343.041.21 is an RoW M030 front sport shock for a MY03 or newer. 996.343.051.26 is an RoW M030 rear sport shock for a MY03 or newer.
  2. Was the oil level very high (full or a little over full) - then that would be normal. Otherwise look for leaks.
  3. A the center top of any page is a link that says "Porsche Parts at Dealer Cost". That link is to Sunset Imports. I think you will find they have the best prices on genuine Porsche parts -- and fast courteous service. Tell them RennTech.org sent you!
  4. A little clarification... P1411 Secondary Air Injection System, Bank 2 – Below Limit Potential causes: - Secondary air injection pump does not function - Air supply lines restricted - Electric change-over valve does not function - Air change-over valve does not function - Vacuum system leaking
  5. This is looking good for the 'ultimate' CAI then? Airbox, throttle body, inlet hose and oil filler tube. The Porsche independent I mentioned has ordered the parts and I will be speaking to them again next week to arrange a time for a test fit. I'm not sure when I will be able to lend them the car but I will post back to this and other Porsche forums with impressions and dyno graphs after we're done. We're also intending to do stock dyno runs, header and catalyst runs, header catalyst and airbox runs and then over the next couple of months, the 9ff cams / headers / cats / ECU both with and without the CAI kit above. We'll then hopefully be able to give the whole Porsche community out there some real independently tested feedback on what works and what doesn't and in what combinations. Whilst doing the dyno runs, we'll be carefully monitoring the engine coolant and intake temps to ensure no timing is being pulled by the ECU. All runs will be done using 99RON fuel. Ian W See my latest blog for my thoughts on dyno testing... here.
  6. I think that is System Too Lean at Idle. He should check MAF air flow to verify the fault.
  7. Use a warm (not hot) hairdryer and dental floss to cu the tape. Then one it is off use 3M Adhesive Remover. You might try reading through the old aerokit instructions TSB. In the original instructions the side skirts were epoxy glued on - but that will also take 24 hours to cure.
  8. P0650 Check Engine Malfunction Indicator Light (MIL) – Open Circuit Check wiring from DME control module, pin IV/31, to instrument cluster for continuity.
  9. I think this is it. To see how to get to this point have a look at Replacing the Gas Door Actuator here.
  10. Nope... they would be 996.505.525.00.01C Left cover -- MSRP $10.19 (as of June 2007) 996.505.526.00.01C Right cover -- MSRP $6.59
  11. They should start with 629xxxx.
  12. 986.606.125.01 is the correct number -- and it will REQUIRE a software update to your DME.
  13. Have you tried Sunset Imports (Porsche Parts at Dealer Cost)? (link at the top center of any page)
  14. Most of that information is in PET - Porsche's Electronic Parts Catalog.
  15. That must be the molding number because that part number does not come up in my parts list - the .01 does. The last number in the (extended) part number is always the paint code or color code.
  16. MY99 Fuel Tank Ventilation System 1 - EVAP canister purge valve 2 - EVAP canister 3 - Purge air 4 - Tank 5 - Tank pressure sensor 6 - Shutoff valve 7 - Operating purge valve 8 - To intake manifold 9 - Vacuum control valve
  17. They would not have needed to remove them when cleaning the radiators or removing the bumper. The (item 4) pieces fit at the end of the bumper where it wraps around in front of the wheels. MY02 and newer are the same bumper - Porsche uses the pic for reference. 996.505.525.01.01C Left cover -- MSRP $10.19 (as of June 2007) 996.505.526.01.01C Right cover -- MSRP $11.00
  18. The satin black bumper grilles are: 986.505.553.01.01C Left grille frame 986.505.554.01.01C Right grille frame The titanium metallic grilles are: 986.505.553.02.9A4 Left grille frame 986.505.554.02.9A4 Right grille frame
  19. Yeah, as I recall, when removed it is partially open. But you can usually move it around too so I don't know if the proves anything. Again, I don't think a good working valve makes any buzzing noises. Usually I have seen the solenoid go out and the valve doesn't move or the valve is so gummed up with deposits that is doesn't move freely. No fault codes in the DME? Have you cleaned the throttle butterfly (front and back)?
  20. 1. That sounds normal to me. 2. The set position of the IACV is based on information the DME gets on temperature and mixture. 3. A rattling sound when you remove it is normal - when it doesn't rattle then it is usually gummed up with carbon. In normal operation I have never heard the IACV make noise. So what is the problem you are trying to solve? Uneven idle? hunting?
  21. Based on the fit I see - yes you need the GT2 ducts. This is the risk you take when you use after market parts or change factory parts without taking in to account the associated parts and their purpose. Please try do a search for your subject in the future as it has likely been covered here before. http://www.renntech.org/forums/index.php?s...ost&p=51743
  22. 1. Pull engine cover vertically upwards and off. 2. Separate the six ignition coils from the wiring harness. Refer to the following note for more information. It is very difficult to access the ignition module plugs to unlock them. Therefore, use a suitable tool (e.g. a bent piece of wire) for unlocking. Press the plugs against the ignition module to facilitate unlocking. Otherwise, the plug locks may break. 3. Press plugs down slightly, unlock with a suitable tool (e.g. bent piece of wire) and remove. 4. Pull out ignition coil and lay it aside. 5. Remove the spark plugs. 6. Check electrode gap. The electrode gap for the spark plug must be 1.1 mm. 7. Tighten spark plugs using special tool (spark plug wrench 3122B ). New spark plugs are tightened to 20 Nm (15.0 ftlb.) when first tightened. 8. Install the plug coils. When doing so, make sure that the straight surface is pointing to the intake pipes. 9. Reconnect the ignition coil. The connectors must engage audibly. 10. Clip on engine cover and check that it is seated correctly.
×
×
  • Create New...

Important Information

We have placed cookies on your device to help make this website better. You can adjust your cookie settings, otherwise we'll assume you're okay to continue.