Jump to content

Welcome to RennTech.org Community, Guest

There are many great features available to you once you register at RennTech.org
You are free to view posts here, but you must log in to reply to existing posts, or to start your own new topic. Like most online communities, there are costs involved to maintain a site like this - so we encourage our members to donate. All donations go to the costs operating and maintaining this site. We prefer that guests take part in our community and we offer a lot in return to those willing to join our corner of the Porsche world. This site is 99 percent member supported (less than 1 percent comes from advertising) - so please consider an annual donation to keep this site running.

Here are some of the features available - once you register at RennTech.org

  • View Classified Ads
  • DIY Tutorials
  • Porsche TSB Listings (limited)
  • VIN Decoder
  • Special Offers
  • OBD II P-Codes
  • Paint Codes
  • Registry
  • Videos System
  • View Reviews
  • and get rid of this welcome message

It takes just a few minutes to register, and it's FREE

Contributing Members also get these additional benefits:
(you become a Contributing Member by donating money to the operation of this site)

  • No ads - advertisements are removed
  • Access the Contributors Only Forum
  • Contributing Members Only Downloads
  • Send attachments with PMs
  • All image/file storage limits are substantially increased for all Contributing Members
  • Option Codes Lookup
  • VIN Option Lookups (limited)

Loren

Admin
  • Posts

    37,566
  • Joined

  • Days Won

    581

Everything posted by Loren

  1. Item 7 - 996.559.401.00.G2X Left Roof Edge Strip (unpainted) 996.559.402.00.G2X Right Roof Edge Strip (unpainted) Item 8 - 996.559.721.00 Left Gasket 996.559.722.00 Right Gasket Item 9 - 996.559.405.01 Adapter (10 per car) Item 10 - 996.559.403.01 Clip (10 per car) Item 11 - 996.559.729.00 Bracket for flap (4 per car) Item 12 - 996.559.501.00.G2X Flap Front (2 per car) 996.559.503.00.G2X Flap Rear (2 per car)
  2. The only time the part numbers change is if you are in a right hand drive country - or if they are Litronics.
  3. I am trying to tell you that the number printed or stamped on a part is not necessarily the Porsche part number to order that part. In some cases it is the molded pieces part number. Ask for pics of the front and back of the headlights. On the back look for broken attachment tabs or a broken electrical socket. On the front make sure they are the "clears" you are looking for and that they are not scratched or discolored.
  4. 996.631.064.20 is likely the subassembly part number for the unassembled case. It does not come up as a valid (orderable) part in the system.
  5. P1602 Terminal 30 missing. - Fuse faulty. - Open circuit. - Battery was disconnected. - DME connector was unplugged. Troubleshooting: Check the battery - replace if bad. Check fuse C1 - replace if bad. Check wire terminal 30 (main power) continuity - repair wire harness.
  6. You need the color/finish code to be a valid part number. 996.504.393.01.01C Left and 996.504.394.01.01C Right
  7. Did you try the Links button at the top right? http://www.renntech.org/forums/index.php?a...DE=02&cat=5
  8. Are you sure it is not 182 - Chiffonweiss?
  9. I think you want item 7 in post #2 above. Left or right -- or both?
  10. Silver yes - but I do not find one in chrome.
  11. The picture you pointed me to are item 4 and are removed from the end of the bumper when you add an aerokit. Perhaps you mean the air guides at the bottom of the wheel well liners? (items 7 an 8)
  12. Check all of your fuses and once you are sure they are good. 1. Disconnect your battery - wait 5 minutes. 2. Reconnect your battery. 3. Turn the ignition switch to "on" - but do not start the car and do not touch the accerator pedal for 1 minute. Then turn the car off. 4. Start the car as you normally would.
  13. It's the fan inside your AC/heater system. Kind of a pain to get to - so do the tests first.
  14. Air injection is used on US/Canada cars to meet country emission standards. BTW.. this we we ask folks to to fill the location in their profile. So we get you the right answer for your country/location.
  15. I'm not sure. What I am after are the parts to replace the rear 'mudflap' pieces which is smoothly moulded to the body and is left over when you fit the aerokit sideskirts. Maybe there are also front ones normally? Perhaps someone can let me know. It's the bits shown here in figure 9 at the end. http://p-car.com/996/diy/aerokit/ regards They are on the front. Item 4? I will need to know for what model year too.
  16. Follow the manual.
  17. Fault code 31 -- Voltage too low, Voltage too high Potential causes: No control module fault stored. Supply voltage OK. Nominal blower voltage > 3 volts. Nominal blower voltage stabilized. Voltage too low Note - Voltage too low means that the measured blower voltage lies below the nominal blower voltage. 1. Check the heating activation relay. Battery positive voltage must be present at terminal 87 when the ignition is switched on. 2. Unplug connector C from the heating/air-conditioning control. 3. Connect voltmeter to C 14 (positive) and ground. Switch on ignition. Display: Battery voltage 4. Push connector C on the heating/air-conditioning control. 5. Connect voltmeter to C 14 (positive) and C 11 (negative). Maximum blower speed Display: approx. 12 V Minimum blower speed Display: approx. 0 V 6. Connect voltmeter to C 14 (positive) and C 16 (negative). Maximum blower speed Display: approx. 5 V Minimum blower speed Display: approx. 9 V 7. Check driver. Connect voltmeter to positive and pin 3 on driver connector. Display: Battery voltage Connect voltmeter to positive and pin 1 on driver connector. Maximum blower speed Display: approx. 5 V Minimum blower speed Display: approx. 9 V Connect voltmeter to positive and pin 2 on the driver connector. Maximum blower speed Display: approx. 12 V Minimum blower speed Display: approx. 0 V 8. Check wiring from heating/air-conditioning control to driver for continuity. 9. Check blower motor. Voltage too high Note - A higher blower voltage can only be caused by a short to ground on the wires to pins 1 or 2 of the driver. 1. Unplug connector C from the heating/air-conditioning control. 2. Unplug connector from the driver. 3. Connect ohmmeter to C 16 and ground. Display: infinite ohms 4. Unplug connector from the fan motor. 5. Connect ohmmeter to driver connector pin 2 and ground. Display: infinite ohms
  18. Your car should already have an air pump. This is standard for emission control.
  19. On both C4, C4S and MY02 and newer the fuel filter attaches to that piece.
  20. Okay now I am confused... you want a "Carrera" chrome logo for a Boxster? Or, you want a "Boxster" logo in chrome? Or?
  21. I don't recall one in chrome. You might try Performance Products.
  22. I am not sure that plastic to plastic needs any seal -- and the parts list does not show one either.
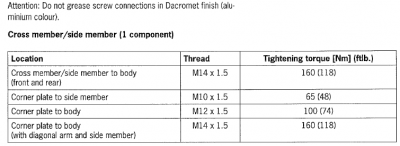
  23. I don't think there is anything special here - just unbolt and bolt in the new one. I don't think you will need to remove the lower ball-joint. The torque settings are below. And... you will probably want ot have the alignment checked too.
  24. You are correct there is no seal on the level switch. That is the correct (current) part number for an RoW MY99.
×
×
  • Create New...

Important Information

We have placed cookies on your device to help make this website better. You can adjust your cookie settings, otherwise we'll assume you're okay to continue.