Jump to content

Welcome to RennTech.org Community, Guest

There are many great features available to you once you register at RennTech.org
You are free to view posts here, but you must log in to reply to existing posts, or to start your own new topic. Like most online communities, there are costs involved to maintain a site like this - so we encourage our members to donate. All donations go to the costs operating and maintaining this site. We prefer that guests take part in our community and we offer a lot in return to those willing to join our corner of the Porsche world. This site is 99 percent member supported (less than 1 percent comes from advertising) - so please consider an annual donation to keep this site running.

Here are some of the features available - once you register at RennTech.org

  • View Classified Ads
  • DIY Tutorials
  • Porsche TSB Listings (limited)
  • VIN Decoder
  • Special Offers
  • OBD II P-Codes
  • Paint Codes
  • Registry
  • Videos System
  • View Reviews
  • and get rid of this welcome message

It takes just a few minutes to register, and it's FREE

Contributing Members also get these additional benefits:
(you become a Contributing Member by donating money to the operation of this site)

  • No ads - advertisements are removed
  • Access the Contributors Only Forum
  • Contributing Members Only Downloads
  • Send attachments with PMs
  • All image/file storage limits are substantially increased for all Contributing Members
  • Option Codes Lookup
  • VIN Option Lookups (limited)

Loren

Admin
  • Posts

    37,525
  • Joined

  • Days Won

    570

Everything posted by Loren

  1. Thank you, and great web site. Being a new member I am unfamiliar with the venacular.. What is the TSB and where would I find that? Best regards. Brian You must be a Contributing Member to view TSBs here. How to become a Contributing Member
  2. Fans go to stage 2 (high speed) all the time the AC is on.
  3. Fully covered in a TSB. You could do the inspection and install yourself. Contributing Members here can view all current Porsche TSBs here.
  4. Need to check the DME readout to be sure but it sounds like an air leak or a bad MAF. Getting the readings would tell for sure which.
  5. You are correct - usually stapled in the service book.
  6. Without a whole lot of detail teh basic difference is that in the Bi-Xenon both the high beam and low beam are Xenon. In the Litronic system the low beam is Xenon and the high beam is Halogen with the Xenon low beam added in via a lens rotation.
  7. What plugs (exactly) did you put in at 60,000 miles? If they were the Bosch or Beru 2 prong plugs it would be 30,000 miles - if they were the Bosch or Beru 4 prong plugs then it would be 60,000 miles.
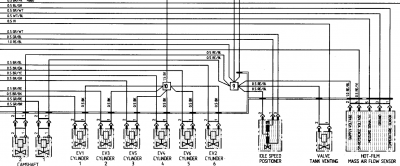
  8. MESSORE SIGNAL (+) is the air flow (over the MAF) signal sent back to the DME. So with no air flow signal you are likely not get good revs above 4500 RPM but idle is likely okay. Hopefully the missing wire is in that harness and can be spliced into.
  9. I just posted 2 new videos on myspace.. www.myspace.com/bobby or click this link http://www.youtube.com/watch?v=iwljNhq0040976 another video click the next link please give me some feed back :) Sorry, your first youtube link is bad.
  10. Water pump impellers are plastic. IMHO as long as they are very small and not sharp chunks - then that might be normal wear for 40-60 K miles car.
  11. 1. See the wiring diagram for the proper wiring colors for your MY1998 Boxster. 2. Normal - that is just vent line and is normally open to air. 3. Correct it is an engine compartment air temperature sensor. It needs to be properly in place or it will fall on the engine and give incorrect readings - causing the purge fan to run all the time.
  12. Try 6721 or 6719 If you have not already read this please do so... Lost Radio Code - FAQ, PLEASE READ THIS FIRST
  13. Here is another (but more expensive thought). You could put a C4S or Turbo front bumper on the car. Add in the larger radiators (from either C4S or Turbo) and the ducting and you should have more surface area to cool under both standing and driving conditions. You might be able to find those parts reasonable at a salvage yard like Oklahoma Foreign or Silver Star Recycling.
  14. 996.351.425.22 Left Front 996.351.426.22 Right Front -- US MSRP $644.31 each 996.352.421.24 Left Rear 996.352.422.24 Right Rear -- US MSRP $468.55 each
  15. The pump is over $800 MSRP and if you need to two hydraulic rams - they are over $400 each -- So, I guess that would depend on the fixed wing you buy.
  16. I could not agree more - this is one chance you do not want to take.
  17. Scouser has updated his outstanding VIN Decoder. The VIN Decoder is here. Changes: 3.05 20/Aug/08 Fixed bug in USA spec Cayenne 9PA->4 was Row Spec only. 3.06 1/Mar/2009 Added 944 Row Spec coupe Added 997 Row Spec coupe (model 2) Fixed 997 GT3 bug was incorrect 3.8Ltr now 3.6Ltr. Many thanks to Scouser for his continued efforts, work, and updates to this fine tool! :clapping:
  18. P0650 Check Engine Malfunction Indicator Light (MIL) – Open Circuit P0650 Check Engine Malfunction Indicator Light (MIL) – Below Limit P0650 Check Engine Malfunction Indicator Light (MIL) – Above Limit Check wiring from DME control module, pin IV/31, to instrument cluster for continuity. 1. Connect special tool 9637 to wiring harness (DME control module connector). 2. Remove connector X 2/3. 3. Connect ohmmeter to special tool 9637, pin IV/31, and to X 2/3 on pin side, pin 11. Display: 0 - 5 ohms If infinite ohms is displayed, check wiring harness for chafing and pinching damage. 4. Remove connector III of instrument cluster. 5. Connect ohmmeter to X 2/3, sleeve side, and to connector III of instrument cluster, pin 2. Display: 0 - 5 ohms If infinite ohms is displayed, check wiring harness for chafing and pinching damage. Check wiring from DME control module, pin IV/31, to instrument cluster for short to ground. 1. Connect special tool 9637 to wiring harness (DME control module connector). 2. Remove connector III of instrument cluster. 3. Connect ohmmeter to special tool 9637, pin IV/31, and ground. Display: infinite ohms If 0 - 5 ohms is displayed, check wiring harness for chafing and pinching damage. Check wiring from DME control module, pin IV/31, to instrument cluster for short to B+. 1. Connect special tool 9637 to wiring harness (DME control module connector). 2. Remove connector III of instrument cluster. 3. Switch on the ignition. 4. Connect voltmeter to special tool 9637, pin IV/31, and ground. Display: 0 V If battery voltage is displayed, check wiring harness for chafing and pinching damage.
  19. Model year please?
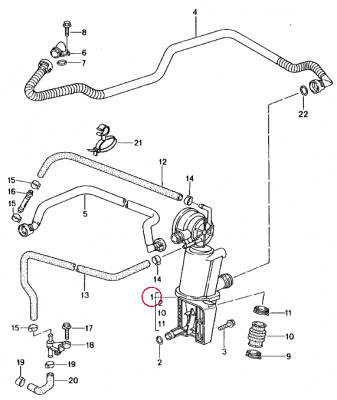
  20. This is the AOS on the top of the engine (that usually goes bad) - those other two are in the crankcase. Item 1 is the AOS Item 10 is the bellows.
  21. Can you please explain the proper way to check the wiring? Are you saying to ohm out between the computer and the harness going to the sensor? Thanks! I just got the CEL the other day, read the codes today and also got P0133 and P1275... Your fault codes are different you will need a PST2 or PIWIS tester to regulator delay and the sensor-signal period. If the wiring is ok - then you like need a new sensor.
  22. I already got one radio code for you back in June 2008. THIS IS NOT WHERE YOU POST THOSE REQUESTS. Try 8591 or 8589 Please read this and follow the instructions... Lost Radio Code - FAQ, PLEASE READ THIS FIRST
  23. Try 4768 or 4766 Please read this and follow the instructions... Lost Radio Code - FAQ, PLEASE READ THIS FIRST
  24. Please read this and follow the instructions... Lost Radio Code - FAQ, PLEASE READ THIS FIRST
×
×
  • Create New...

Important Information

We have placed cookies on your device to help make this website better. You can adjust your cookie settings, otherwise we'll assume you're okay to continue.