Jump to content

Welcome to RennTech.org Community, Guest

There are many great features available to you once you register at RennTech.org
You are free to view posts here, but you must log in to reply to existing posts, or to start your own new topic. Like most online communities, there are costs involved to maintain a site like this - so we encourage our members to donate. All donations go to the costs operating and maintaining this site. We prefer that guests take part in our community and we offer a lot in return to those willing to join our corner of the Porsche world. This site is 99 percent member supported (less than 1 percent comes from advertising) - so please consider an annual donation to keep this site running.

Here are some of the features available - once you register at RennTech.org

  • View Classified Ads
  • DIY Tutorials
  • Porsche TSB Listings (limited)
  • VIN Decoder
  • Special Offers
  • OBD II P-Codes
  • Paint Codes
  • Registry
  • Videos System
  • View Reviews
  • and get rid of this welcome message

It takes just a few minutes to register, and it's FREE

Contributing Members also get these additional benefits:
(you become a Contributing Member by donating money to the operation of this site)

  • No ads - advertisements are removed
  • Access the Contributors Only Forum
  • Contributing Members Only Downloads
  • Send attachments with PMs
  • All image/file storage limits are substantially increased for all Contributing Members
  • Option Codes Lookup
  • VIN Option Lookups (limited)

Loren

Admin
  • Posts

    37,530
  • Joined

  • Days Won

    572

Everything posted by Loren

  1. Removal 1. Disconnect the battery and cover terminal or battery. Undo the fastening screw for the air cleaner housing and the hose clamp on the throttle body. 2. Disconnect the electrical plug connection on the air flow sensor and remove the complete air cleaner assembly. 3. Relieve the drive belt at the tensioning pulley and remove the belt. 4. Disconnect the electrical plug connection on the vacuum switchover valve and unclip the switchover valve from the holder. 5. Undo the holder at the intake distributor (2 screws) and remove. Pay attention to the sealing ring (vacuum line for brake booster) when removing. 6. Undo left fastening screw (in direction of travel) and unscrew. 7. Undo right fastening screw (with deflection roller) by three turns. A gentle tap on the fastening screw loosens the threaded bushing in the generator arm (use aluminum mandrel). Unscrew fastening screw and remove with deflection roller. 8. The generator must be turned clockwise so that the swivel arm is near the crankcase and the holding arm projects beyond the fastening eye. 9. Carefully pull the generator back a little and undo the electrical connections, or press the plug connection to the generator housing, release (arrow A) and pull off. Pullout generator to the rear. Installation Tightening torques: Hexagon nut a/f24 M16 x 1.5 = 48 +-3.5 ftlb. (65 +-5 Nm) Hexagon-head bolts M10 = 33 ftlb. (45 Nm) Hexagon nut a/f13 M8 = 11.0 ftlb. (15 Nm) Note When carrying out installation, make sure that the sealing ring for the vacuum brake booster is replaced and carefully fitted. Undoing and tightening the belt pulley Note The belt pulley can be undone and tightened using a standard commercially available tool. Tools: double offset ring wrench a/f 24, screwdriver insert for internal serration screw a/f 10, cross handle and torque wrench. The hexagon nut a/f 24 must be countered with the ring wrench during tightening. The shaft is tightened to the prescribed tightening torque of 48 +-3.5 ftlb. (65 +-5 Nm) using the screwdriver insert and the torque wrench. Tool for holding the free-wheel pulley For Carrera 996 (manual transmission only) from engine No. 66 Y 03208 Use an a/f 17 multiple-tooth adapter to hold the free-wheel pulley. A/f 17 multiple-tooth adapter: see Workshop Equipment Manual, chapter on commercially available tools, No. 32-1. Note Counter with a double ring wrench when tightening with the a/f 17 multiple-tooth adapter. The shaft is tightened to the prescribed tightening torque of 59 +- 3.5 ftlb. (80 +-5 Nm) using the screwdriver insert (a/f 10 internal serration screw) and torque wrench.
  2. Removing and Replacing the Alternator Removal 1. Disconnect the battery and cover terminal or battery. Undo the fastening screw for the air cleaner housing and the hose clamp on the throttle body. 2. Disconnect the electrical plug connection on the air flow sensor and remove the complete air cleaner assembly. 3. Relieve the drive belt at the tensioning pulley and remove the belt. 4. Disconnect the electrical plug connection on the vacuum switchover valve and unclip the switchover valve from the holder. 5. Undo the holder at the Author Loren Category Carrera (996) - Common Fixes and Repairs Submitted 04/25/2010 08:37 AM Updated 07/19/2012 08:19 AM
  3. Try 8521 or 8519 If you have not already read this FAQ - please do so... Lost Radio Code - FAQ, PLEASE READ THIS FIRST
  4. Try 1221 or 1219 If you have not already read this FAQ - please do so... Lost Radio Code - FAQ, PLEASE READ THIS FIRST
  5. 3 bolts, oil sender and o-ring - should come right out with a little wiggling.
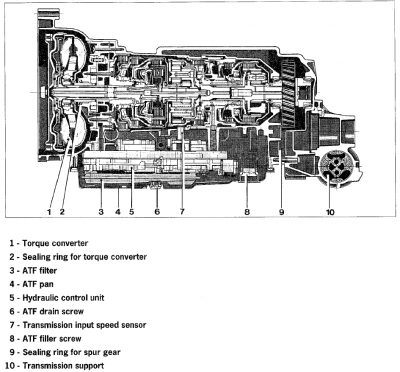
  6. Hi Loren: Some more questions on the tiptronic ... 1.) How many different transmission oil type is used to fill (chamber to chamber) in the Boxster TIP? 2.) Or, is it just one oil type (like ESSO, faint pink in color), that covers the chamber containing the gears and also the differential? 3.) Does the gear section have different oil than differential? 4.) What quantity (amount in oz. or litre) of tranny oil used in the Boxster TIP? What quantity is for the gear chamber and what quantity is for the differential. 5.) Where can I get the schematic (like CAD drawing) on the TIP? Thanks. 1. and 2. and 3. Two - ATF for transmission portion and Gear Oil for the differential section. See also DIY Tiptronic Transmission Service 4. Transmission (ATF): Filling capacity = 9.5 liters; Change capacity = 4.0 liters Differential (75W-90 gear oil): 0.9 liters 5.
  7. Do your brake lights work?
  8. Sorry. Looking at the drawing you posted part #21 is missing. The other two assemblies on the rear wheels are OK. Item 21 996.341.371.03 Support -- US MSRP $3.80
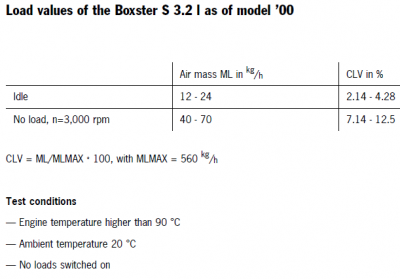
  9. No load means no AC or other engine operated accessories.
  10. There will be a new search in the next version of the software - it is a total re-write so hopefully it will be much better. I found this easily because I knew someone asked it before and so I seared for 'glovebox' with author 'Loren'.
  11. Did you push the overhead button to turn those lights off? As I recall they run off the central locking/alarm control box. Fuse C3. So if the alarm is working the problem is likely elsewhere.
  12. http://www.renntech.org/forums/index.php?/topic/19696-glove-box-light-microswitch-996-coupe-03
  13. Ok - you lost me there . Can you tell me what parts (item numbers) you need?
  14. :welcome: Which part has broken?
  15. Try 0534 or 0532 If you have not already read this FAQ - please do so... Lost Radio Code - FAQ, PLEASE READ THIS FIRST
  16. Try 6655 or 6653 If you have not already read this FAQ - please do so... Lost Radio Code - FAQ, PLEASE READ THIS FIRST
  17. Try 0193 or 0191 If you have not already read this FAQ - please do so... Lost Radio Code - FAQ, PLEASE READ THIS FIRST
  18. As I recall it just snaps into place. In the photo above of the blue car - we had just installed the new solenoid when we noticed there was no rose (nor clip in the door). Chuck just added both later without any additional work.
  19. Try 1072 or 1070 If you have not already read this FAQ - please do so... Lost Radio Code - FAQ, PLEASE READ THIS FIRST
  20. Please post this in the proper thread. Please read this and follow the instructions... Lost Radio Code - FAQ, PLEASE READ THIS FIRST I will only answer radio code requests in the one thread linked at the end of the FAQ. This thread is now closed.
  21. Try 3154 or 3152 If you have not already read this FAQ - please do so... Lost Radio Code - FAQ, PLEASE READ THIS FIRST
  22. 997.101.212.00 Rear Main Seal -- US MSRP $17.68
  23. Yes, but the easiest way to measure volume is to catch it in a clean container for 30 seconds.
  24. You can test the postilioner with a PST2 or PIWIS tester - not sure about Durametric. 997.605.115.01 Throttle body -- US MSRP $324.04
  25. Try 4124 or 4122 If you have not already read this FAQ - please do so... Lost Radio Code - FAQ, PLEASE READ THIS FIRST
×
×
  • Create New...

Important Information

We have placed cookies on your device to help make this website better. You can adjust your cookie settings, otherwise we'll assume you're okay to continue.