Welcome to RennTech.org Community, Guest
There are many great features available to you once you register at RennTech.org
You are free to view posts here, but you must log in to reply to existing posts, or to start your own new topic. Like most online communities, there are costs involved to maintain a site like this - so we encourage our members to subscribe or donate. All subscriptions and donations go to the costs operating and maintaining this site. We prefer that guests take part in our community and we offer a lot in return to those willing to join our corner of the Porsche world. This site is 99 percent member supported (less than 1 percent comes from advertising) - so please consider an annual subscription or donation to keep this site running.
Here are some of the features available - once you subscribe RennTech.org
- View Classified Ads
- DIY Tutorials
- Porsche TSB Listings (limited)
- VIN Decoder
- Special Offers
- Paint Codes
- Registry
- Videos System
- View Reviews
- and get rid of this welcome message
It takes just a few minutes to register, and it's quality Porsche information at a low cost.
Contributing Members also get these additional benefits:
(you become a Contributing Member by subscribing or donating money to the operation of this site)
- No ads - advertisements are removed
- Access the Contributors Only Forum
- Contributing Members Only Downloads
- Send attachments with PMs
- All image/file storage limits are substantially increased for all Contributing Members
- Option Codes Lookup
- VIN Option Lookups (limited)

-0001-0001.png.112c13ee97acfad0cb1e70d195cc9a0e.png)
Loren
-
Posts
37,898 -
Joined
-
Days Won
649
Content Type
Profiles
Events
Forums
Exterior Paint Colors
Downloads
Tutorials
Links Directory
Collections
Classifieds
Store
Everything posted by Loren
-
The latest RMS TSB is dated 07-24-2004. Superseded means it replaces earlier versions (at least three that I remember). That same TSB also instructs the shop to replace the bolts with self-sealing crankcase bolts. The reason is that some engines were returned to Porsche that did not have RMS problem but leaking engine bolts (near the flywheel).
-
-0001-0001.thumb.png.17f5bb25bf8ec261a17c21e6321c8492.png)
997's & Built-in Cellphone
Loren replied to michaeltw's topic in 997-1 Series (Carrera, Carrera 4, Carrera 2S, Carrera 4S)
Did the dealer activate it with their PST2 or PIWIS system? -
wheel spacers
Loren replied to C4S Surgeon's topic in 996 Series (Carrera, Carrera 4, Carrera 4S, Targa)
Well, if it were my car I'd use the GT3 spacers and bolts which are 5 mm longer. I think the last thing you want is a front tire held on by two threads. -
Cab Top Not Operating Help!!!!
Loren replied to LVDell's topic in 996 Series (Carrera, Carrera 4, Carrera 4S, Targa)
Does your hand brake light come on in the intrument cluster when you apply it? If not then the switch is not functioning and needs to be replaced. To replace the switch you will need to remove (at least partially) the center console. -
Passenger rear foglight out
Loren replied to able2ski's topic in 996 Series (Carrera, Carrera 4, Carrera 4S, Targa)
The schematics show all options for all countries so chances are the wiring harness in a US car does not have the wiring. -
rain sensor windshield
Loren replied to 1101mv's topic in 996 Series (Carrera, Carrera 4, Carrera 4S, Targa)
Have a look at TSB 4/98 9212 Installing Rain Sensor -
rain sensor windshield
Loren replied to 1101mv's topic in 996 Series (Carrera, Carrera 4, Carrera 4S, Targa)
I don't know for sure. I would expect the sensor and wiring come with the windshield but not the relay. The windshield is a replacement part not an upgrade part. -
rain sensor windshield
Loren replied to 1101mv's topic in 996 Series (Carrera, Carrera 4, Carrera 4S, Targa)
If you are replacing a windshield then you can get it preinstalled. A rain sensor can be put on any windshield. -
rain sensor windshield
Loren replied to 1101mv's topic in 996 Series (Carrera, Carrera 4, Carrera 4S, Targa)
No, it does not come "built-in" but if your windshield had one before then they would put a new one in. Once they are attached I don't think they come off. -
What do you want to do?
-
rain sensor windshield
Loren replied to 1101mv's topic in 996 Series (Carrera, Carrera 4, Carrera 4S, Targa)
It is pretty easy and gets installed after the windshield. It basically sticks to the windshield (similar to the mirror). 996 612 981 00 - Retail price is $306.25 but I think I've seen the upgrade kit advertised for about $180. Try Sunset Imports (Porsche Parts at Dealer Cost) at the top of the page. The install TSB (9212) is in the TSB section. -
RMS TSB Title?
Loren replied to Rob in WA's topic in 996 Series (Carrera, Carrera 4, Carrera 4S, Targa)
Sounds like you need a new dealer.... I sent you a PM. -
The Carrera/GT3 Maintenance Checklists section has been updated to current Porsche schedules. The list now includes a separate schedule for MY04 and newer cars. Enjoy... :D
-
Most likely the early small tube type for 3.4 liter cars only. The latter mufflers (-03 and -04) will work on any year.
-
It is a new year and???
Loren replied to drpaulmarsh's topic in 996 Series (Carrera, Carrera 4, Carrera 4S, Targa)
Thanks! Just click on any donate button or use admin@renntech.org -
Anyone seen the PIWIS?
Loren replied to Richard Hamilton's topic in Diagnostics, Tips and Diagnostic Tools
Technically they all should have it. I think Jeff's photo is from Stevens Creek Porsche. -
MAF/ Air Mass Meter Replacement
Loren replied to 1999/986's topic in 986 Series (Boxster, Boxster S)
According to the TSB the new sensor started with the following VINs: -
What do all these numbers mean
Loren replied to DeAd-EyE's topic in 996 Series (Carrera, Carrera 4, Carrera 4S, Targa)
XKW - ? perhaps XKX - instrument surround in arctic silver XNY - trim strip in arctic silver -
New RMS TSB come out today
Loren replied to Scouser's topic in 996 Series (Carrera, Carrera 4, Carrera 4S, Targa)
From the TSB on the subject... -
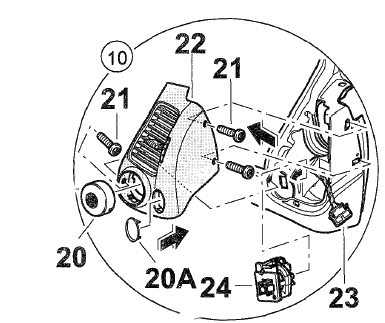
Passenger side air duct
Loren replied to JimPDX's topic in 996 Series (Carrera, Carrera 4, Carrera 4S, Targa)
You probably mean the screw (21) behind the interior air temp cover (20).
-
What do all these numbers mean
Loren replied to DeAd-EyE's topic in 996 Series (Carrera, Carrera 4, Carrera 4S, Targa)
:oops: bad cut 'n paste - all fixed now. -
Rear Center console: is it the same as 996?
Loren replied to jpcolin's topic in 986 Series (Boxster, Boxster S)
Yes. -
Time units to Hours?
Loren replied to 996TRUNDLE's topic in 996 Series (Carrera, Carrera 4, Carrera 4S, Targa)
100 Time Units is one hour. So 1 TU is 0.6 minutes, or 36 seconds. -
What do all these numbers mean
Loren replied to DeAd-EyE's topic in 996 Series (Carrera, Carrera 4, Carrera 4S, Targa)
C02 - Equipped with catalytic converter 226 - ? maybe 236 18" tires ? 288 - Headlight washers 411 - 18" Carrera wheels 437 - Comfort Seat Left, electronically adjustable 438 - Comfort Seat Right, electronically adjustable 446 - Cocave hub cap with colored escutchenion 476 - PSM (Porsche Stability Management) -
High Oil pressure & Approved oil
Loren replied to angeltic's topic in 996 Series (Carrera, Carrera 4, Carrera 4S, Targa)
:lol: Sorry, but RennTech.org does not make the decals. The decals are done (with our approval) by XenonMods.com. A (very) small part of each decal order is donated to RennTech.org to help pay for our operating costs. At $12 (for a set of 2) I doubt you will find a better deal.