Welcome to RennTech.org Community, Guest
There are many great features available to you once you register at RennTech.org
You are free to view posts here, but you must log in to reply to existing posts, or to start your own new topic. Like most online communities, there are costs involved to maintain a site like this - so we encourage our members to subscribe or donate. All subscriptions and donations go to the costs operating and maintaining this site. We prefer that guests take part in our community and we offer a lot in return to those willing to join our corner of the Porsche world. This site is 99 percent member supported (less than 1 percent comes from advertising) - so please consider an annual subscription or donation to keep this site running.
Here are some of the features available - once you subscribe RennTech.org
- View Classified Ads
- DIY Tutorials
- Porsche TSB Listings (limited)
- VIN Decoder
- Special Offers
- Paint Codes
- Registry
- Videos System
- View Reviews
- and get rid of this welcome message
It takes just a few minutes to register, and it's quality Porsche information at a low cost.
Contributing Members also get these additional benefits:
(you become a Contributing Member by subscribing or donating money to the operation of this site)
- No ads - advertisements are removed
- Access the Contributors Only Forum
- Contributing Members Only Downloads
- Send attachments with PMs
- All image/file storage limits are substantially increased for all Contributing Members
- Option Codes Lookup
- VIN Option Lookups (limited)

-0001-0001.png.112c13ee97acfad0cb1e70d195cc9a0e.png)
Loren
-
Posts
37,902 -
Joined
-
Days Won
651
Content Type
Profiles
Events
Forums
Exterior Paint Colors
Downloads
Tutorials
Links Directory
Collections
Classifieds
Store
Everything posted by Loren
-
-0001-0001.thumb.png.17f5bb25bf8ec261a17c21e6321c8492.png) View this tutorial Front Wheel Drive Oil Change Instructions Note: Part numbers sometimes change without notice. Always double check with your supplier that you have the latest part numbers. Parts you will need: 1.5 liters Shell Transaxle (75W-90) or Mobil Mobilube PTX (75W-90) Approved Front Axle Oils 000 043 204 20 Mobil (Mobilube PTX) - 20 liter container 000 043 204 19 Shell (Transaxle) - 20 liter container 999 917 546 00 Shell (Transaxle) - 1 liter container Tools you will need: Tire ramps or jack Wrench for the fill plug Author Loren Category Carrera (996) - Maintenance Submitted 11/16/2005 09:08 AM
View this tutorial Front Wheel Drive Oil Change Instructions Note: Part numbers sometimes change without notice. Always double check with your supplier that you have the latest part numbers. Parts you will need: 1.5 liters Shell Transaxle (75W-90) or Mobil Mobilube PTX (75W-90) Approved Front Axle Oils 000 043 204 20 Mobil (Mobilube PTX) - 20 liter container 000 043 204 19 Shell (Transaxle) - 20 liter container 999 917 546 00 Shell (Transaxle) - 1 liter container Tools you will need: Tire ramps or jack Wrench for the fill plug Author Loren Category Carrera (996) - Maintenance Submitted 11/16/2005 09:08 AM -
 Note: Part numbers sometimes change without notice. Always double check with your supplier that you have the latest part numbers. Parts you will need: 1.5 liters Shell Transaxle (75W-90) or Mobil Mobilube PTX (75W-90) Approved Front Axle Oils 000 043 204 20 Mobil (Mobilube PTX) - 20 liter container 000 043 204 19 Shell (Transaxle) - 20 liter container 999 917 546 00 Shell (Transaxle) - 1 liter container Tools you will need: Tire ramps or jack Wrench for the fill plug Wrench for the drain plug 2 quart oil catch pan Torque wrench (optional) Draining Front Wheel Drive Oil Front Wheel Drive oil should be changed when the engine/transmission has reached normal operating temperature. CAUTION - oil will be hot, take adequate precautions to avoid being burned. Use ramps or jack up the vehicle at the points provided. Remove underside panels to access the front wheel drive. Place oil collection pan under the front wheel drive (at least 4 quarts). Always dispose of the waste oil in accordance with local legal requirements. Unscrew oil filler screw (A). Unscrew oil drain screw (B) and drain the front wheel drive oil. Wait about 20 minutes for all the old oil to drain. Fill Front Wheel Drive Oil Clean oil drain and oil filler screw. Screw in oil drain screw. Tightening torque: 21 ft-lb. (28 Nm) Fill with gear oil up to the bottom edge of the oil filler opening. Screw in oil filler screw. Tightening torque: 21 ft-lb.(28 Nm) Install underside panels. Front Wheel Drive Model/Capacity (approx.) 911 Carrera 4 - 1.5 liters Turbo - 1.2 liters
 -
View this tutorial Hood/Trunk Latch Release Removal/Install Note: Part numbers sometimes change without notice. Always double check with your supplier that you have the latest part numbers. (photos courtesy of Steven Gliksman) Tools you will need: Torx T20 driver Small narrow regular screwdriver Plastic Spatula (or butter knife) 4 mm and 6 mm hex allen socket or 4 mm and 5 mm allen wrench Disassembling the release for front/rear lids Undo hexagon socket head bolts - Remove the plastic plugs and loosen (but do not remo Author Loren Category Carrera (996) - Common Fixes and Repairs Submitted 11/16/2005 07:54 AM Updated 05/12/2019 06:33 PM
-
Hood/Trunk Latch Release Removal/Install
Loren posted a tutorial in Carrera (996) - Common Fixes and Repairs
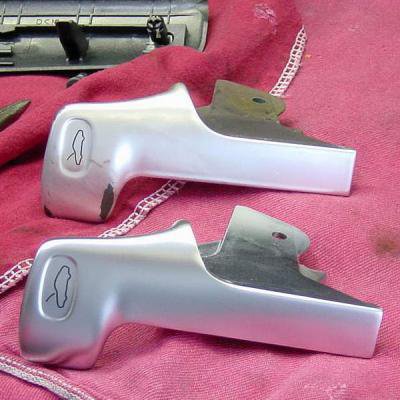 Note: Part numbers sometimes change without notice. Always double check with your supplier that you have the latest part numbers. (photos courtesy of Steven Gliksman) Tools you will need: Torx T20 driver Small narrow regular screwdriver Plastic Spatula (or butter knife) 4 mm and 6 mm hex allen socket or 4 mm and 5 mm allen wrench Disassembling the release for front/rear lids Undo hexagon socket head bolts - Remove the plastic plugs and loosen (but do not remove) the M6 x 25 hexagon socket head bolts from the sill (approx. 4 to 5 turns). Remove the sill cover - Lift sill cover upwards and out of the bottom support with a plastic spatula (or butter knife) and carefully pull it out. Release the bowden cables - Undo the M4 x 14 hex socket head bolt of the bowden cable in the actuating lever. Press the bowden cable sleeve out of the guide on the sill cover. Release the actuating levers - Press the retainer (SLB 6) out of the (6 x 22 x 19) pin. Remove the pin from the actuating lever and from the sill cover. Disengage the spring from the sill cover and pull the actuating lever up and out of the sill cover. Release the actuating element - Remove the Torx screws from the actuating element and pull it slightly out the support to the rear. Disconnect the electrical connection. Remove. ------------------------------------------------------------------------------------------------------------------------------ Assembling the release for front/rear lids Fit the actuating element - Insert the actuating element for the lid release into the support from behind. Then fasten it with the T20 x 15 Torx screws. Connect the electrical plug connection. Fit the actuating levers - Position actuating lever in the sill cover, press in the (6 x 22 x 19) pin and secure it with the retainer (SLB 6). Engage the tension spring (0.8 x 5.2 x 30) in the sill cover and engage the actuating lever. Fit the bowden cables - Position the bowden cable in the actuating lever and fasten it with the M4 x 14 hex head bolt. Press the bowden cable sleeve into the guide of the sill cover. Check the plastic clips - Check the plastic clips in the sill cover and replace them if damaged (999 703 443 40 01C Plug - satin black). Put in the hex head bolts - The M6 x 25 hex head bolts in the support MUST NOT be screwed in by more than 3 to 4 turns. Fit the sill cover - Position the sill cover on the support and push it into the support. Tighten the hex head bolts - Tighten the M6 x 25 hex head bolts in the support through the holes in the sill Cover. Press in the (8.0 x 11 x 7.2) plugs.
 -
View this tutorial Door Panel Removal / Install Instructions Note: Part numbers sometimes change without notice. Always double check with your supplier that you have the latest part numbers. Tools you will need: 10 mm socket or wrench Small narrow regular screwdriver Phillips screwdriver 4 mm hex allen socket or 4 mm allen wrench Door Panel Removal Note: If you are just going after the speaker enclosures you may not need to do all the items here (i.e. door handle mechanism). Just remove the minimum and carefully lean the door panel to the si Author Loren Category Carrera (996) - Common Fixes and Repairs Submitted 11/16/2005 07:42 AM Updated 03/11/2017 06:21 AM
-
Door Panel Removal / Install Instructions
Loren posted a tutorial in Carrera (996) - Common Fixes and Repairs
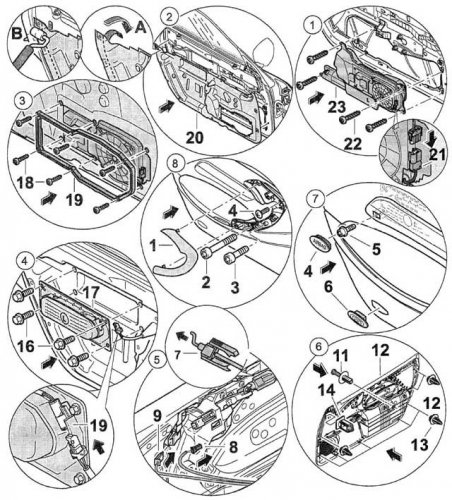 Note: Part numbers sometimes change without notice. Always double check with your supplier that you have the latest part numbers. Tools you will need: 10 mm socket or wrench Small narrow regular screwdriver Phillips screwdriver 4 mm hex allen socket or 4 mm allen wrench Door Panel Removal Note: If you are just going after the speaker enclosures you may not need to do all the items here (i.e. door handle mechanism). Just remove the minimum and carefully lean the door panel to the side. Warning: Airbag could inflate. Danger of injury or damage during removal/install! 1. Remove ignition key. 2. Disconnect and cover the negative terminal of the battery. 3. After the battery is disconnected, assembly work or work on the vehicle may be started after a waiting period of 1 minute. Caution: Damage may occur if the bowden cable is bent at the hook. The hook of the bowden cable is pressed into the end piece of the cover for protection during transport and assembly. Pull the hook out of the end piece only after installation in the inner door release (see below). Remove (1) cover - Use a plastic spatula to release the clipped connection out of the door handle on all sides. Remove fastening screws 2, 3, 4. Remove (2) plastic cover (airbag) - Press the cover out with a narrow screwdriver 5. Remove the fastening screw 6 seated below it. Press light 7 out of the door trim panel using a plastic spatula 10. Disconnect (pull off) electrical plug connection. Disconnect (3) the bowden cable (arrow B ) and electrical plug connection - Disconnect electrical plug connection from the microswitch for the door handle 9 and orientation lighting 10. Press lugs of the plastic clip (arrow A) and pull out towards the rear. Carefully push the bowden cable 8 back into the end piece of the sleeve (arrow B ). Remove (4) door trim panel - Take expanding nut out of the door trim panel. Unclip door trim panel out of the door on all sides and lift up and off. Clips 13 and 14 must be replaced for assembly (according to the manual). Remove (5) airbag - Disconnect electrical plug connection 15. Remove the fastening screws 16 out of the side airbag and remove. Removing (6) frame - Remove fastening screws 18 from the frame 19. Remove (7) door film (only if needed)- Pull off carefully on all sides. Removing (8) sound enclosure (if present) - Disconnect electrical plug connection from the sound enclosure 21. Remove the fastening screws 22 on the sound enclosure 23. ------------------------------------------------------------------------------------------------------------------------------ Door Panel Install Caution: Water may enter at the door film! Door films which have been completely removed or torn must always be replaced. In the case of door films which have become partly detached at the top and side, the detached films must be reattached using a butyl sealing cord. Install (1) sound enclosure - Position sound enclosure 23 in the door. Screw on the sound enclosure with the fastening screws 22. Connect electrical connection 21. Install (2) the door film (if needed) - Peel off the protective film -A- on the door film and position on the door. Using a roller 8, press on the door film on all sides 20. Install (3) frame - Position the frame 19 on the sound enclosure. Make sure that the door film cut-out is positioned correctly on the sound enclosure. Screw in the fastening screws 18 and tighten. Install (4) side airbag - Position side airbag 17 on the door and tighten fastening screws 16 (7.5 ft-lb). The fastening screws 16 must be replaced each time they are removed (according to the manual). Engage (5) the bowden cable B. Connect electrical plug connection - Engage bowden cable B 7 in the door handle. Pull the hook out of the end piece of the sleeve only after installation in the door handle. Clip plastic clip into the door handle. Connect electrical plug connections 8, 9. Install (6) door trim panel - The clips 13, 14 must be replaced every time the door trim panel is removed (according to the manual). Position the door trim panel on the door and clip it in. (7) Position fastening screws 5 in the door trim panel and tighten (4.5 ft-lb). Press in plastic cover. Make sure the logo reads correctly. Install (8) the cover - Screw in the fastening screws 2, 3, 4 and tighten. Clip in the cover 1 on the door handle.
 -
View this tutorial Brake Pad Change Instructions Note: Part numbers sometimes change without notice. Always double check with your supplier that you have the latest part numbers. Parts you will need: 1 set 996 352 949 03 Front Brake Pads - Porsche (Pagid "S" Pads - Dark Blue - T5104SRS14) 1 set 996 351 088 01 Front Vibration Dampers for Brake Pads (recommended) 2 ea 996 351 959 00 Front Pad Repair Kit (consisting of 2 bolts, springs and securing clips) 2 sets 996 612 365 00 Front and Rear Wear Sensors (if needed) 1 set 996 Author Loren Category Carrera (996) - Maintenance Submitted 11/16/2005 07:25 AM
-
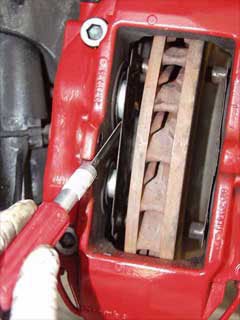 Note: Part numbers sometimes change without notice. Always double check with your supplier that you have the latest part numbers. Parts you will need: 1 set 996 352 949 03 Front Brake Pads - Porsche (Pagid "S" Pads - Dark Blue - T5104SRS14) 1 set 996 351 088 01 Front Vibration Dampers for Brake Pads (recommended) 2 ea 996 351 959 00 Front Pad Repair Kit (consisting of 2 bolts, springs and securing clips) 2 sets 996 612 365 00 Front and Rear Wear Sensors (if needed) 1 set 996 352 939 03 Rear Brake Pads - Porsche (Pagid "S" Pads - Dark Blue - T5105SRS14) 1 set 964 352 096 01 28 mm Rear Vibration Dampers for Brake Pads (recommended) 1 set 964 352 096 00 30 mm Rear Vibration Dampers for Brake Pads (recommended) 2 ea 996 352 959 00 Rear Pad Repair Kit (consisting of 2 bolts, springs and securing clips) Tools you will need: Jack 19 mm socket for wheel bolts Brake Parts Cleaner (do not use other cleaners) Needle Nose Pliers Punch (for driving the pins out) Hammer or soft mallet Caliper Spreader or large Water Pump Pliers Note: The brake pads must be replaced (both sets of pads per axle) if the brake pad warning indicator lights up, but no later than when there is a residual pad thickness of 2 mm. If brake pad wear is indicated by the warning light, the warning contact sensor (sender including wire and plug connection) must also be replaced. Replacing the warning contact sensor can be avoided by replacing the brake pads no later than when the pad thickness is 2.5 mm. Warning contact sensors with a worn wire core must be replaced. However, if only the plastic part of the warning contact is worn, replacement is not necessary. Also, do not disassemble the caliper when changing the vibration dampers (or painting the calipers) as Porsche does not sell inner seal kits. Jack up the vehicle at the lift points provided and remove the a wheel (you will need to do this for each wheel). Visually inspect the brake pads for wear. The wear limit is reached when the pad has a residual thickness of 2 mm (or less). Front Pad Replacement Remove the retainer (arrow) and extract the retainer pin inwards. Pull out the warning contact wire on the brake caliper and remove the warning contacts from the brake pad plates. Remove brake pads with a brake pad puller or use the water pump Pliers to spread the pads. (Photos are courtesy of Greg Heumann) Important Notes: Pull out brake pads together with the vibration dampers. If this is not possible (depending on wear of the brake pads), use a spatula to detach the vibration dampers from the brake pad plate before removing the pads. In both cases, first set back the brake pads as far as possible with the piston resetting fixture. If necessary, first remove some brake fluid by suction from the brake fluid reservoir. If necessary, carefully push back the piston to its original position. Fit new vibration dampers in the pistons. Do this by removing protective film from the vibration dampers before installation. Insert the brake pads. Caution: The pad backing plates (rear side of the brake pads) must not be greased. Note: If you are using Pagid (or some other 3rd party pads) you will likely have to drill the pad for the wear sensors. Just look at the old pads and drill the sensor holes in the same location. Fit new expanding spring, new retaining pin and new retainer (retaining bracket). These parts are available as a repair set and must be 'renewed' each time the pads are changed. Insert the warning contact wire and warning contacts. Firmly press the brake pedal several times with the vehicle stationary so that the brake pads assume their fit in accordance with the operating state. Next, check and, if necessary, correct the brake fluid level. Bedding in the brake pads New brake pads require a bedding-in period of approximately 125 miles. Not until then do they achieve their best friction and wear coefficient. During this period, the brakes should be subjected to full stress only in emergencies when traveling at high speed. ------------------------------------------------------------------------------------------------------------------------------ Rear Pad Replacement Remove the retainer (arrow) and extract the retainer pin inwards. Pull out the warning contact wire on the brake caliper and remove the warning contacts from the brake pad plates. Remove brake pads with a brake pad puller or use the Water pump Pliers to spread the pads. Important Notes: Pull out brake pads together with the vibration dampers. If this is not possible (depending on wear of the brake pads), use a spatula to detach the vibration dampers from the brake pad plate before removing the pads. In both cases, first set back the brake pads as far as possible with the piston resetting fixture. If necessary, first remove some brake fluid by suction from the brake fluid reservoir. If necessary, carefully push back the piston to its original position. Fit new vibration dampers in the pistons. There are 2 sizes of vibration dampers. The lower piston is 28 mm (smaller) and upper piston is 30 mm (larger). Be sure you get them in the right places. As you install them you will need to remove the protective film from the vibration dampers. Insert the brake pads. Note: The pad backing plates (rear side of the brake pads) must not be greased. Fit new expanding spring, new retaining pin and new retainer (retaining bracket). These parts are available as a repair set and must be 'renewed' each time the pads are changed. Insert the warning contact wire and warning contacts. Firmly press the brake pedal several times with the vehicle stationary so that the brake pads assume their fit in accordance with the operating state. Finally, check and, if necessary, correct the brake fluid level. Bedding in the brake pads New brake pads require a bedding-in period of approximately 125 miles. Not until then do they achieve their best friction and wear coefficient. During this period, the brakes should be subjected to full stress only in emergencies when traveling at high speed.
 -
View this tutorial Brake/Clutch Fluid Change and Bleeding Instructions Note: Part numbers sometimes change without notice. Always double check with your supplier that you have the latest part numbers. (Edit - July 25, 2006 - Updated the clutch bleeding procedure to the latest procedure as outlined in supplement 98 of the Carrera Service Manual - Loren) Parts you will need: 1 liter (minimum) 000 043 203 66 Porsche DOT 4 Brake Fluid or equal (ATE Gold or ATE Super Blue) Tools you will need: Jack 19 mm socket for wheel bolts Motive Power Bleed Author Loren Category Carrera (996) - Maintenance Submitted 11/16/2005 07:02 AM
-
Brake/Clutch Fluid Change and Bleeding Instructions
Loren posted a tutorial in Carrera (996) - Maintenance
 Note: Part numbers sometimes change without notice. Always double check with your supplier that you have the latest part numbers. (Edit - July 25, 2006 - Updated the clutch bleeding procedure to the latest procedure as outlined in supplement 98 of the Carrera Service Manual - Loren) Parts you will need: 1 liter (minimum) 000 043 203 66 Porsche DOT 4 Brake Fluid or equal (ATE Gold or ATE Super Blue) Tools you will need: Jack 19 mm socket for wheel bolts Motive Power Bleeder (or equal) image Needle Nose Pliers 11 mm wrench for brakes; 9 mm for clutch slave (sizes vary from car to car but they are usually 9 mm or 11 mm) Plastic tubing and waste container (at least 1 liter) Jack up the vehicle at the lift points provided and remove the rear wheel (you will need to do this for each wheel). Remove the cap on the master cylinder reservoir. Remove the plastic screen using a pair of needle nose pliers. This can be a little bit challenging but it will pop off (be careful with the brake fluid.. it eats paint!) Use a syringe (or turkey baster... just don't reuse it) and suck out as much of the old fluid as possible. Fill the master cylinder reservoir with new fluid. Put the rest in the power bleeder. Screw the cap that came with the power bleeder onto the master cylinder reservoir. Put the pressure cap with the pump handle on the power bleeder and pump it up to just under 20 psi - do not go over 20 psi! Bleed order - Right rear, Left rear, Right front, Left front. Place your drain tube over the outside bleed nipple and in the bottle (remember it will need to hold a liter when you are done). Bleed the outer bleeder valve first. Open each bleeder valve until clear, bubble free brake fluid emerges. Take care to bleed at each brake caliper and at both bleeder valves. Carefully tighten the bleed screw. Wipe off the area and replace the rubber protective cap over the bleed screw. Repeat steps 8-10 for the interior bleed screw. Then reinstall the wheel and move on to the next wheel. Note: It makes sense to check the pressure and amount of fluid in the tank between wheels. Running out of fluid means starting over and getting air out. Optional Clutch Bleeding This is best done when you are bleeding the left (driver's side) rear wheel as the clutch bleed valve is mounted high above the axle on the transmission. Push the clutch pedal in by hand (very slowly) and use a long piece of wood to hold the pedal down. I wedged the other end (of the wood) between the seat and door frame -- with plenty of soft padding to avoid scratches. A second option is to have a 2nd person sit in the car and keep the clutch pedal FULLY depressed. Open the clutch bleeder valve until clear, bubble free brake fluid emerges (at least 30 seconds according to Porsche). Remove the wood. Then, pump the pedal again very slowly by hand for a further 60 seconds. After pressing the pedal down fully about 10 to 15 times, leave the pedal in its normal position. After allowing a fill time of 90 seconds, check that no more air bubbles appear at the bleeder valve (use a collecting bottle with a transparent hose). Then close the bleeder valve. Wipe off the area and replace the rubber protective cap over the bleed screw. You may notice that the clutch pedal does not return... so carefully pull it up (slowly) to it's normal position. Then depress it (slowly) a few (at least 5) times. In a few cycles the feel should return. [*]Torque the wheels bolts to 96 ftlb. (130 Nm). [*]Do a final check on the brake fluid level and top up if needed.
 -
Tire choice for a C2 1999
Loren replied to Hroussard's topic in 996 Series (Carrera, Carrera 4, Carrera 4S, Targa)
I live in the SF Bay Area and have experience(s) with Custom Alignment. So, I'll let some of our LA users speak to Tire Rack installers in the LA area. -
PCM 1 Calibration
Loren replied to TD in DC's topic in 996 Series (Carrera, Carrera 4, Carrera 4S, Targa)
Calibration Process for PCM1: -
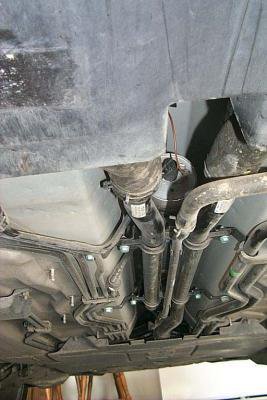 Note: Part numbers sometimes change without notice. Always double check with your supplier that you have the latest part numbers. Parts you will need: 1 996 110 253 01 Fuel Filter - for 2WD cars or 1 996 110 253 52 Fuel Filter - for 4WD cars Tools you will need: Tire ramps or jack (and jack stands) Various screwdrivers to remove underbody cover For the C2 the fuel filter is located in the tunnel area facing the center unit above the coolant pipes (up to and including MY01). For the C4 the fuel filter is located in the engine compartment, strapped to the coolant tank (up to and including MY01). MY02 and newer cars have the fuel filter incorporated in the fuel pump - and usually does not need to be changed. This DIY is for MY01 and older cars. Remove cover for rear and center underbody. (photo courtesy Tool Pants) Pull off ground cable on filter. Then release the rapid-action couplings by pressing on the grey surfaces and remove the fuel lines. Collect emerging fuel. Loosen the large hose clamp on the filter and remove the filter element. Re-install a new filter element and tighten the hose clamp. Join the rapid-action couplings of the fuel lines. The plug connections must engage audibly. Then push the ground cable onto the filter element. Replace the cover for the rear and center underbody.
 -
View this tutorial Fuel Filter Replacement (to MY01 only) Note: Part numbers sometimes change without notice. Always double check with your supplier that you have the latest part numbers. Parts you will need: 1 996 110 253 01 Fuel Filter - for 2WD cars or 1 996 110 253 52 Fuel Filter - for 4WD cars Tools you will need: Tire ramps or jack (and jack stands) Various screwdrivers to remove underbody cover For the C2 the fuel filter is located in the tunnel area facing the center unit above the coolant pipes (up to and incl Author Loren Category Carrera (996) - Maintenance Submitted 11/15/2005 02:16 PM
-
 Note: Part numbers sometimes change without notice. Always double check with your supplier that you have the latest part numbers. Parts you will need: 1 each 996 102 151 64 (or 996 102 151 66) Polyrib Belt (with air conditioning) or 1 each 996 102 151 65 Polyrib Belt (without air conditioning) Tools you will need: 13 mm socket or wrench (for air cleaner) Regular screwdriver (for air cleaner) 24 mm socket or wrench (for belt pulley) Remove air cleaner housing. Mark belt travel direction with a coloured pen (if you intend to reuse it). Note: Never remove Polyrib belt when warm. The belt will deform and could be damaged. Turn the tensioning roller 7 on the socket wrench (wrench size 24 mm) clockwise and simultaneously remove the belt from the drive pulleys. Visually inspect the condition of the belt and replace it if necessary. Check belt pulley for damage. Install Polyrib belt in the order shown. Twist the tensioning roller 7 clockwise and simultaneously place the belt on the idler pulley 8. Subsequently relieve the tensioning roller slowly. Visually check whether the belt is correctly positioned on all pulleys. Reinstall the air cleaner housing
 -
View this tutorial Changing the Polyrib Belt Note: Part numbers sometimes change without notice. Always double check with your supplier that you have the latest part numbers. Parts you will need: 1 each 996 102 151 64 (or 996 102 151 66) Polyrib Belt (with air conditioning) or 1 each 996 102 151 65 Polyrib Belt (without air conditioning) Tools you will need: 13 mm socket or wrench (for air cleaner) Regular screwdriver (for air cleaner) 24 mm socket or wrench (for belt pulley) Remove air cleaner housing. Author Loren Category Carrera (996) - Maintenance Submitted 11/15/2005 02:09 PM
-
 Note: Part numbers sometimes change without notice. Always double check with your supplier that you have the latest part numbers. Parts you will need: 3-4 liters 999 917 546 00 (Shell) Shell Transaxle (75W-90) or Mobil Mobilube PTX (75W-90) Approved Manual Transmission Oils 000 043 204 20 Mobil (Mobilube PTX) - 20 liter container 000 043 204 19 Shell (Transaxle) - 20 liter container 999 917 546 00 Shell (Transaxle) - 1 liter container Note: All are synthetic GL4 and GL5 rated (or "non-conventional processing") oils. GL oils have good light running properties because of their light low-temperature viscosity as well as a high level of temperature stability. Tools you will need: Tire ramps or jack 17 mm allen for the fill plug 16 mm triple square with a hole in the middle for the drain plug Note: Most later cars have an 10 mm allen type plugs - we recommend checking before you start. 3 quart oil catch pan Torque wrench (optional) Drain Transmission Oil Transmission oil should be changed when the engine/transmission has reached normal operating temperature. CAUTION - oil will be hot, take adequate precautions to avoid being burned. Use ramps or jack up the vehicle at the points provided. Remove underside panels to access the transmission. (Boxster owners you need to loosen the diagonal braces and then remove the transverse strut member. A little more work on a Boxster. When you put them back they need to have the bolts torqued to 48 ft lbs. (65 nm). See images Image 1 Image 2 Image 3 Image 4 Image 5 ) (images courtesy of scherb) Place oil collection pan under the transmission (at least 9 quarts). Always dispose of the waste oil in accordance with local legal requirements. Unscrew oil filler screw (1). Unscrew oil drain screw (2) and drain transmission oil. Wait about 20 minutes for all the old oil to drain. Fill Transmission Oil Clean oil drain and oil filler screw. Screw in oil drain screw. Tightening torque: 22 ft-lb. Fill with gear oil up to the bottom edge of the oil filler opening. Screw in oil filler screw. Tightening torque: 22 ft-lb. Install underside panels. Model/Capacity (approx.) Manual Transmission 911 Carrera (G96/00) - 2.7 liters 911 Carrera 4 (G96/30) - 2.7 liters GT3 - 3.3 liters Boxster (G86/00) - 2.25 liters Turbo - 3.0 (to 3.8) liters Front-axle Final Drive 911 Carrera 4 (Z96/00) - 1.5 liters Turbo - 1.5 liters
 -
View this tutorial Manual Transmission Oil Change Instructions Note: Part numbers sometimes change without notice. Always double check with your supplier that you have the latest part numbers. Parts you will need: 3-4 liters 999 917 546 00 (Shell) Shell Transaxle (75W-90) or Mobil Mobilube PTX (75W-90) Approved Manual Transmission Oils 000 043 204 20 Mobil (Mobilube PTX) - 20 liter container 000 043 204 19 Shell (Transaxle) - 20 liter container 999 917 546 00 Shell (Transaxle) - 1 liter container Note: All are synthetic GL4 and GL5 rated ( Author Loren Category Carrera (996) - Maintenance Submitted 11/15/2005 02:04 PM Updated 03/22/2017 05:41 AM
-
 Note: Part numbers sometimes change without notice. Always double check with your supplier that you have the latest part numbers. Parts you will need: 6 ea 999 170 207 91 Spark Plugs (Beru 14FGR 6KQU) MY99-MY01 or 6 ea 999 170 223 90 Spark Plugs (Beru FGR 5KQE0) MY02 Tools you will need: Jack 19 mm socket for wheel bolts Snap-On S9706 Spark Plug Socket Snap-On FXW4 (4 inch) Extension (or any 3/8" drive extension that allows at least 16 degrees of offcenter movement) 3/8" Ratchet 5 mm hex allen socket or 5 mm allen wrench Torque wrench Note: Most find that removing the muffler first (a 15 minute job) will make spark plug replacement much much easier (and faster). Jack up the vehicle at the lift points provided and remove the rear wheel (you will need to do this for each side).<br></li><li>Remove the 2 fastening screws (M6 x 20) of the shields on the cylinder heads and remove the plates. Disconnect connection cable of the ignition coils. Check for damage and replace if needed Remove the two fastening screws (M6 x 25) of the plug coils and remove the 6 plug coils. You may find it easier to remove the top 5 MM socket cap screws first. Then remove the bottom screws. Unscrew the spark plugs using the spark-plug wrench. Remove the spark plug and install the new plug by hand. Do not use any anti-seize or any other lubricant on the plug threads! Use the socket extension minus the ratchet to get the plug started. Always turn the plug counterclockwise until you feel it seat. This insures that the plug is in the threads on the cylinder head so there is no concern about cross threading it. Then turn it clockwise until it is as tight as I can get it by hand. IF YOU CAN'T TURN IT BY HAND THEN IT IS NOT THREADED PROPERLY When the plugs are hand tightened, attach the ratchet and tighten it a little. Then use the torque wrench to finish the job. Tighten new spark plugs to 22 ft-lb. Push on plug coils and tighten the fastening screws (M6 x 25) to 7.5 ft-lb. Reinstall the bottom screws first and then top. Subsequently push on the connecting cable of the plug coils. Refit the two shields and tighten the fastening screws to 7.5 ft-lb. Re-install the wheel(s) and lower vehicle. Torque the wheels bolts to 96 ftlb. (130 Nm)
 -
View this tutorial Spark Plug Change Instructions Note: Part numbers sometimes change without notice. Always double check with your supplier that you have the latest part numbers. Parts you will need: 6 ea 999 170 207 91 Spark Plugs (Beru 14FGR 6KQU) MY99-MY01 or 6 ea 999 170 223 90 Spark Plugs (Beru FGR 5KQE0) MY02 Tools you will need: Jack 19 mm socket for wheel bolts Snap-On S9706 Spark Plug Socket Snap-On FXW4 (4 inch) Extension (or any 3/8" drive extension that allows at least 16 degrees of offcenter movement) Author Loren Category Carrera (996) - Maintenance Submitted 11/15/2005 01:40 PM Updated 01/11/2011 12:15 PM
-
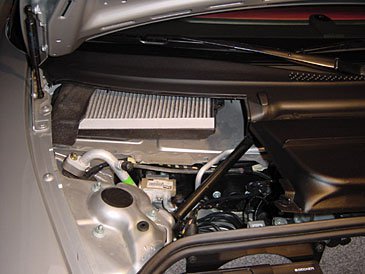 Note: Part numbers sometimes change without notice. Always double check with your supplier that you have the latest part numbers. Images are for LHD cars - RHD cars will be on the opposite side. Parts you will need: 1 ea 996 571 219 03 Pollen Filter (Charcoal activated filter) Tools you will need: T25 Torx drive Remove T25 Torx screw that holds the panel cover in place (passenger side front trunk). Remove the panel cover. Remove the particle filter upwards and out of the housing guide. Insert a new particle filter into the housing guide. Check that the filter is correctly fitted and in the correct installation position. Replace the panel cover. Tighten T25 Torx screw that holds the panel cover in place.
 -
Pollen Filter Change Instructions
Loren posted a topic in DIY Articles - Carrera (996) - Maintenance
View this tutorial Pollen Filter Change Instructions Note: Part numbers sometimes change without notice. Always double check with your supplier that you have the latest part numbers. Images are for LHD cars - RHD cars will be on the opposite side. Parts you will need: 1 ea 996 571 219 03 Pollen Filter (Charcoal activated filter) Tools you will need: T25 Torx drive Remove T25 Torx screw that holds the panel cover in place (passenger side front trunk). Remove the panel cover. Remove the particle filter upw Author Loren Category Carrera (996) - Maintenance Submitted 11/15/2005 01:31 PM Updated 06/14/2010 09:31 AM -
 Note: Part numbers sometimes change without notice. Always double check with your supplier that you have the latest part numbers. Parts you will need: 1 ea 996 110 131 52 Air Filter or equal (BMC or K&N Filter) Tools you will need: 13 mm socket or wrench Regular screwdriver Phillips screwdriver Remove hexagon-head bolt M6 x 34. (13 mm wrench) Loosen the hose clamp on the throttle body and remove the connection of the sucking jet pumps (not present on early cars). Pull connecting plug off the mass air flow sensor by squeezing the connector clips. Then unclip the cable on the air cleaner housing. Subsequently unclip the oil filler snorkel. Remove the whole air cleaner housing out of the engine compartment. Unscrew the 7 (phillips) fastening screws on the air cleaner housing and remove the upper part of the air cleaner. Subsequently remove the cleaner element. Clean air cleaner housing. Insert new filter element and replace the upper part of the air cleaner housing (BMC filter shown). Tighten the 7 fastening screws. Place the air cleaner housing in the engine compartment again. Make sure that the rubber mount of the air cleaner housing is still seated in the body. Tighten the air cleaner housing with the fastening screw M6 x 34, the screw is tightened with 7.5 ft-lb. Clip in oil filler neck again.. Reconnect the intake pipes on the throttle body. Retighten the hose clamp. Subsequently insert the connection for the sucking jet pump (again, if present) and mount the spring band clamp. Fit the connecting cable and clip into the holder on the air cleaner. Push the connecting plug on the mass air flow sensor.
 -
View this tutorial Air Filter Change Instructions Note: Part numbers sometimes change without notice. Always double check with your supplier that you have the latest part numbers. Parts you will need: 1 ea 996 110 131 52 Air Filter or equal (BMC or K&N Filter) Tools you will need: 13 mm socket or wrench Regular screwdriver Phillips screwdriver Remove hexagon-head bolt M6 x 34. (13 mm wrench) Loosen the hose clamp on the throttle body and remove the connection of the sucking jet pumps (not present on ea Author Loren Category Carrera (996) - Maintenance Submitted 11/15/2005 01:24 PM
-
You could use the phone prep - if it is not already in use. It has both switched and unswitched power, ground and a telephone mute wire.


