Welcome to RennTech.org Community, Guest
There are many great features available to you once you register at RennTech.org
You are free to view posts here, but you must log in to reply to existing posts, or to start your own new topic. Like most online communities, there are costs involved to maintain a site like this - so we encourage our members to subscribe or donate. All subscriptions and donations go to the costs operating and maintaining this site. We prefer that guests take part in our community and we offer a lot in return to those willing to join our corner of the Porsche world. This site is 99 percent member supported (less than 1 percent comes from advertising) - so please consider an annual subscription or donation to keep this site running.
Here are some of the features available - once you subscribe RennTech.org
- View Classified Ads
- DIY Tutorials
- Porsche TSB Listings (limited)
- VIN Decoder
- Special Offers
- Paint Codes
- Registry
- Videos System
- View Reviews
- and get rid of this welcome message
It takes just a few minutes to register, and it's quality Porsche information at a low cost.
Contributing Members also get these additional benefits:
(you become a Contributing Member by subscribing or donating money to the operation of this site)
- No ads - advertisements are removed
- Access the Contributors Only Forum
- Contributing Members Only Downloads
- Send attachments with PMs
- All image/file storage limits are substantially increased for all Contributing Members
- Option Codes Lookup
- VIN Option Lookups (limited)

-0001-0001.png.112c13ee97acfad0cb1e70d195cc9a0e.png)
Loren
-
Posts
37,896 -
Joined
-
Days Won
648
Content Type
Profiles
Events
Forums
Exterior Paint Colors
Downloads
Tutorials
Links Directory
Collections
Classifieds
Store
Everything posted by Loren
-
-0001-0001.thumb.png.17f5bb25bf8ec261a17c21e6321c8492.png)
looking for the stock muffler mounting hardware
Loren replied to stumpjumper's topic in 986 Series Part Number Requests
Tell us the item numbers and we will look them up.
-
preventive replacement of RMS
Loren replied to a topic in 996 Series (Carrera, Carrera 4, Carrera 4S, Targa)
IMHO - yes (if it has ever been replaced before) and yes. Make sure you get the newest RMS 997 101 212 00. See the thread here. -
We have just added (only for our Contributing Members) a Retail Price Search feature. Now Contributing Members can look up the US MSRP for any Porsche part(s). Just enter the part number (or the first few numbers of the sequence) and it will return the current Retail Price. Contributing Members will find links on the Online Docs Menu (drop-down menu) and in the 996, 997 (Carrera) Series DIY / How to... forum.
-
Replacing the Ignition Switch
Loren replied to santambrogio's topic in 986 Series (Boxster, Boxster S)
http://www.renntech.org/forums/index.php?s...indpost&p=29825 Be sure and read the whole thread for other tips. -
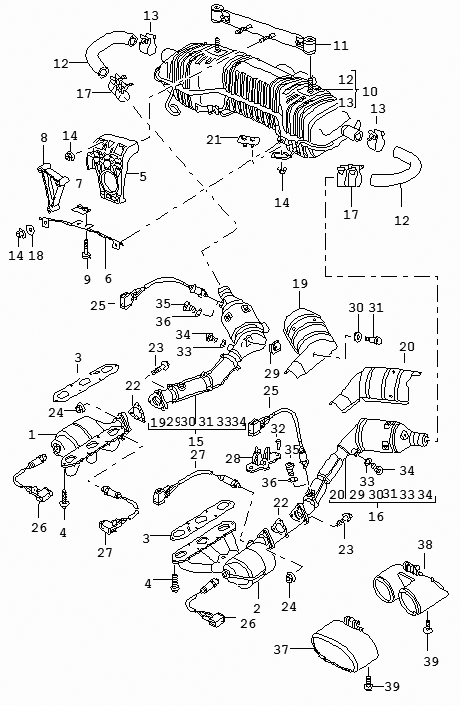
I'm not sure which parts you want. Can you identify them from the diagram below?
-
Standard factory shifter or short shift option? The factory shifter does not have any adjustment for looseness - only for gear throw. You could have a worn bushing like the one Tool Pants showed here.
-
TT (GT2 and GT3) have a completely different engine from the 996 and 986. Not to say there has never been an RMS failure - it would be very rare though.
-
At first I thought it was the air pressure sensor but it does not look electrical (or the right shape). If that is just a hose connected to it then perhaps it is the oil breather hose from the oil system heat exchanger (burns the vapors for emissions).
-
Isn't that the air inlet from the intercooler?
-
Blinking temperature light.
Loren replied to Nick_Esc's topic in 996 Series (Carrera, Carrera 4, Carrera 4S, Targa)
If you add more than 8 ounces of coolant then I think I would also look for leaks. The older caps (part number ending in 00) are not very good and should be replaced with 01 caps. The tank should also be inspected as well as the hoses. Good luck! -
Contributing Members can have a link to read the entire TSB as published by Porsche. There is plenty of detail. Some TSBs are for tire, oil and other recommendations. Some are for adding accessories and some are for problems. Of the ones with specific problem fixes, I'd say about one third are for VIN specific issues. That is, only a few cars from a selected production run. RMS problems are a leaking Rear Main Seal on the engine. I think it is pretty rare on the new models and Porsche is on a 4th generation seal for the older cars. It would not stop me from buying another Porsche.
-
951 airbag removal
Loren replied to dave@legendcreative.com's topic in 924, 931, 944, 951, 968 Series
I sent you a PM... -
Porsche has a stone guard film that can be put on the rear fender flares or you could get one of the aftermarket clear protection companies to cover even more.
-
Thye were all moved to the new Carrera DIY Articles section here
-
Compass Option for PCM 2.1
Loren replied to Loren's topic in 9PA, 9PA1 (Cayenne, Cayenne S, Cayenne Turbo, Cayenne Turbo S)
From the way I read the TSB - yes, as long as you have PCM 2.1. It seems like the process is very similar to programming a new key (from the dealer perspective). -
Blinking temperature light.
Loren replied to Nick_Esc's topic in 996 Series (Carrera, Carrera 4, Carrera 4S, Targa)
Covers all Carrera (996), GT3, TT / GT2 and Boxster (986) cars Here is the long explanation from the service manual on the flashing coolant light. "Four functions of the coolant warning light: 1. Engine coolant level too low -- light flashes slowly (0.5 Hz) 2. Engine compartment temperature too high -- light flashes slowly (0.5 Hz) (engine compartment blower might be faulty) 3. Engine coolant temperature too high -- light is lit; pointer on the right 4. Temperature sensor at water outlet faulty -- light flashes rapidly (1 Hz) ; pointer on the right Note: The temperature warning in point three is indicated if the conditions "engine coolant temperature too high" and "engine coolant level too low" are present simultaneously." -
Compass Option for PCM 2.1
Loren replied to Loren's topic in 9PA, 9PA1 (Cayenne, Cayenne S, Cayenne Turbo, Cayenne Turbo S)
The TSB implys that the Compass function is built into the PCM 2.1 and that it just needs to be turned on. It shows no additional parts or work other than the code and a PIWIS tester. Have a look at TSB 7/05 9110 PCM2.1 Compass (I No. QR1) (dated 9-20-2005). -
We have just added a (long overdue) Porsche Option Codes Lookup section. :clapping: You can get there by using the Online Docs Menu or clicking here.
-
GT3 Mk1 rotors vs C4S/TT rotors
Loren replied to damianc4s's topic in 996 Series (Carrera, Carrera 4, Carrera 4S, Targa)
Well, the GT3 mk1 front rotor (996 351 409 91) has a Motorsport part number (ends in 91) and the TT front rotor (996 351 409 02)has a regular part number. The specs same the total pad area and the sweep areas are identical also. I do not know if the material (hardness) grades are the same or not. The GT3 was intended for track performance and the TT really wasn't. -
Correct.
-
jammed ignition key
Loren replied to alexsee's topic in 997-1 Series (Carrera, Carrera 4, Carrera 2S, Carrera 4S)
There are a couple of new TSBs for 997 both of which are Workshop Service Actions. These are VIN specific and are required on a "next visit" basis. Since your car is under warranty I think it would be wise to take it and have them check the Tiptronic controller with their PIWIS tester for faults and correct actuation. It looks to me like the selector in "P" is not registering with the controller - could be mechanical or could be electronic. -
Removing windshield frame trim and the A-pillar trim
Loren replied to jpcolin's topic in 986 Series (Boxster, Boxster S)
The relay carrier is right above the fuse box. Do a search here as Tool Pants has pics of releasing the relay carrier to add the wiring connection. The headlight switch removal is also covered here in a couple of places. -
GT3 Mk1 rotors vs C4S/TT rotors
Loren replied to damianc4s's topic in 996 Series (Carrera, Carrera 4, Carrera 4S, Targa)
Any of these options will require wheel hub changes also. GT3 mk1 (and perhaps others) calipers will require 5 mm spacers so the wheels won't rub the calipers. C2 and C4 Rotors (steel) Front: 318 mm Rear: 299 mm C2 and C4 Calipers 4 piston GT3 mk1 Rotors (steel) Front: 330 mm Rear: 330 mm GT3 mk1 Calipers 4 piston GT3 mk2 Rotors (steel) Front: 350 mm Rear: 330 mm GT3 mk2 Rotors (PCCB) Front: 350 mm Rear: 350 mm GT3 mk2 Calipers 6 piston TT Rotors (steel) Front: 330 mm Rear: 330 mm TT Rotors (PCCB) Front: 350 mm Rear: 350 mm TT Calipers 4 piston GT2 Rotors (steel) Front: 350 mm Rear: 350 mm GT2 Rotors (PCCB) Front: 350 mm Rear: 350 mm GT2 Calipers 4 piston -
CDR220 stays on
Loren replied to goalgunther's topic in 996 Series (Carrera, Carrera 4, Carrera 4S, Targa)
The radio should go off within a few seconds of removing the key. Hmm... I wonder if the previous owner had a third party radio/cd player and just threw original one back in for the sale. I would wonder if the wiring harness has been spliced? I think I would get a hold of some Becker radio removal keys and have a look. Don't buy your Becker keys on eBay they are asking $10 (or more) for something Becker sells for $1.68. -
We have added and or updated TSBs in the following categories today: Boxster (987): 3 Cayman (987): 1 Carrera (997): 4 Cayenne: 6