Welcome to RennTech.org Community, Guest
There are many great features available to you once you register at RennTech.org
You are free to view posts here, but you must log in to reply to existing posts, or to start your own new topic. Like most online communities, there are costs involved to maintain a site like this - so we encourage our members to subscribe or donate. All subscriptions and donations go to the costs operating and maintaining this site. We prefer that guests take part in our community and we offer a lot in return to those willing to join our corner of the Porsche world. This site is 99 percent member supported (less than 1 percent comes from advertising) - so please consider an annual subscription or donation to keep this site running.
Here are some of the features available - once you subscribe RennTech.org
- View Classified Ads
- DIY Tutorials
- Porsche TSB Listings (limited)
- VIN Decoder
- Special Offers
- Paint Codes
- Registry
- Videos System
- View Reviews
- and get rid of this welcome message
It takes just a few minutes to register, and it's quality Porsche information at a low cost.
Contributing Members also get these additional benefits:
(you become a Contributing Member by subscribing or donating money to the operation of this site)
- No ads - advertisements are removed
- Access the Contributors Only Forum
- Contributing Members Only Downloads
- Send attachments with PMs
- All image/file storage limits are substantially increased for all Contributing Members
- Option Codes Lookup
- VIN Option Lookups (limited)

-0001-0001.png.112c13ee97acfad0cb1e70d195cc9a0e.png)
Loren
-
Posts
37,902 -
Joined
-
Days Won
651
Content Type
Profiles
Events
Forums
Exterior Paint Colors
Downloads
Tutorials
Links Directory
Collections
Classifieds
Store
Everything posted by Loren
-
-0001-0001.thumb.png.17f5bb25bf8ec261a17c21e6321c8492.png)
Help Hose decentigrating
Loren replied to violaGT3's topic in 996 Series (Carrera, Carrera 4, Carrera 4S, Targa)
Model? Year? -
can anyone tell me what this is
Loren replied to brucem's topic in 996 Series (Carrera, Carrera 4, Carrera 4S, Targa)
446 - center caps for your wheels with the Porsche logo. 236 - even though it is not on the current list we are pretty sure it is 18" Tires. -
If your car is still under warranty - I certainly would not skip any scheduled service -- whether you do it yourself or have a shop do it. Don't give a dealer an excuse to refuse a warranty claim. As Orient Express said changing your own oil is very easy (20 to 30 minutes) and costs less than $50 in parts (oil and filter). Air filter takes about 5 minutes and the pollen filter 2 minutes. All are documented here on the site. Where are you located? If you are in Northern California you should come to one of our work on cars days - we'll even help you learn to do it yourself.
-
Hmm... the washer pump gets it's power from the intermittent wiper relay - unless you have the rain sensor option - in that case the power comes from the rain sensor relay. It is just power and ground at the pump itself. Did you check the (brown) ground wire at the pump? If that is fine then the only thing left is the switch in the steering wheel.
-
Use the Carrera install TSB (4/98 9212 Installing Rain Sensor -dated Jan 26, 1999). It is the same procedure for TT.
-
The Manual Transmission oil change procedure came directly from the Porsche Service Manual. The fill should take about 2.25 liters.
-
One recommendation (from another post) is to: "...contact the Insurance Commisioner's office in your state. If they were licensed to sell in your state then there is usually an insurance fund that all insurance companies pay into to cover claims on insolvent insurance companies. It may take you a while to recover, but they should cover you. However, if they were not licensed in your state, you are probably out of luck."
-
Since you do not have the rain sensor option I would look first at the intermittent wiper relay (since the pump signal goes through the same relay). it could be a bad stalk switch - that would be unusual (and difficult to change).
-
Some help on some codes, please...
Loren replied to NikoS3's topic in 996 Series (Carrera, Carrera 4, Carrera 4S, Targa)
X97 an X98 are special order items likely deviating stitching. 09991 means manufacture from the exclusive-programme which simply means where Exclusive Program special orders. I have no idea what 10001 is. Only MY99 Carrera's had LSD as an option - after MY99 PSM took the place of Traction Control and LSD. So a MY03 does not have a traditional LSD it has PSM. -
http://www.renntech.org/forums/index.php?s...indpost&p=14453
-
I really don't think a PSE is any noisier than a stock car under 3500 RPM. I doubt you drive through your neighborhood at 4000 plus RPM.
-
Porsche recommends Ride height and Alignment be adjusted with the empty weight, i.e. full fuel tank, vehicle with spare wheel/collapsible wheel and tools, but without driver and without additional weights. Most folks I know (including me) that drive on the track have the car aligned/balanced with the drivers weight in the drivers seat.
-
PCMII Intermittent problem... help...
Loren replied to Fast40th's topic in 996 Series (Carrera, Carrera 4, Carrera 4S, Targa)
Have a look at TSB 8/03 9110 Diagnosing And Repairing The PCM2 System (dated 10-20-2004). -
Only with a PST2 or PIWIS tester (that I know of). According to the service manual: "The steering angle sensor must be calibrated after: - A new steering angle sensor has been installed. - The PSM control device has been exchanged. - The steering gear and / or components which change the zero position of the steering angle sensor have been exchanged. - Accident repairs - Suspension alignment procedures during which the previous wheel alignment values were changed." "The steering angle sensor actual value must be checked: - After a suspension alignment which resulted in no changes being made to the wheel alignment values. - As a check after steering angle sensor calibration."
-
Loren, My reverse lights work fine but my mirror does not swivel down. Looking at my manual, it says the dealer can activate this feature if I have memory seats, which I do. This goes for the automatic locking options when the car is moving. Can I do this, rather than take it to the dealer? If so, any idea how? Both functions require a PST2 (or PIWIS) tester to activate. If you know a shop or racer that has one they can do it for you - otherwise you will need to go to a dealer.
-
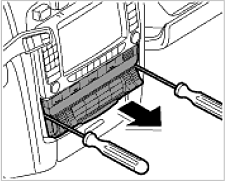
Utility Tray Removal
Loren replied to bokelley's topic in 9PA, 9PA1 (Cayenne, Cayenne S, Cayenne Turbo, Cayenne Turbo S)
Use two screwdrivers to lever out the left and the right detent, then remove the ac control. Then press in detent of electrical plugs and pull the plugs up and off then the whole ac control will pull out.
-
Try using the search function ;) PSE (Porsche Sport Exhaust) Install
-
Utility Tray Removal
Loren replied to bokelley's topic in 9PA, 9PA1 (Cayenne, Cayenne S, Cayenne Turbo, Cayenne Turbo S)
http://www.renntech.org/forums/index.php?s...indpost&p=36407 -
OK. A recent post has me confused again.
Loren replied to PJF's topic in 996 Series (Carrera, Carrera 4, Carrera 4S, Targa)
Yes. M220 LOCKING DIFFERENTIAL 40 % M222 TRACTION CONTROL SYSTEM M224 AUTOMATIC LIMITED SLIP DIFFERENTIAL M095 SPECIAL MODEL '40 YEARS 911' was only for MY04 and was a "sportier" version of the C4S suspension. -
I don't think RoW cars get the phone prep as standard (US/Canada cars do). Telephone mute should be a yellow/black wire coming off the radio (CDR-23) - plug A (black connector). You should be able to take switched power from fuse E8 - or a green/black wire from there. Fuse E8 is the 5th row from the top 8th fuse from the left.
-
Transfer them from your old seats.
-
I think your friend is thinking of DaimlerChrysler's Multiple Displacement System (MDS) V8. The specs for a V6 Cayenne state: City 16 MPG Highway 20 MPG So depending on your driving style that seems about right.
-
You don't need to remove the drive shaft - but you do need to remove the axle nut on the wheel hub. The wheel hub will need to slide out and away from the car to clear the strut/spring assembly (after removing the track rod and control arm from the wheel carrier). Don't forget on any car with PSM that the steering angle sensor needs to be re-calibrated after any suspension change/alignment.
-
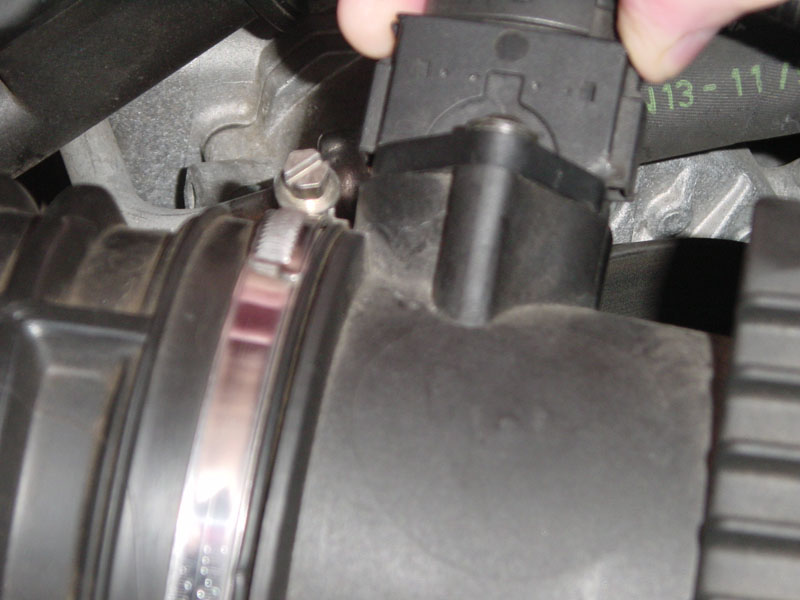
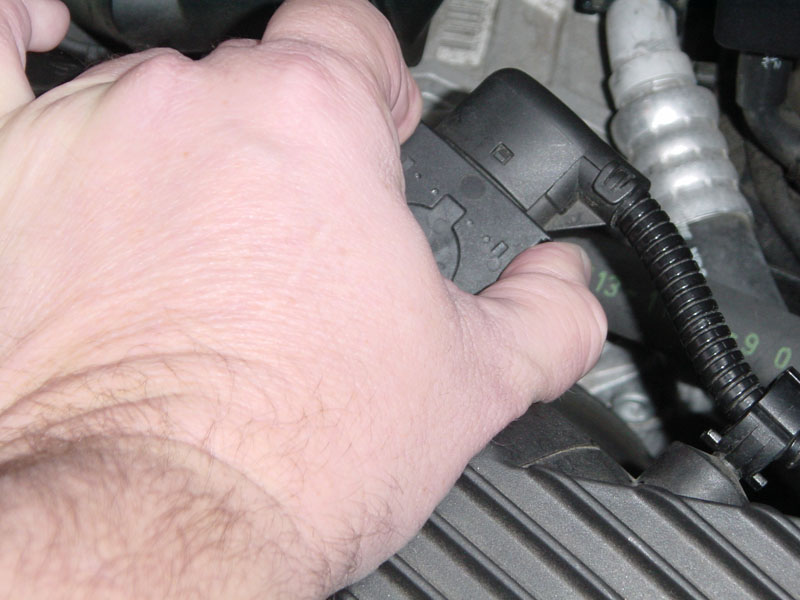
Mass Air Flow Sensor
Loren replied to DoubleNutz's topic in 996 Series (Carrera, Carrera 4, Carrera 4S, Targa)
If it is not too tight then you might get it off with one hand (as in photo 1). If it is on tight then grab the other way (photo 2) and then pull with the other hand while squeezing.
-
Have a look at the DIY here.