Welcome to RennTech.org Community, Guest
There are many great features available to you once you register at RennTech.org
You are free to view posts here, but you must log in to reply to existing posts, or to start your own new topic. Like most online communities, there are costs involved to maintain a site like this - so we encourage our members to subscribe or donate. All subscriptions and donations go to the costs operating and maintaining this site. We prefer that guests take part in our community and we offer a lot in return to those willing to join our corner of the Porsche world. This site is 99 percent member supported (less than 1 percent comes from advertising) - so please consider an annual subscription or donation to keep this site running.
Here are some of the features available - once you subscribe RennTech.org
- View Classified Ads
- DIY Tutorials
- Porsche TSB Listings (limited)
- VIN Decoder
- Special Offers
- Paint Codes
- Registry
- Videos System
- View Reviews
- and get rid of this welcome message
It takes just a few minutes to register, and it's quality Porsche information at a low cost.
Contributing Members also get these additional benefits:
(you become a Contributing Member by subscribing or donating money to the operation of this site)
- No ads - advertisements are removed
- Access the Contributors Only Forum
- Contributing Members Only Downloads
- Send attachments with PMs
- All image/file storage limits are substantially increased for all Contributing Members
- Option Codes Lookup
- VIN Option Lookups (limited)

-0001-0001.png.112c13ee97acfad0cb1e70d195cc9a0e.png)
Loren
-
Posts
37,899 -
Joined
-
Days Won
649
Content Type
Profiles
Events
Forums
Exterior Paint Colors
Downloads
Tutorials
Links Directory
Collections
Classifieds
Store
Everything posted by Loren
-
Yes, egas.
-
Correct MY changes for Porsche in the US is August 1. So if your car were built August - December 1999 it would be a MY00 in the US. What does Scouser's VIN Decoder say for Manufacture Year?
-
-0001-0001.thumb.png.17f5bb25bf8ec261a17c21e6321c8492.png)
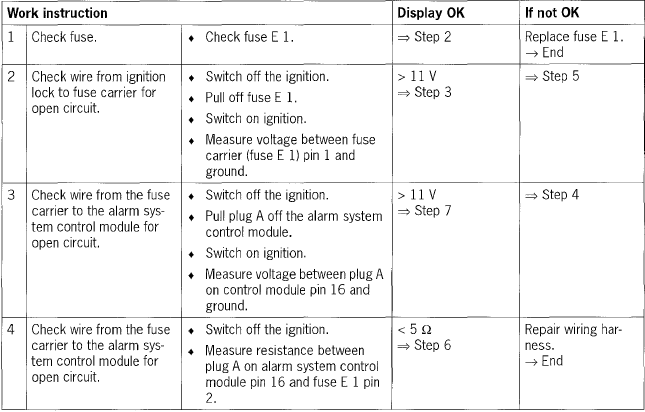
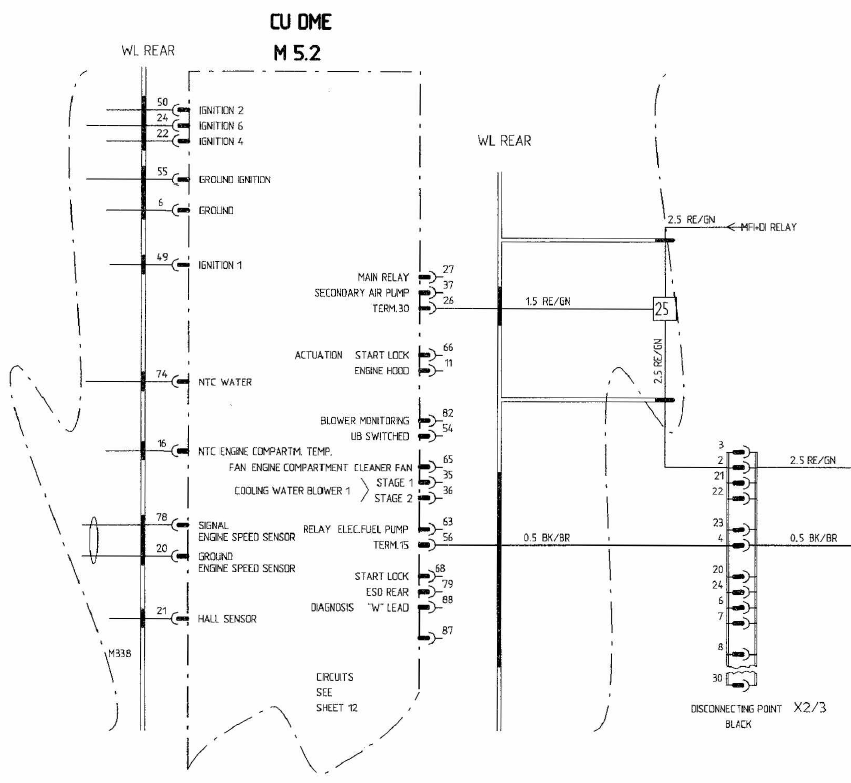
Fuse F 5/1 Location? No terminal 86 S Recognized
Loren replied to 98Boxster98's topic in 986 Series (Boxster, Boxster S)
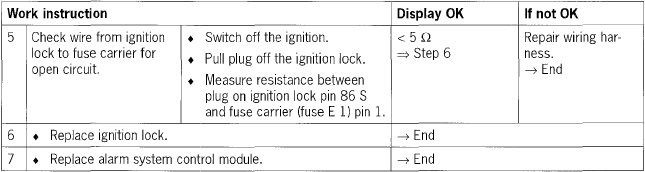
Possible cause of fault: • Pin 86 S is not detected when terminal 15 is switched on • Fuse E1 faulty • Short circuit to ground/open circuit in wiring between the alarm system control module and the ignition lock • Ignition lock faulty
-
Warped valve covers? Only way to really tell is to steam clean the bottom of the engine. Then put the car on a hoist while it is running to see where the leaks are starting from.
-
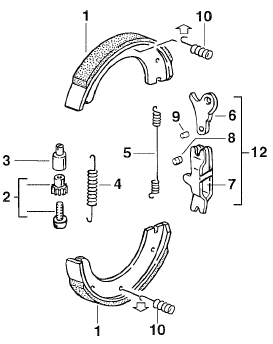
According to the manual you do the handbrake handle first -- and last. If the handle can be pulled up more than 4 clicks (before apparent braking action) then it needs to be adjusted. Then adjust the brake shoes to the point where the rotor can not be spun - then back off 5 notches and make sure the rotor turns freely. Then go back to the handbrake handle and pull it up two clicks - adjust the turnbuckle (at the handbrake handle) so that the rotors just turn (with some difficulty). Release the handbrake and make sure the wheels turn freely.
-
Is this a UK car?
-
PST2 Error Analysis
Loren replied to ToblertheDog's topic in 996 Series (Carrera, Carrera 4, Carrera 4S, Targa)
Can you connect to other control modules? Tab over to alarm system (or cluster, etc.) then hit >> -
I believe egas started in the Boxster in MY00.
-
Fuse F 5/1 Location? No terminal 86 S Recognized
Loren replied to 98Boxster98's topic in 986 Series (Boxster, Boxster S)
If that is a fault code 25 -- No pin 86 S recognized then it would be fuse E1. That would be the fifth row down from the top - first fuse on the left (7.5A). If the fuse is good (when tested with a meter) then you may have a short to ground. If that is the case then look for water under the driver's seat. -
1. On a standard 996 they are 10 mm hex. On a GT3 I think they are the same just longer. 2. Yes, you can remove the bracket. I usually just hang the caliper off the spring with a wire or twine so there is no pressure on the brake lines/fittings. 3. Ok, maybe you should write up a DIY for GT3 when you are done. ;) 4. If that is attached to the caliper wouldn't come off with the caliper? 5. You take regular screw driver and rotate the wheel - like you are prying it in the direction it will rotate. One direction tightens the parking brake shoes and the other way loosens them. Item 2 in the pic is the shoe adjustor. You are turning it to force the screw (lower part of 2) and the bushing (3) either to push the shoes out or bring them in. 6. Correct, if you can get the rotor off without loosening the brake shoes that is fine. Just realize you still may have to loosen the shoes a little to get the new rotor on.
-
Coolant - Red temp. gauge light
Loren replied to sentipede's topic in 996 Series (Carrera, Carrera 4, Carrera 4S, Targa)
Yes, distilled water would be best. -
Coolant - Red temp. gauge light
Loren replied to sentipede's topic in 996 Series (Carrera, Carrera 4, Carrera 4S, Targa)
http://www.renntech.org/forums/index.php?s...ew=findpost&p=5 If you are adding to existing coolant I would use only Porsche coolant. A mix of 50-50 with water should be fine. Fill the line on the coolant tank - with the engine cold. -
1. No there is no spec in the manual. When the wheel is in place that screw is not going anywhere. 2. There is no torque spec specified in the manual - as I recall we guessed based on the size of the bolt - so 7.5 to 10 ft/lbs. 3. Porsche does not suggest any thread locking. It is likely too hot for it there anyway. Porsche does recommend new caliper bolts. The GT3 bolts are 5 mm longer than a 996 and should be red (not silver). 4. http://www.renntech.org/forums/index.php?s...indpost&p=16992 Same type of an adjuster as on typical drum brakes. Rotate one direction and the brake pads are forced closer to the drums - rotate the other and they are pulled away from the drums.
-
996 under steer
Loren replied to hindswillrox's topic in 996 Series (Carrera, Carrera 4, Carrera 4S, Targa)
Towards the bottom of the page after the heading: New Trend for RWD cars -- the 996 expained (and a lot more) http://www.autozine.org/technical_school/h..._handling_5.htm -
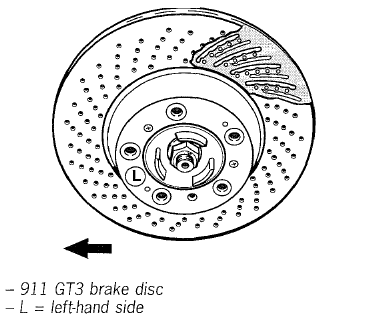
Pretty much the same for a GT3 -- be careful the rotors are directional. http://www.renntech.org/forums/index.php?s...indpost&p=16992
-
Rubbing Sound on left turns only?
Loren replied to mytoy986's topic in 986 Series (Boxster, Boxster S)
Are they the proper offset? or did you put Carrera wheels on a Boxster? ;) -
Pull the A-pillar trim 7 inwards along the roof frame and windscreen frame.
-
Broken Oil Fill Tube
Loren replied to Lee Quave's topic in 996 Series (Carrera, Carrera 4, Carrera 4S, Targa)
It is okay to have different opinions on a subject. They are just that - "opinions". Lee has had his question answered and he will make the final decision on what he does - just as any of us do. I don't see any point in further comments so I am closing this topic. -
Broken Oil Fill Tube
Loren replied to Lee Quave's topic in 996 Series (Carrera, Carrera 4, Carrera 4S, Targa)
996.107.150.61 OIL FILLING PIPE -- MSRP $32.72 (as of April 2006) -
All the OEM filters I've seen were made by Mann. BMC does the filters for all the Cup cars and other Porsche race cars.
-
I sent you a PM with some info...
-
Is this what you need?
-
Creaking Rear Suspension
Loren replied to Mike(UK)'s topic in 996 Series (Carrera, Carrera 4, Carrera 4S, Targa)
It could also be a loose swaybar mount. -
Horn Problem
Loren replied to natzee's topic in DIY Articles - Boxster (986) - Common Fixes and Repairs
I think you need to get your eyes checked. ;) You do know that you click on the image to make it larger? -
The Aerokit II install TSB shows a different number for the front spoiler(s): 996.505.980.02.G2X Boxster 996.505.980.03.G2X Boxster S My guess is that the Boxster S spoiler has the opening for the 3rd radiator.