Welcome to RennTech.org Community, Guest
There are many great features available to you once you register at RennTech.org
You are free to view posts here, but you must log in to reply to existing posts, or to start your own new topic. Like most online communities, there are costs involved to maintain a site like this - so we encourage our members to subscribe or donate. All subscriptions and donations go to the costs operating and maintaining this site. We prefer that guests take part in our community and we offer a lot in return to those willing to join our corner of the Porsche world. This site is 99 percent member supported (less than 1 percent comes from advertising) - so please consider an annual subscription or donation to keep this site running.
Here are some of the features available - once you subscribe RennTech.org
- View Classified Ads
- DIY Tutorials
- Porsche TSB Listings (limited)
- VIN Decoder
- Special Offers
- Paint Codes
- Registry
- Videos System
- View Reviews
- and get rid of this welcome message
It takes just a few minutes to register, and it's quality Porsche information at a low cost.
Contributing Members also get these additional benefits:
(you become a Contributing Member by subscribing or donating money to the operation of this site)
- No ads - advertisements are removed
- Access the Contributors Only Forum
- Contributing Members Only Downloads
- Send attachments with PMs
- All image/file storage limits are substantially increased for all Contributing Members
- Option Codes Lookup
- VIN Option Lookups (limited)

-0001-0001.png.112c13ee97acfad0cb1e70d195cc9a0e.png)
Loren
-
Posts
37,896 -
Joined
-
Days Won
648
Content Type
Profiles
Events
Forums
Exterior Paint Colors
Downloads
Tutorials
Links Directory
Collections
Classifieds
Store
Everything posted by Loren
-
-0001-0001.thumb.png.17f5bb25bf8ec261a17c21e6321c8492.png)
Exhaust tips
Loren replied to rval_1999's topic in 996 Series (Carrera, Carrera 4, Carrera 4S, Targa)
Correct - they will not fit. Both the bumper shape and exhaust design changed in MY02 (and newer cars). Perhaps an exhaust specialty shop could make them work with a welding but they are definitely not bolt-on. -
Removing and installing the engine drive belt Removing the engine drive belt 1. Remove the complete air cleaner assembly (1). - Undo hexagon head bolt M6 x 34. - Undo the hose clamp on the throttle body. - Remove the connector for the mass air flow sensor (MAF) and remove air cleaner assembly. 2. Loosen servo pump wheel (2). - Mark belt travel direction with a colored pen (if you are going to re-use the belt). - Undo the three hexagon head bolts on the servo pump by approx. one half turn. 3. Rel Author Loren Category TT/GT2 (996) - Maintenance Submitted 08/28/2006 07:32 AM Updated 03/10/2017 02:09 PM
-
Removing the engine drive belt 1. Remove the complete air cleaner assembly (1). - Undo hexagon head bolt M6 x 34. - Undo the hose clamp on the throttle body. - Remove the connector for the mass air flow sensor (MAF) and remove air cleaner assembly. 2. Loosen servo pump wheel (2). - Mark belt travel direction with a colored pen (if you are going to re-use the belt). - Undo the three hexagon head bolts on the servo pump by approx. one half turn. 3. Relieve drive belt (3). - To do this, turn the tensioning roller clockwise and simultaneously remove the belt from the drive pulleys. 4. Remove servo pump wheel (4). Note - Only remove the servo pump wheel when the drive belt tension is completely relieved! - Remove servo pump wheel with drive belt to the rear. - Remove the belt from all drive wheels and lift up to remove. ---------------------------------------------------------------------------------------------------------------------------------- Installation of the engine drive belt 1. Fit drive belt (1). - Fit the belt onto the drive wheels. 2. Position servo pump wheel (2). - Put on the servo pump wheel together with the drive belt. - Slightly tighten the three fastening screws on the servo pump wheel. 3. Tension drive belt (3). Note - It is absolutely necessary to check that the drive belt is correctly seated on all belt pulleys! - To tension the drive belt, turn the tensioning roller 7 in clockwise direction and simultaneously fit the drive belt on the deflection roller 8. - Then slowly relieve. To do this, turn the tensioning roller slowly counter−clockwise (anti-clockwise). 4. Tighten fastening screws on servo pump (4). - Tighten the fastening screws of the servo pump drive wheel. Tightening torque: 17 ftlb. (23 Nm) 5. Install air cleaner assembly (5). - Attach connector onto mass air flow sensor (MAF). - Tighten the hose clamp on the throttle body. - Tighten the M6 x 34 hexagon−head bolt to 7.5 ftlb. (10 Nm)
-
Cold - yes Warm - no. There is a TSB for more of a screeching noise on during warmup (on 987's only). If you are getting this screeching noise then you should take it to your dealer and tell them you have the problem described in TSB 1/06 1726 Screeching Noise From the Engine During Warm-up -- dated Feb 27, 2006.
-
Strange Clutch Mishap
Loren replied to rval_1999's topic in 996 Series (Carrera, Carrera 4, Carrera 4S, Targa)
There are more than a couple of TSBs for MY99 clutch issues. Your problem sounds like a faulty release arm. There are also TSBs for the pedal return spring and a misaligned clutch pedal. -
My car is now a submarine?!
Loren replied to GOB's topic in 996 Series (Carrera, Carrera 4, Carrera 4S, Targa)
I would check all of the drains. Is your car a coupe? If so, here is where they are located.
-
Changing the Polyrib Belt
Loren replied to Loren's topic in DIY Articles - Carrera (996) - Maintenance
It is a bit more complicated. I'll try to put a DIY together in the next couple of days. You can find the new TT belt replacement here. -
I would crank in a litttle more (negative) camber than RoW sport and a little less than X74 (X74 is 30 mm lower).
-
Carrera (RoW -- not US) 996.631.485.00 left rear tailight housing 996.631.486.00 right rear tailight housing C4S (RoW -- not US) 996.631.487.00 left rear tailight housing 996.631.488.00 right rear tailight housing
-
The rattle is from the hydraulic lifters not the timing chains. Porsche's "approved" list includes 0W-40 and 5W-40 all synthetic oils
-
My car is now a submarine?!
Loren replied to GOB's topic in 996 Series (Carrera, Carrera 4, Carrera 4S, Targa)
Your AC drain tube is likely dislodged. Look for the tube from the condenser under the dash and make sure it is not blocked and draining out under the car. -
Ok, start with the fuses. The fuse panel (on LHD cars) is the left under the dash. Look at fuse C3 (that would the third row down from the top - and the third fuse from the left) it should 15A. Also check B8 (second row down 8th from the left) it should be 15A also. Replace them if they are not clearly good. If the drains for the top storage were ever clogging and the car got water inside then their could be damage to the central locking/alarm unit under the drivers seat (LHD). Feel under the seat to see if it is wet there. In many cases if that has happened then the central locking/alarm controller will need to be replaced (by a dealer because of the alarm system re-coding). Any other electrical issues? Sometimes a bad ignition switch will cause a number strange things. Good luck - hope it's just a fuse.
-
If the other locks are working then the solenoid that locks the handles should be working too -- they all work off the central locking controller. Look down in the cracks and see if anything is jammed in the latch area.
-
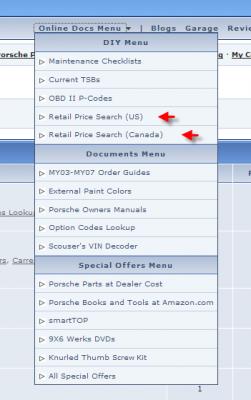
Sorry folks I have been out sick for few days and have not been able to keep up here as I would like. Now that I am feeling better I will try to get caught up on a few things. The Retail Price Search feature (for our Contributing Members) has been updated to reflect August 2006 pricing for both the US and Canada. We try and update this on a monthly basis as the price lists come available to us. For August 2006 the price lists support - US: 205,376 parts Canada: 205,377 parts Choose your price list from the drop down menu
-
Unapproved oil & filter change
Loren replied to Tool Pants's topic in 986 Series (Boxster, Boxster S)
Hardly... Porsches approved oils list is over 5 pages long. It is merely a list of oils and specific weights of oils and they have tested and approved. Porsche updated their list about once a year via TSB. -
No. Take it to an Autozone or other parts place have the fault codes read for free. Report back the fault codes and any other symptoms here.
-
P0740 Fault, torque converter clutch - present Possbile causes: - ATF supply - Torque converter - Pressure regulator 4 (hydraulic) - Electrical triggering to pressure regulator 4 - Hydraulic control unit
-
information under the tach
Loren replied to X911CarreraX's topic in 996 Series (Carrera, Carrera 4, Carrera 4S, Targa)
http://www.whiteson.org/boxster/mods/obc/ -
Have a look at Cayenne TSB 12/05 9153 Satellite Radio Installation Instructions (I No. QV4 QV8) -- dated Sep 19, 2005.
-
K&N Intake 63 Series
Loren replied to mdillian3690's topic in 996 Series (Carrera, Carrera 4, Carrera 4S, Targa)
Clean the MAF again and if that does not fix I think you will need a new MAF. -
Mass Air Flow Sensor
Loren replied to DoubleNutz's topic in 996 Series (Carrera, Carrera 4, Carrera 4S, Targa)
Only the 124 MAF is approved for use with a 996TT. -
How to disassemble the lower slots?
Loren replied to jicko's topic in 996 Series (Carrera, Carrera 4, Carrera 4S, Targa)
All together as one unit. -
I don't think it is a problem. Ask a fellow Boxster owner (or dealer) to let you listen to another car. I think you will find they all do this.
-
Clear Rear Lights for 1998 996
Loren replied to Sly74's topic in 996 Series (Carrera, Carrera 4, Carrera 4S, Targa)
Try Performance Products or Sunset Imports (Porsche Parts at Dealer Cost). :welcome: -
How to make your sidemarkers flash