Welcome to RennTech.org Community, Guest
There are many great features available to you once you register at RennTech.org
You are free to view posts here, but you must log in to reply to existing posts, or to start your own new topic. Like most online communities, there are costs involved to maintain a site like this - so we encourage our members to subscribe or donate. All subscriptions and donations go to the costs operating and maintaining this site. We prefer that guests take part in our community and we offer a lot in return to those willing to join our corner of the Porsche world. This site is 99 percent member supported (less than 1 percent comes from advertising) - so please consider an annual subscription or donation to keep this site running.
Here are some of the features available - once you subscribe RennTech.org
- View Classified Ads
- DIY Tutorials
- Porsche TSB Listings (limited)
- VIN Decoder
- Special Offers
- Paint Codes
- Registry
- Videos System
- View Reviews
- and get rid of this welcome message
It takes just a few minutes to register, and it's quality Porsche information at a low cost.
Contributing Members also get these additional benefits:
(you become a Contributing Member by subscribing or donating money to the operation of this site)
- No ads - advertisements are removed
- Access the Contributors Only Forum
- Contributing Members Only Downloads
- Send attachments with PMs
- All image/file storage limits are substantially increased for all Contributing Members
- Option Codes Lookup
- VIN Option Lookups (limited)

-0001-0001.png.112c13ee97acfad0cb1e70d195cc9a0e.png)
Loren
-
Posts
37,896 -
Joined
-
Days Won
648
Content Type
Profiles
Events
Forums
Exterior Paint Colors
Downloads
Tutorials
Links Directory
Collections
Classifieds
Store
Everything posted by Loren
-
IMHO - PCA is the yearly membership fee just for the monthly magazine (Panorama). We work with our local regions (their are 4 just in the general bay area here). We help with some tech sessions, parade laps, fun drives, etc. and we do our local "Work on cars days".
-
If it is on "Auto" it will run most of the time. Still the problem could be a sensor....
-
Try the emergency release in the door frame (above the top hinge - way back in there).

-
-
-
-0001-0001.thumb.png.17f5bb25bf8ec261a17c21e6321c8492.png)
Noticable hum from pass. airbag area...
Loren replied to rsfeller's topic in 986 Series (Boxster, Boxster S)
Yes. it could be a bad heater control valve but I think it could also be a bad sensor (thinking it is already hot enough). With these testers you can actually test each (independent) part of the system for proper function. Try your local PCA for a list of local independent shops. -
Noticable hum from pass. airbag area...
Loren replied to rsfeller's topic in 986 Series (Boxster, Boxster S)
There are many other tests you can do with a Porsche PST2 or PIWIS tester. For example: actual values readouts to test flap operation sensors, switches, etc., etc. Try to find an independent shop that has one of these testers - it will make short work of diagnosing your problem.
-
Noticable hum from pass. airbag area...
Loren replied to rsfeller's topic in 986 Series (Boxster, Boxster S)
Yes, it will just show faults (at this time). It will not show any actuals or run any tests. 180-190 is normal. It is advisable to clean the leaves and other debris from inside the front bumper openings at least once a year. The front bumper comes off pretty easy (see my 3rd radiator DIY in the 996 DIY mods section). With the front bumper off you can really clean both the AC condensers and the engine radiators. -
http://www.wilhelmy-it.de/sms/db/smarttop/?coupon=renntech
-
Are you sure the part number is not 996.332.024.9B? The 9B was used on the MY03 GT3 RS (full race cars). Again, sorry I don't have older cup car info.
-
I don't know when the blue axle shafts started. My model year 2003 GT3 Cup Service book says the blue ones are 996.332.024.92.
-
From the Porsche OBD II manual. BTW... not all faults turn on the CEL - temporary faults do not mean that the problem can not be corrected without intervention. Many temporary faults are self corrected.
-
No, the Targa came out after the switches changed from glossy to matte finish - so there is no glossy Targa switch.
-
http://www.renntech.org/forums/index.php?s...ost&p=48522 Search is your friend ;)
-
GT2 Front Bumper Conversion Part Numbers
Loren replied to BigBadBen's topic in 996 TT, 996 TT S, 996 GT2
I sent you a reply by PM. The cooling system list is 16 pages and you will need to go through it and subsitute the GT2 parts (they are marked) for TT parts. Here is the GT2 bumper parts list: gt2_front_bumper.pdf -
http://www.renntech.org/forums/index.php?s...ost&p=45985 Search is your friend ;)
-
I would try new batteries and the reverse/reboot trick too. I think an alarm controller is expensive.
-
Yes, but it could be intermittent. To my knowledge - yes. We have seen that same error fault on many cars that work fine.
-
Alarm Error Codes commented needed
Loren replied to rsfeller's topic in 986 Series (Boxster, Boxster S)
You will need to ask the Durametric folks. I have a PST2 and it will reset any code(s) in any model Porsche. Of course it cost more than ten times what the Durametic Software did. ;) -
This says that the alarm controller is not getting a signal from your key fob transponder. Try another key or you could have a bad key fob (transponder). Fairly common - likely nothing to worry about. The motion sensor detected something moving (once). This is not enough to trigger an alarm.
-
Alarm Error Codes commented needed
Loren replied to rsfeller's topic in 986 Series (Boxster, Boxster S)
This just means that the battery was disconnected recently. I think it is just there to warn that perhaps someone was trying to defeat the alarm (except in this case it was likely you or someone else trying to clear codes). The ABS light simply means that a problem or fault has been detected in the ABS system. It may or may not be working. Did you use the Durametric Software to check for ABS codes? If the contact cleaner fix does not work then you will need new belt buckles as described in the TSB. -
OBDII Question
Loren replied to raleighcab's topic in 996 Series (Carrera, Carrera 4, Carrera 4S, Targa)
http://www.renntech.org/forums/index.php?s...ost&p=51555
-
Ever have your convertible top lubed?
Loren replied to LVGeorge's topic in 996 Series (Carrera, Carrera 4, Carrera 4S, Targa)
As it says on the donation page You have now been upgraded - elaspsed time -- 48 minutes. You should have full access now. -
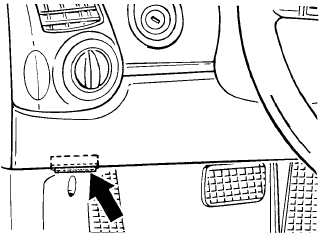
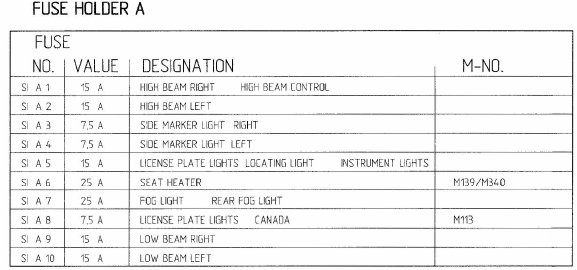
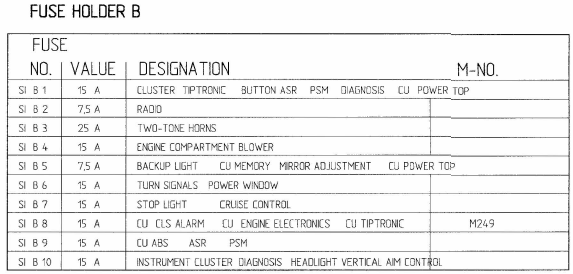
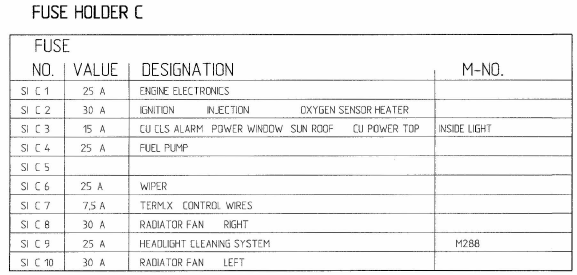
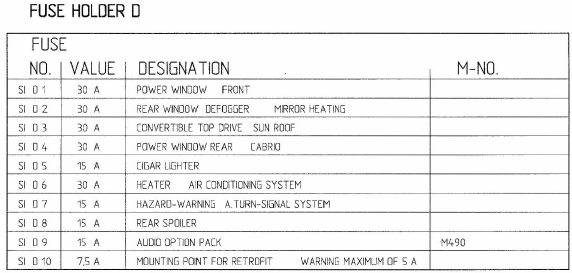
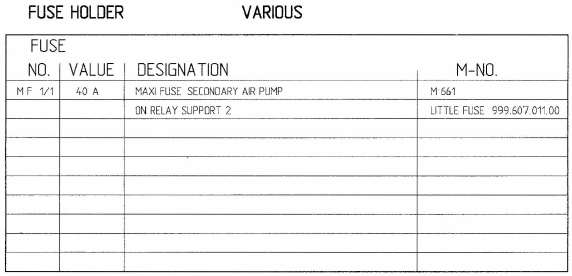
Fuse Chart or Fuse Map
Loren replied to mm23's topic in 996 Series (Carrera, Carrera 4, Carrera 4S, Targa)
For MY99
-
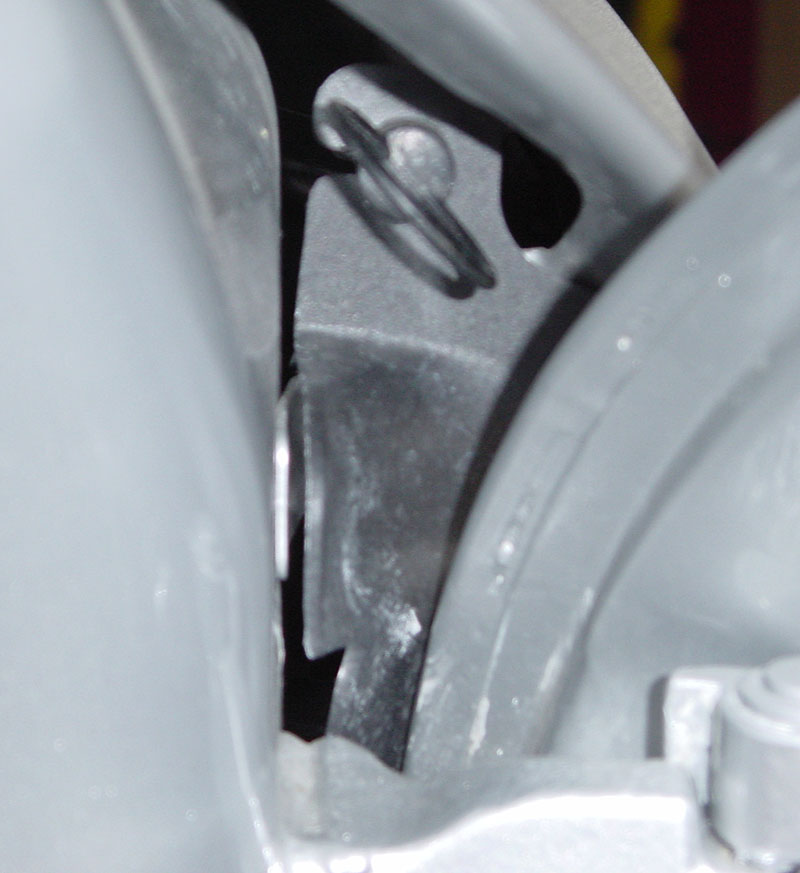
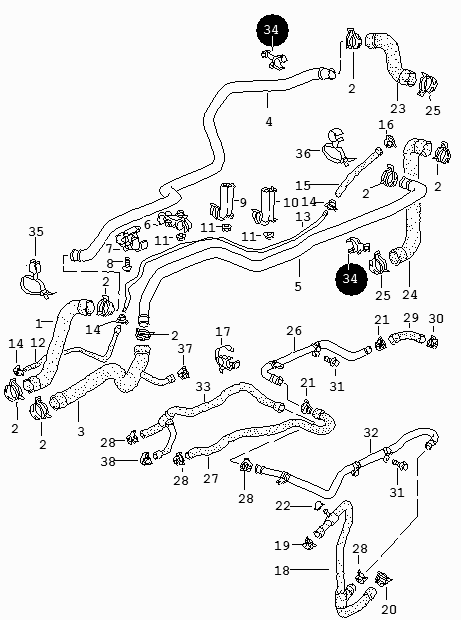
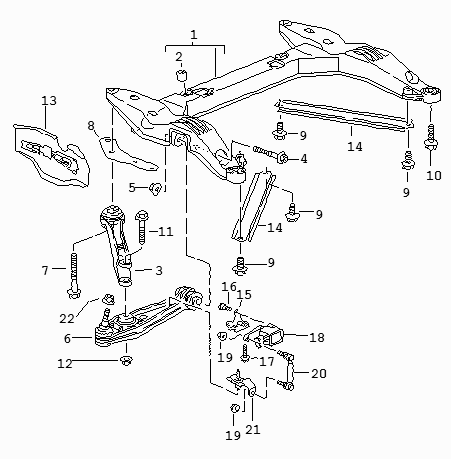
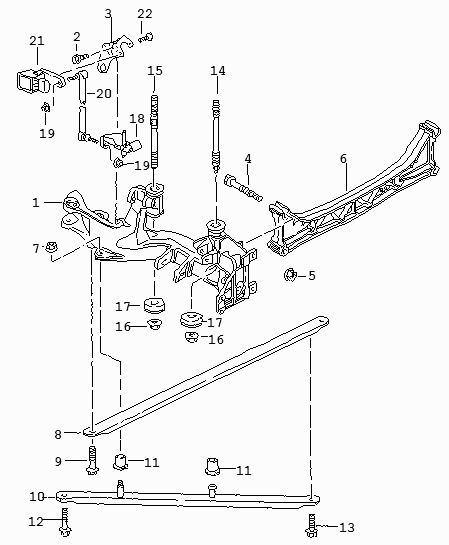
Front Suspension Sensor is Dangling?
Loren replied to racerken's topic in 996 Series (Carrera, Carrera 4, Carrera 4S, Targa)
The front sensor (item 18). There should be a small strut (item 20) and everything is held on with screws, bolts and nuts. I would look to see what is missing or broken/bent. The rear is very similar. Sensor (item 21) strut (item 20). etc.