Welcome to RennTech.org Community, Guest
There are many great features available to you once you register at RennTech.org
You are free to view posts here, but you must log in to reply to existing posts, or to start your own new topic. Like most online communities, there are costs involved to maintain a site like this - so we encourage our members to subscribe or donate. All subscriptions and donations go to the costs operating and maintaining this site. We prefer that guests take part in our community and we offer a lot in return to those willing to join our corner of the Porsche world. This site is 99 percent member supported (less than 1 percent comes from advertising) - so please consider an annual subscription or donation to keep this site running.
Here are some of the features available - once you subscribe RennTech.org
- View Classified Ads
- DIY Tutorials
- Porsche TSB Listings (limited)
- VIN Decoder
- Special Offers
- Paint Codes
- Registry
- Videos System
- View Reviews
- and get rid of this welcome message
It takes just a few minutes to register, and it's quality Porsche information at a low cost.
Contributing Members also get these additional benefits:
(you become a Contributing Member by subscribing or donating money to the operation of this site)
- No ads - advertisements are removed
- Access the Contributors Only Forum
- Contributing Members Only Downloads
- Send attachments with PMs
- All image/file storage limits are substantially increased for all Contributing Members
- Option Codes Lookup
- VIN Option Lookups (limited)

-0001-0001.png.112c13ee97acfad0cb1e70d195cc9a0e.png)
Loren
-
Posts
37,902 -
Joined
-
Days Won
651
Content Type
Profiles
Events
Forums
Exterior Paint Colors
Downloads
Tutorials
Links Directory
Collections
Classifieds
Store
Everything posted by Loren
-
-0001-0001.thumb.png.17f5bb25bf8ec261a17c21e6321c8492.png)
CDR-32 owners manual on pdf please
Loren replied to Fulla's topic in 996 Series (Carrera, Carrera 4, Carrera 4S, Targa)
CDR-32 was used for RoW cars in MY99-02. I had heard it was very close to the US/Canada CDR-220. You might try Becker in your country. -
Sorry, but that is BS. Try Sunset Imports (Porsche Parts at Dealer Cost) for a good price.
-
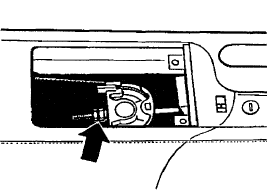
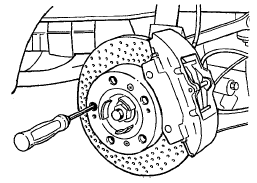
Adjusting parking brake
Loren replied to evansaero's topic in DIY Articles - Carrera (996) - Maintenance
There are two adjustments - at the wheels and at the handbrake handle itself. To adjust: 1. Remove the rear wheels. 2. Release the parking brake lever and push back the brake pads of the rear axle until the brake disc can be turned freely. 3. Undo the adjustment nuts on the turnbuckle (arrow) until the cables are without pretension. 4. With a screwdriver, adjust the adjustment fixture through a threaded wheel bolt hole until the wheel can no longer be turned. Next, turn back the adjustment fixture through 5 notches again (release approx. 3 notches until the wheel can be turned freely, then release another 2 notches). Repeat the procedure on the other wheel. 5. Pull up the parking brake lever by 2 teeth and turn the adjustment nut of the turnbuckle until both wheels can be turned manually with difficulty. 6. Release the parking brake lever and check whether both wheels can be turned freely.
-
Tiptronic oil seperator tips?
Loren replied to Jeremy Cottrell's topic in 996 Series (Carrera, Carrera 4, Carrera 4S, Targa)
Are you talking about the oil seperator in the engine sump? If so, then you remove the oil pan cover - no need to remove the engine. -
burning oil == new engine?
Loren replied to muranomike's topic in 996 Series (Carrera, Carrera 4, Carrera 4S, Targa)
I would ask them to run a compression check on each cylinder. This should tell if you have rings leaking or worse a slipped cylinder liner. -
I guess I was not clear - I think you need to have all the system controllers scanned again and print out all the fault codes. An OPC or independent shop with a PST2 or PIWIS can easily do this. They can even tell you if you have a sensor disconnected.
-
Every fault has a code PSM, ABS, DME etc., etc. You really need to these codes to narrow down the possibilities.
-
Is this a UK car (where they report the manufacture year rather model year)? because the 996TT didn't come out until MY01. Have you had the fault codes read on the car? The is the first thing you should do - and write them all down and report back here. At this point it could be anything from an air/vacuum leak to a MAF to a bad electrical connection.
-
Carrera logo location
Loren replied to Long Islander's topic in 996 Series (Carrera, Carrera 4, Carrera 4S, Targa)
Yes, that should work. MSRP (in US dollars) is $23.36 (as of August 2006). -
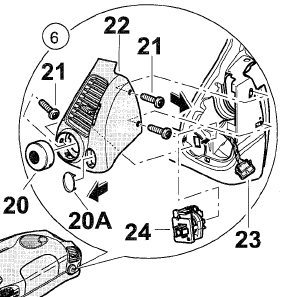
How to remove the side vents for 03 turbo...
Loren replied to Alex4747's topic in 996 TT, 996 TT S, 996 GT2
Remove cap (20) and then the screw (21) from inside. The remove the two screws (21) from the door side of the vent. Disconnect any electrical connectors (if there are any).
-
How to remove the side vents for 03 turbo...
Loren replied to Alex4747's topic in 996 TT, 996 TT S, 996 GT2
Have look here. Is that what you need? -
My new porsche
Loren replied to laneskelton's topic in 996 Series (Carrera, Carrera 4, Carrera 4S, Targa)
:welcome: -
15A for both A9 and A10.
-
adding glovebox
Loren replied to Fidgits's topic in 996 Series (Carrera, Carrera 4, Carrera 4S, Targa)
Not without changing out the whole dash - which is quite a job...
-
Any chance you have a water leak and water has gotten to the alarm/central locking control box under the driver's seat? I would see if the carpet under the driver seat is wet or damp...
-
Well the battery needs to have a vent connection that can have a tube attached to it - and sorry I do not know about the Interstate battery. The Autozone Duralast that Tool Pants and I use comes with a battery side connector, tubing and an adapter so I would think other good battery makers would do the same. Se my post (and others) here.
-
Do you mean vent (for the battery gases)? or the water drains for the area around the battery?
-
Do I have Bose?
Loren replied to kirk1176's topic in 996 Series (Carrera, Carrera 4, Carrera 4S, Targa)
996.645.331.03 is the amp for M490. I believe that is the Harman amp sound package. -
Do I have Bose?
Loren replied to kirk1176's topic in 996 Series (Carrera, Carrera 4, Carrera 4S, Targa)
BOSE High End Sound package was an option (680) on the MY04 40th Anniversary car. It included a 100 watt amp and 11 speakers. Sorry, it does not sound like you have it unless it was installed after production. I think your amp part number would be 996.645.332.05 if you have the BOSE High End Sound package. Option 665 and 670 are PCM2 (navigation) with radio. -
Well, you need to find a shop with a PST2 or PIWIS tester and have read out your Parkassist fault code(s). These codes will tell you and tech exactly where the problem is. An independent shop will likely be the least cost.
-
You need to find someone to read the fault code(s). Where are you located? The loudspeaker emits the following signals: System readiness - 0.5 sec. continuous tone, 1200 Hz. Fault signal - Continuous tone whenever just switched on, 600 Hz. Obstacle detection - Signal tone with tone break. Tone break is distancedependent. Continuous tone from distance of 30 cm, 1200 Hz.
-
The are ultra sound sensors and I don't think they require any cleaning. Are you having a problem? What are the symptoms?
-
Probably an 8 bit first version unit. The first PCM (rev 2) change didn't happen until February 2001 TT production (accroding to the TSB). See the pinned post here (PCM/PCM2 Software Revisions).
-
Try MAShaw.com
-
With the right driver I have seen them last more than 150,000 miles. But I have also seen clutches that were trashed in less than 60,000 miles. It really all depends on how the car was driven.