Welcome to RennTech.org Community, Guest
There are many great features available to you once you register at RennTech.org
You are free to view posts here, but you must log in to reply to existing posts, or to start your own new topic. Like most online communities, there are costs involved to maintain a site like this - so we encourage our members to subscribe or donate. All subscriptions and donations go to the costs operating and maintaining this site. We prefer that guests take part in our community and we offer a lot in return to those willing to join our corner of the Porsche world. This site is 99 percent member supported (less than 1 percent comes from advertising) - so please consider an annual subscription or donation to keep this site running.
Here are some of the features available - once you subscribe RennTech.org
- View Classified Ads
- DIY Tutorials
- Porsche TSB Listings (limited)
- VIN Decoder
- Special Offers
- Paint Codes
- Registry
- Videos System
- View Reviews
- and get rid of this welcome message
It takes just a few minutes to register, and it's quality Porsche information at a low cost.
Contributing Members also get these additional benefits:
(you become a Contributing Member by subscribing or donating money to the operation of this site)
- No ads - advertisements are removed
- Access the Contributors Only Forum
- Contributing Members Only Downloads
- Send attachments with PMs
- All image/file storage limits are substantially increased for all Contributing Members
- Option Codes Lookup
- VIN Option Lookups (limited)

-0001-0001.png.112c13ee97acfad0cb1e70d195cc9a0e.png)
Loren
-
Posts
37,885 -
Joined
-
Days Won
646
Content Type
Profiles
Events
Forums
Exterior Paint Colors
Downloads
Tutorials
Links Directory
Collections
Classifieds
Store
Everything posted by Loren
-
-0001-0001.thumb.png.17f5bb25bf8ec261a17c21e6321c8492.png) When a PSE is installed you re-use the old tips - so no they do not mean anything.
When a PSE is installed you re-use the old tips - so no they do not mean anything. -
When a PSE is installed you re-use the old tips - so no they do not mean anything. You need to look at the muffler and see if it has the bypass valve.

-
996 Gauge Cluster Part Number
Loren replied to supra519's topic in 996 Series (Carrera, Carrera 4, Carrera 4S, Targa)
Are you sure the part number is not 996.641.103.03.70C? 996 641 103 08 70C does not exist in my parts listing? 996.641.103.03.70C -- fits only MY99 US, rear wheel drive (C2), 6 speed. -
Problem with B&M short shifter
Loren replied to tmc's topic in 996 Series (Carrera, Carrera 4, Carrera 4S, Targa)
You could try Loctite Red. I have not seen the problem before. Perhaps it is a bad kit -- have you talked to the B&M folks? -
Problem with B&M short shifter
Loren replied to tmc's topic in 996 Series (Carrera, Carrera 4, Carrera 4S, Targa)
Use a little Loctite. -
IMHO yes. I can not hear any difference to 2 or 3 large tube versions. There are too many to list here. Get me the part number off one of the mufflers - that will be enough to tell.
-
Oil change DIY & a suggestion
Loren replied to Scouser's topic in 996 Series (Carrera, Carrera 4, Carrera 4S, Targa)
It does say: "Model/Capacity in Liters (US quarts) (approx.) 911 Carrera (3.4 liter engine) - 8.50 liters (8.98 quarts) 911 Carrera (3.6 liter engine MY02 on) - 8.25 liters (8.71 quarts) Boxster - 8.50 liters (8.98 quarts)" I will add the US quarts just to make it "really" clear. Cheers! :cheers: -
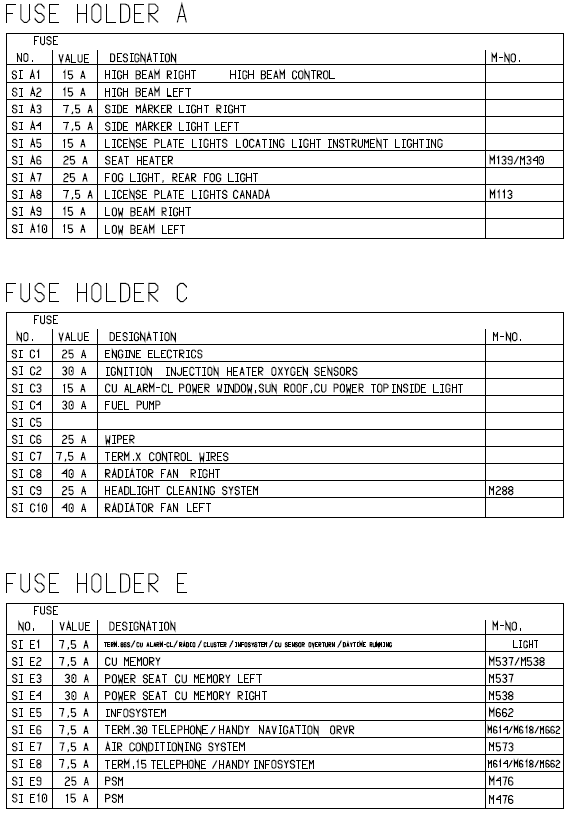
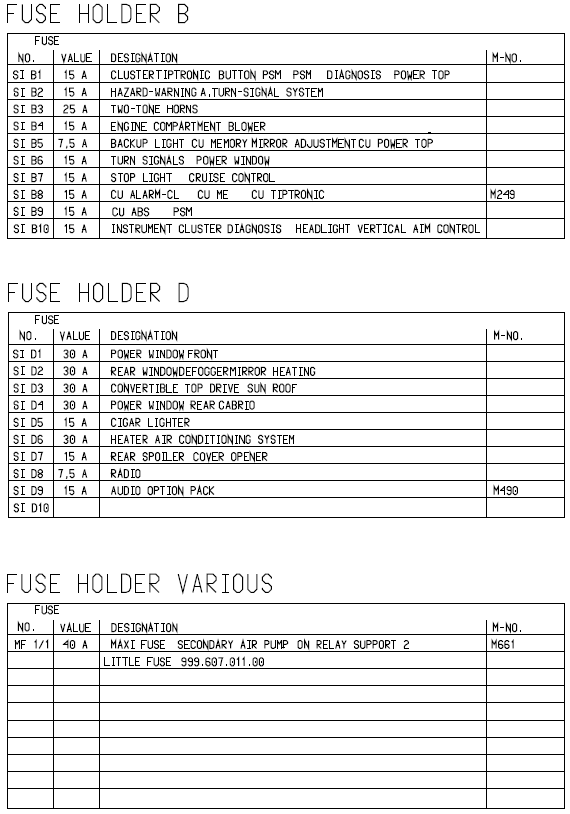
You did look for the paper booklet on the back of fusebox cover? ;) MY03 TT
-
PS Fluid Leak
Loren replied to MH996TT's topic in 996 Series (Carrera, Carrera 4, Carrera 4S, Targa)
It is probably best to put the car on a lift and pull the bottom cover so you can see where it is leaking. I've actually seen one of the metal lines leak that was damaged by a road hazard -- or an off-road experience ;) -
Oxygen Sensor removal
Loren replied to dr_karlb's topic in 996 Series (Carrera, Carrera 4, Carrera 4S, Targa)
Check the gas cap seal first then go after the cannister purge valve. If both are okay then it be the MAF (reading less air that actual). -
Yes, but elsewhere in that TSB you will find: If you use 5 mm spacer (with any wheel or tire) your existing bolts will be 5 mm too shorter. This means that there will be 5 mm less thread contact to hold the wheel on. Porsche sells the 5 mm spacers with the longer (5 mm longer) bolts. I would not use the 5 mm spacers without the 5 mm longer bolts.
-
Oxygen Sensor removal
Loren replied to dr_karlb's topic in 996 Series (Carrera, Carrera 4, Carrera 4S, Targa)
P1123 Oxygen Sensing Adaptation Area 1 (Cylinders 1 - 3) - Lean Threshold P1125 Oxygen Sensing Adaptation Area 1 (Cylinders 4 - 6) - Lean Threshold These codes say your mixture is too rich for the DME to control (it has reached it leaning threshold). The O2 sensors are reporting the problem - they are not likely the cause. This could be something as simple as an open EVAP canister purge valve. -
The 5mm spacers require a longer wheel bolt. The 17mm spacers have bolts to the rotor/hub and then you use your original bolts to bolt the wheels to the 17mm spacers.
-
The Retail Price Search feature (for our Contributing Members) has been updated to reflect September 2006 pricing for the US (only). We try and update this on a monthly basis as the price lists come available to us. For September 2006 the price lists support - US: 207,082 parts Choose your price list from the drop down menu
-
Part No.s for Carbon Door Trim Needed
Loren replied to Master_Betty's topic in 986 Series Part Number Requests
Yes, these parts will fit MY97 to MY04 Boxster (986 series). -
Part No.s for Carbon Door Trim Needed
Loren replied to Master_Betty's topic in 986 Series Part Number Requests
There are three pieces for each door (left and right). 986.555.982.02 Right handle trim (carbon) 986.555.981.02 Left handle trim (carbon) 986.555.991.01 Right armrest cover (carbon) 986.555.990.01 Left armrest cover (carbon) 986.555.988.03.xxx Right door handle pull (carbon/leather) 986.555.987.03.xxx Left door handle pull (carbon/leather) you need to specify the leather color code for the door pulls (xxx). OR you can order the first two (armrest cover and handle trim) in one package: 000.044.800.88 -
5 mm front and rear or 5 mm front and 17 mm rear (with specified tire and wheel sizes).
-
The car should not be driven with a flashing cell. Have someone like Autozone read your codes for free and report back here.
-
Hava look at the announcment in any forum How to become a Contributing Member.
-
You will find approved spacers as well as wheels and tires in TSB 2/04 4440 Summer Tire and Wheel Summary -- dated May 25, 2004. As a Contributing member you can read that in the TSb section here.
-
New Audio System
Loren replied to Jorge332655's topic in 996 Series (Carrera, Carrera 4, Carrera 4S, Targa)
No, it should be disconnected and taped. -
We have added and/or updated TSBs in the following categories today (27 total): Boxster (986) - 1 Boxster (987) - 3 Carrera (996) - 1 Carrera (997) - 10 Carerra GT - 2 Cayenne - 4 GT3 (996) - 1 GT3 (997) - 1 TT/GT2 (996) - 1 TT (997) - 3 All models (except the Cayenne V6) have a new "Engine Oils Approved By Porsche" seven page listing.
-
:thumbup:
-
Options tags were both under the front hood and in the service booklet that came with the owners manual. If you don't have either then you can get a Certificate of Authenticity from Porsche - for $95. It will tell you exactly what shipped on the car from, the factory. You can download the order form for the Certificate of Authenticity here.
-
Loren, question about PCM model number....
Loren replied to robcorn's topic in 987-1 Series (Boxster, Boxster S)
The part number is only sold for RoW cars. It has been replaced by 997.642.101.11.FMH. I do not know if it will work (program) in a US car.