Jump to content

Welcome to RennTech.org Community, Guest

There are many great features available to you once you register at RennTech.org
You are free to view posts here, but you must log in to reply to existing posts, or to start your own new topic. Like most online communities, there are costs involved to maintain a site like this - so we encourage our members to donate. All donations go to the costs operating and maintaining this site. We prefer that guests take part in our community and we offer a lot in return to those willing to join our corner of the Porsche world. This site is 99 percent member supported (less than 1 percent comes from advertising) - so please consider an annual donation to keep this site running.

Here are some of the features available - once you register at RennTech.org

  • View Classified Ads
  • DIY Tutorials
  • Porsche TSB Listings (limited)
  • VIN Decoder
  • Special Offers
  • OBD II P-Codes
  • Paint Codes
  • Registry
  • Videos System
  • View Reviews
  • and get rid of this welcome message

It takes just a few minutes to register, and it's FREE

Contributing Members also get these additional benefits:
(you become a Contributing Member by donating money to the operation of this site)

  • No ads - advertisements are removed
  • Access the Contributors Only Forum
  • Contributing Members Only Downloads
  • Send attachments with PMs
  • All image/file storage limits are substantially increased for all Contributing Members
  • Option Codes Lookup
  • VIN Option Lookups (limited)

Loren

Admin
  • Posts

    37,559
  • Joined

  • Days Won

    581

Everything posted by Loren

  1. Yes, the whole upper part of the dash has to come out to get to the instrument cluster.
  2. Yeah, I guess I missed updating those links... They are updated now. You can find the Fuel Filter DIY here.
  3. Plesae do a search here as this has been covered many many times... :D
  4. 944.628.305.01 Wiper arm cap -- MSRP $1.00 (as of Sept 2006)
  5. Yes, pretty much. No, it is down below the radio. If you look at the other posts you will see you just remove the trim panel on the passenger side and it is usually right there. Covered many, many, many times in previous posts. There is switched and un-switched power and ground. Ignore the telephone mute wire. Look a little harder at the earlier posts please... :)
  6. Yes, he posted that here over a year ago... http://www.renntech.org/forums/index.php?showtopic=6016 I am not sure I agree with his process - especially since there is a a new seal and install tool.
  7. Try using Search... ;) You will find topics here and here.
  8. The Mk1 GT3 was not sold in the US and Canada -- it was only sold in the Rest of World market (which is everything except US/Canada). This as well as many other terms can be found in our Glossary of Technical Terms
  9. :eek: Oh my... $100? (well $98.90 plus shipping of $8.05)
  10. I will give someone the instructions for disassembling the rear deck lid/spoiler if they will take some pictures and write up the process changing out the folding wall. Please PM me if you want to volunteer.
  11. With the proper tools and lift I would say 3-4 hours tops.
  12. That was my point I've see kits with them and without them -- maybe a little too tongue in cheek - :lol:
  13. Once the airbag light comes on it can only be turned off with a PST2, PIWIS or the Durametric Software. Besfore it is reset thye should read the fault code so you can see what turned it on - and correct the problem. My guess is it is likely a seat belt buckle (unless you took the steering wheel off recently). ;)
  14. Yes, but the PSS9's will go faster since the coils are already mounted on the struts.
  15. The OBD II manual says for P0343 to repair the wiring harness. "Check signal wire from DME control module, Pin III/12, to CMP sensor for short to B+. Connect special tool 9637 to wiring harness (DME control module plug) - Remove connector of CMP sensor 1 - Switch on the ignition - Measure voltage between special tool 9637 Pin III/12 and ground 0 V is ok. If not 0V repair the wiring harness.
  16. As I recall the screws don't come with the 5 mm spacers either. You use the two that hold the rotor on.
  17. The mk1 wheels used 5 mm spacers on the RoW GT3 because the brakes are bigger. They are not required for use of the wheels on a 996 Carrera. The sizes/offsets are -- Front: 18 x 8 offset 52 mm Rear: 18 x 10 offset 65 mm
  18. Loren

    GT3 DME

    DME 7.8
  19. You have to turn it off.
  20. Check your emissions warranty - it is usually much longer than the rest of the car. I think my MY99 California Emissions Warranty is 7 years / 70,000 miles.
  21. It works for me (using Firefox 1.5)... and last time I checked RennTech.org members got a discount.
  22. Here is a very similar question asked at PCA Tech http://www.pca.org/tech/tech_qa_question.a...F-D4F2CF848BE2}
  23. The parts (except for the door itself) are the same as on the 996. Have a look here and here.
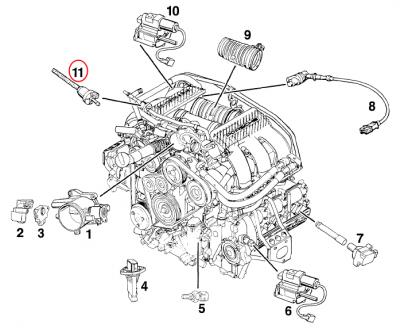
  24. Item 11 is the EVAP purge valve.
×
×
  • Create New...

Important Information

We have placed cookies on your device to help make this website better. You can adjust your cookie settings, otherwise we'll assume you're okay to continue.