Welcome to RennTech.org Community, Guest
There are many great features available to you once you register at RennTech.org
You are free to view posts here, but you must log in to reply to existing posts, or to start your own new topic. Like most online communities, there are costs involved to maintain a site like this - so we encourage our members to subscribe or donate. All subscriptions and donations go to the costs operating and maintaining this site. We prefer that guests take part in our community and we offer a lot in return to those willing to join our corner of the Porsche world. This site is 99 percent member supported (less than 1 percent comes from advertising) - so please consider an annual subscription or donation to keep this site running.
Here are some of the features available - once you subscribe RennTech.org
- View Classified Ads
- DIY Tutorials
- Porsche TSB Listings (limited)
- VIN Decoder
- Special Offers
- Paint Codes
- Registry
- Videos System
- View Reviews
- and get rid of this welcome message
It takes just a few minutes to register, and it's quality Porsche information at a low cost.
Contributing Members also get these additional benefits:
(you become a Contributing Member by subscribing or donating money to the operation of this site)
- No ads - advertisements are removed
- Access the Contributors Only Forum
- Contributing Members Only Downloads
- Send attachments with PMs
- All image/file storage limits are substantially increased for all Contributing Members
- Option Codes Lookup
- VIN Option Lookups (limited)

-0001-0001.png.112c13ee97acfad0cb1e70d195cc9a0e.png)
Loren
-
Posts
37,896 -
Joined
-
Days Won
648
Content Type
Profiles
Events
Forums
Exterior Paint Colors
Downloads
Tutorials
Links Directory
Collections
Classifieds
Store
Everything posted by Loren
-
-0001-0001.thumb.png.17f5bb25bf8ec261a17c21e6321c8492.png) Talk to these folks too. See what they think. They do a lot of Porsche wheels as well as race cars. http://www.wheeltechniques.com/
Talk to these folks too. See what they think. They do a lot of Porsche wheels as well as race cars. http://www.wheeltechniques.com/ -
Mesh Grille For Boxster Air Intakes?
Loren replied to boxsterjohns's topic in 986 Series (Boxster, Boxster S)
I searched for "mesh" ;) -
Mesh Grille For Boxster Air Intakes?
Loren replied to boxsterjohns's topic in 986 Series (Boxster, Boxster S)
http://www.renntech.org/forums/index.php?showtopic=783 -
These come directly from Porsche - so what you see is what I got from them. Usually they do have prices and we post a US and Canadian order guide with their respective prices. Chances are there will be an update in the next 30 days. Go to that download page and click the link near the bottom "Notify me when this file is updated" and you will get an email as soon as it is updated.
-
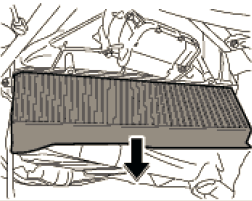
Remove the cover under the passenger side dash. Then remove the 2 screws that hold the filter cover in place. The filter slides straight down. Install is the reverse.

-
Center Console
Loren replied to evil2219's topic in 996 Series (Carrera, Carrera 4, Carrera 4S, Targa)
Please do a Search - this has also been covered many times here. -
Climate Control
Loren replied to evil2219's topic in 996 Series (Carrera, Carrera 4, Carrera 4S, Targa)
Please do a Search - this has been covered here many many times. -
Creaking Noise in Clutch
Loren replied to Scouser's topic in 996 Series (Carrera, Carrera 4, Carrera 4S, Targa)
LOL that thread is from 2003 -- all TSBs have been available here for Contributing Members (almost 3 years). Please go to the Current TSB section and view it... -
Pcm E1 Installation
Loren replied to Hudnu46's topic in 9PA, 9PA1 (Cayenne, Cayenne S, Cayenne Turbo, Cayenne Turbo S)
That looks like the right unit for the early (MY03 and MY04) Cayenne's. PCM 2.0 vs. PCM 2.1 in the later models. I will send you a PM... -
Pcm E1 Installation
Loren replied to Hudnu46's topic in 9PA, 9PA1 (Cayenne, Cayenne S, Cayenne Turbo, Cayenne Turbo S)
:welcome: The 13 page PCM 2.1 Installation TSB is available here to view for our Contributing Members. -
http://www.renntech.org/forums/index.php?s...ost&p=58500
-
How Many Blue/turquoise Boxsters Are There ?
Loren replied to w_pienaar's topic in 986 Series (Boxster, Boxster S)
To my knowledge they only offered Turquoise Blue (3AS) in MY1997 and 1998. -
How Does The Cluster Come Apart To Change Bulbs
Loren replied to Jeremy Cottrell's topic in 986 Series (Boxster, Boxster S)
Taking the cluster apart? -
If you are in the US then some locations of Union 76 carry 100 octane. It is also available at most tracks.
-
Transmission Fluid
Loren replied to PAULSPEED's topic in 997-1 Series (Carrera, Carrera 4, Carrera 2S, Carrera 4S)
There are instructions with diagrams but no pictures (in that same sub-forum). Every time we try to take pictures they come out too dark - not enough light in there. -
Ah... but your list is an RoW list (they have more options). US part numbers for a MY99: 996 731 035 01 mirror glass - left hand side, heated and adjustable 996 731 035 02 mirror glass - left hand side, heated and adjustable and aspherical 996 731 038 03 mirror glass - right hand side
-
RoW car?
-
Transmission Fluid
Loren replied to PAULSPEED's topic in 997-1 Series (Carrera, Carrera 4, Carrera 2S, Carrera 4S)
The 997 Tiptronic fluid change is very very similar to the 996 Tiptronic fluid change - you can see the process here. -
:welcome: Try Sunset Imports (Porsche Parts at Dealer Cost) - link at top of any page. As long as your speed is high enough to not lug the engine. Becker
-
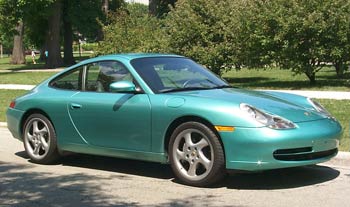
ocean jade metallic?
Loren replied to vunico's topic in 996 Series (Carrera, Carrera 4, Carrera 4S, Targa)
i checked that one before ,but they're boxsters...i'm looking for 996's or 993's if the color goes that far back....thanks So what was wrong this picture from his site?
-
ocean jade metallic?
Loren replied to vunico's topic in 996 Series (Carrera, Carrera 4, Carrera 4S, Targa)
http://www.whiteson.org/boxster/gallery/ Just choose your color... -
For legal reasons we can't let folks print the TSBs.
-
How do you remove Bose Sub?
Loren replied to Sand8's topic in 997-1 Series (Carrera, Carrera 4, Carrera 2S, Carrera 4S)
Should be roughly the same as a 996 - remove the two speaker grills and then remove the 2 screws behind them. -
Replacement Hood Latch Handle
Loren replied to GeneseeMtn's topic in 996 Series (Carrera, Carrera 4, Carrera 4S, Targa)
They don't make them any more. Here is another solution. http://www.renntech.org/forums/index.php?showtopic=7067 -
:lol: How much was the 49? I need one of those for my MB.