Welcome to RennTech.org Community, Guest
There are many great features available to you once you register at RennTech.org
You are free to view posts here, but you must log in to reply to existing posts, or to start your own new topic. Like most online communities, there are costs involved to maintain a site like this - so we encourage our members to subscribe or donate. All subscriptions and donations go to the costs operating and maintaining this site. We prefer that guests take part in our community and we offer a lot in return to those willing to join our corner of the Porsche world. This site is 99 percent member supported (less than 1 percent comes from advertising) - so please consider an annual subscription or donation to keep this site running.
Here are some of the features available - once you subscribe RennTech.org
- View Classified Ads
- DIY Tutorials
- Porsche TSB Listings (limited)
- VIN Decoder
- Special Offers
- Paint Codes
- Registry
- Videos System
- View Reviews
- and get rid of this welcome message
It takes just a few minutes to register, and it's quality Porsche information at a low cost.
Contributing Members also get these additional benefits:
(you become a Contributing Member by subscribing or donating money to the operation of this site)
- No ads - advertisements are removed
- Access the Contributors Only Forum
- Contributing Members Only Downloads
- Send attachments with PMs
- All image/file storage limits are substantially increased for all Contributing Members
- Option Codes Lookup
- VIN Option Lookups (limited)

-0001-0001.png.112c13ee97acfad0cb1e70d195cc9a0e.png)
Loren
-
Posts
37,902 -
Joined
-
Days Won
651
Content Type
Profiles
Events
Forums
Exterior Paint Colors
Downloads
Tutorials
Links Directory
Collections
Classifieds
Store
Everything posted by Loren
-
Just because your car was built with the older version of the seal does not mean it will leak. Still it would be wise to have your dealer check for leaks before your warranty runs out. If they find any be sure it is noted on the repair order - so you proof the issue was there when you were still under warranty. But, like I said it may never leak - only a small percentage ever do.
-
-0001-0001.thumb.png.17f5bb25bf8ec261a17c21e6321c8492.png)
Horn Problem
Loren replied to natzee's topic in DIY Articles - Boxster (986) - Common Fixes and Repairs
I would reverse step 2 and 3. The key activates the airbag circuit - even when the car is off. So, you want to disconnect the battery first. -
Wheel Spacers
Loren replied to gixxer1127's topic in 9PA, 9PA1 (Cayenne, Cayenne S, Cayenne Turbo, Cayenne Turbo S)
Yes, you can use the Porsche 17 mm spacers (on the rear only) with those wheels. -
Bad gear Shift - not just the driver?
Loren replied to gristy's topic in 986 Series (Boxster, Boxster S)
You can always look things up in the Glossary... http://www.renntech.org/forums/index.php?a...;id=1&st=45 -
Bad gear Shift - not just the driver?
Loren replied to gristy's topic in 986 Series (Boxster, Boxster S)
A MY2000 does not have an idle control valve it is an egas car. I would likely start by looking for air leaks and also to see if the throttle butterfly is "carboned-up" and needs cleaning. -
Airbag P49 code?
Loren replied to Reborn996's topic in 996 Series (Carrera, Carrera 4, Carrera 4S, Targa)
Fault 49 Belt buckle, passenger -
Failed emission test
Loren replied to Niclas P's topic in 996 Series (Carrera, Carrera 4, Carrera 4S, Targa)
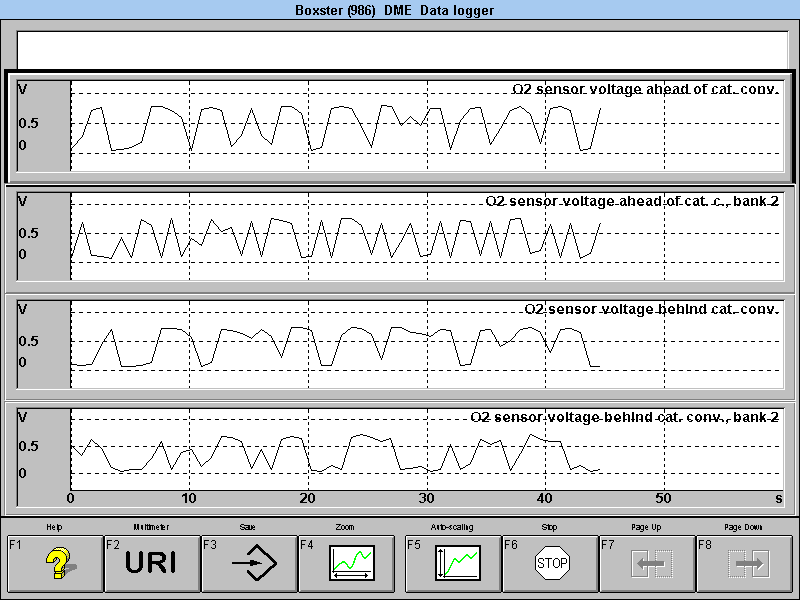
I think you need someone to run the tests on your O2 sensors. -
Failed emission test
Loren replied to Niclas P's topic in 996 Series (Carrera, Carrera 4, Carrera 4S, Targa)
996? I have a 986! I dont recall seeing a DME Tests section - but I'll have a look tonight. Cheers, Jules You posted in the 996 forum. Just go to the 986 section - it has the same test. -
Where to plug in ODB Scanner
Loren replied to stussy1616's topic in 996 Series (Carrera, Carrera 4, Carrera 4S, Targa)
US car? If so, under the dash to left of the steering wheel. -
Failed emission test
Loren replied to Niclas P's topic in 996 Series (Carrera, Carrera 4, Carrera 4S, Targa)
Go to your model (996) then to DME. Once you have the DME tests scroll down to Short Test. -
no lights, instrument cluster
Loren replied to tweety's topic in 996 Series (Carrera, Carrera 4, Carrera 4S, Targa)
No, power and ground come in on the green connector (several pins). -
no lights, instrument cluster
Loren replied to tweety's topic in 996 Series (Carrera, Carrera 4, Carrera 4S, Targa)
Have you checked fuse B10? Also make sure all the cable to the back of the cluster are properly plugged in and locked. -
From what I can tell it pretty much has to be a problem in the clutch master cylinder or the accumulator.
-
R&I Front Apron 2006 C2S
Loren replied to dodo's topic in 997-1 Series (Carrera, Carrera 4, Carrera 2S, Carrera 4S)
Not really - just don't crack the plastic. -
In a TT the brake fluid and clutch fluid are completely seperate - one can not affect the other. In a TT the clutch shares hydraulic fluid (Pentosin) with the power steering - so the problem you are seeing could be with either the clutch or power steering system. Is anyone turning the steering wheel or actuating the clutch while the engine is off? As I mentioned above - this would cause the fluid level to rise (per the service manual).
-
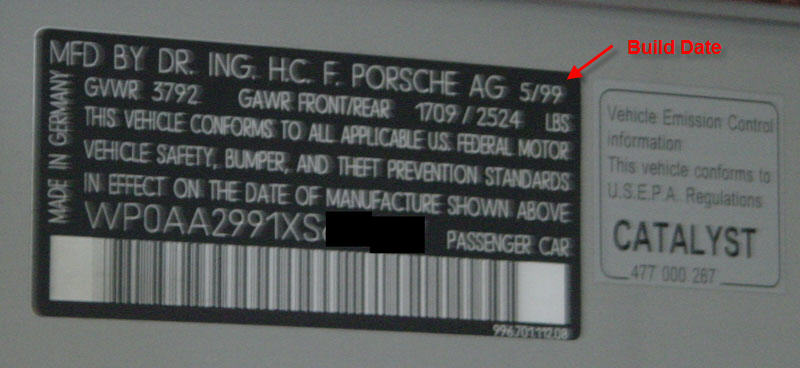
The sticker should be on the drivers door just below the lock mechanism.

-
Failed emission test
Loren replied to Niclas P's topic in 996 Series (Carrera, Carrera 4, Carrera 4S, Targa)
A little early for a sensor failure but I would get someone with an OBD II tool that can graph and show the O2 sensors voltage. My guess is that one or more of the sensors is not working like it should. Also, are you sure your CEL light is not removed or burn't out. Does it come on when you turn the key to the on position?
-
On the drivers door is tag - it has your build date on it. Check the date against the date I provided in the post above. If it is a newer build than that date then you have the new seal.
-
R&I Front Apron 2006 C2S
Loren replied to dodo's topic in 997-1 Series (Carrera, Carrera 4, Carrera 2S, Carrera 4S)
Bumper cover? Just normal hand tools - screwdrivers, hand wrenches, etc. -
Failed emission test
Loren replied to Niclas P's topic in 996 Series (Carrera, Carrera 4, Carrera 4S, Targa)
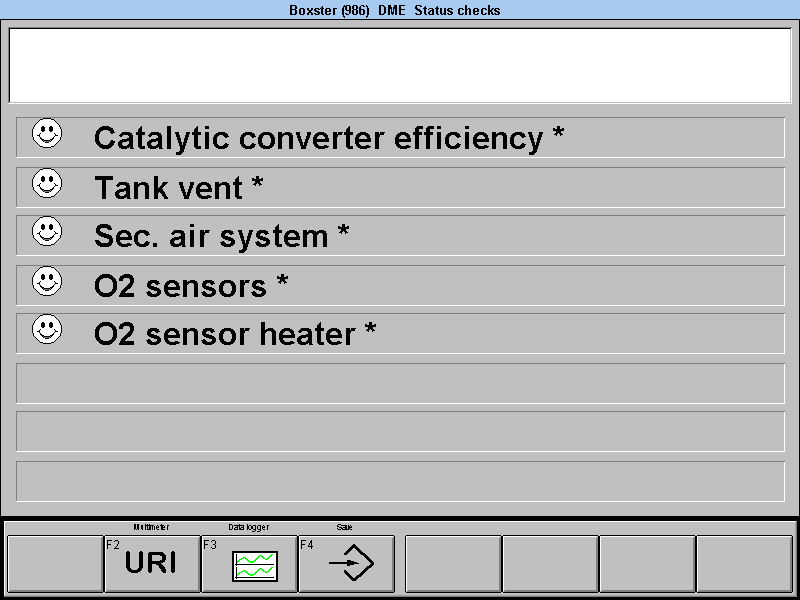
How many Km on the car? You may need new O2 sensors as they degrade over there lifespan. For US cars the PST2 has a test - if you don't get 5 happy faces then you won't pass emissions. I don't think RoW cars have the vent test.
-
The best list I know of is here
-
All of those point back to the O2 sensors before the cats - check the wiring. Are you sure you have the right sensors?
-
Intercooler hoses popped off under boost
Loren replied to ferris's topic in 996 TT, 996 TT S, 996 GT2
"The new hose was introduced into production on July 24th, 2000". As I recall there are even newer hoses than ones in that TSB (10-06-00) - at least the parts list shows newer part numbers. Ask your dealer when you order. -
These are US part numbers - you didn't say where you are located. I think it is 993.641.302.00.61W Tach for Carrera 993S 6 speed. It looks like it only comes in steel grey. or if you have OBC (M659) then it would be 993.641.332.00.61W Tach for Carrera 993S, 6 speed, and OBC. It looks like it only comes in steel grey too.