Welcome to RennTech.org Community, Guest
There are many great features available to you once you register at RennTech.org
You are free to view posts here, but you must log in to reply to existing posts, or to start your own new topic. Like most online communities, there are costs involved to maintain a site like this - so we encourage our members to subscribe or donate. All subscriptions and donations go to the costs operating and maintaining this site. We prefer that guests take part in our community and we offer a lot in return to those willing to join our corner of the Porsche world. This site is 99 percent member supported (less than 1 percent comes from advertising) - so please consider an annual subscription or donation to keep this site running.
Here are some of the features available - once you subscribe RennTech.org
- View Classified Ads
- DIY Tutorials
- Porsche TSB Listings (limited)
- VIN Decoder
- Special Offers
- Paint Codes
- Registry
- Videos System
- View Reviews
- and get rid of this welcome message
It takes just a few minutes to register, and it's quality Porsche information at a low cost.
Contributing Members also get these additional benefits:
(you become a Contributing Member by subscribing or donating money to the operation of this site)
- No ads - advertisements are removed
- Access the Contributors Only Forum
- Contributing Members Only Downloads
- Send attachments with PMs
- All image/file storage limits are substantially increased for all Contributing Members
- Option Codes Lookup
- VIN Option Lookups (limited)

-0001-0001.png.112c13ee97acfad0cb1e70d195cc9a0e.png)
Loren
-
Posts
37,902 -
Joined
-
Days Won
651
Content Type
Profiles
Events
Forums
Exterior Paint Colors
Downloads
Tutorials
Links Directory
Collections
Classifieds
Store
Everything posted by Loren
-
The Cup flywheel is 964.102.239.80. The one listed above for ClubSport (M003 and M004) cars is 964.102.239.31.
-
-0001-0001.thumb.png.17f5bb25bf8ec261a17c21e6321c8492.png)
Fuel Tank Puking, not the fuse
Loren replied to pwarner's topic in 996 Series (Carrera, Carrera 4, Carrera 4S, Targa)
Have a look at TSB 5/99 2015 Fuel Tank Hose Modification -- dated 8-12-1999. It may pertain to your car too. -
For the radio try 4275 or 4273
-
It will depend on the size of your hand - some folks can reach up from underneath and grab it and some folks take one of the plastic rivets out to slip their hand in (that would be me). A CDR-23 is a MOST bus radio will only work in a MY03 and newer car.
-
A/C controls not working
Loren replied to racer08's topic in 996 Series (Carrera, Carrera 4, Carrera 4S, Targa)
Bad news - those control motors are all controlled through the Climatronic. I think you should re-check your connections and if they are okay then your Climatronic is likely bad. -
Running hot...
Loren replied to Newlimbs's topic in 996 Series (Carrera, Carrera 4, Carrera 4S, Targa)
There is likely nothing wrong with your fan. This question has been answered many many times here (please try a search next time). http://www.renntech.org/forums/index.php?s...post&p=1530 -
A/C controls not working
Loren replied to racer08's topic in 996 Series (Carrera, Carrera 4, Carrera 4S, Targa)
If you want me to look at the schematic - then I need to know model and model year please (as requested at the top of this forum). -
Does this also apply to 986s'? Yes.
-
Requesting help decoding engine/tranny Code
Loren replied to SteveGraham's topic in 996 TT, 996 TT S, 996 GT2
M9670-644 is a 309 KW (or about 415 HP). -
You should not remove the oil cap with the engine running. The oil vapor system is part of the US emissions requirement. Your car may come back to normal after a few drive cycles or you can force it to re-learn by disconnecting the battery for a short time. Keep your radio handy if you decide to disconnect the battery.
-
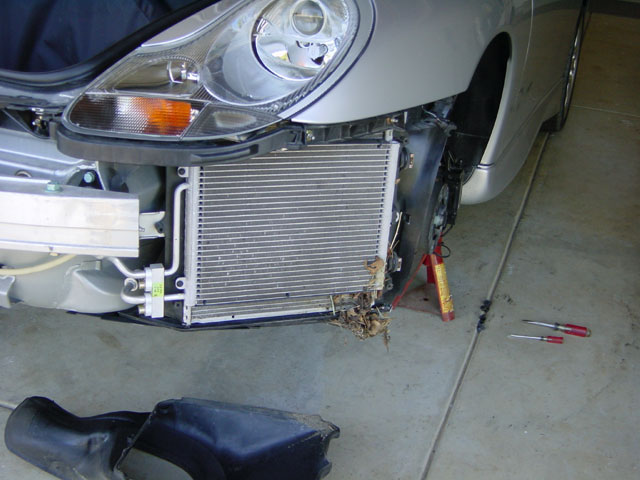
I would start with cleaning the front radiators - especially if it has never been done. Just remove the front bumper and clean the AC condensers and the radiators behind them. How to Remove the Front Bumper

-
How many types of side skirt?
Loren replied to brucey's topic in 996 Series (Carrera, Carrera 4, Carrera 4S, Targa)
Part numbers change all the time and unless there was another reason to update the TSB Porsche rarely updates them for part number changes. I guess they assume their parts system will tell you the new part number when you place an order (which it usually does). -
Do you have a 996TT Service Manual? The procedure is about 51 steps and several pages.
-
5AT Cork was a color for 1979.
-
You might talk a dealer into giving you the code or you can pay Becker $35 for the code.
-
striker adjustment
Loren replied to Carrera's topic in 996 Series (Carrera, Carrera 4, Carrera 4S, Targa)
If your VIN is below these numbers you likely need a new striker (per TSB 4/99 5726 New Door Latch Striker). 99 _YS 62 0622 Coupe 99 _YS 65 1073 Cabriolet -
Th emergency release cable is behind the right front wheel well liner. It has been covered many times here. You just need to reach in there and pull the cable.
-
How many types of side skirt?
Loren replied to brucey's topic in 996 Series (Carrera, Carrera 4, Carrera 4S, Targa)
Those are Aerokit II sideskirts - as they should be for your MY car. -
1. Try retraining the window. Hold the button down until the window is all the way down then continue hoding it for another 10 seconds. Do the same after raising the window. 2. If you get a honk it is because an alarm zone is still open. Common causes are: 3rd party radio, broken microswitch in the center console, broken microswitch in the front (or rear) trunk. You need to find a shop with the Durametric Software, a PST2, or PIWIS tester and a simple test will tell you exactly where the open zone is. 3. The seats are not the airbag circuit - the seatbelt buckles are. The same software above can tell you where the problem is with your airbag light too.
-
Try 6944 or 6946
-
How many types of side skirt?
Loren replied to brucey's topic in 996 Series (Carrera, Carrera 4, Carrera 4S, Targa)
If they are factory then they should be Aerokit II sideskirts. -
How many types of side skirt?
Loren replied to brucey's topic in 996 Series (Carrera, Carrera 4, Carrera 4S, Targa)
Aerokit (I) Cup is for the MY99-MY01 cars. Aerokit II is for MY02 and newer cars. There is a special wing for Cabriolet's that goes with the aerokits. What MY is your car and what do you want to accomplish? -
Send me your VIN in a PM here and I will look it up for you and see what it says.
-
IMS = InterMediate Shaft The IMS (6) drives the chains for the cams.
-
Source for Owner's Manual?
Loren replied to sfarris's topic in 996 Series (Carrera, Carrera 4, Carrera 4S, Targa)
WKD 986 021 00 Boxster Owners Manual MY00 -- MSRP $30.22. The last one I bought from Sunset Imports (Porsche Parts at Dealer Cost) was $18.00.