Welcome to RennTech.org Community, Guest
There are many great features available to you once you register at RennTech.org
You are free to view posts here, but you must log in to reply to existing posts, or to start your own new topic. Like most online communities, there are costs involved to maintain a site like this - so we encourage our members to donate. All donations go to the costs operating and maintaining this site. We prefer that guests take part in our community and we offer a lot in return to those willing to join our corner of the Porsche world. This site is 99 percent member supported (less than 1 percent comes from advertising) - so please consider an annual donation to keep this site running.
Here are some of the features available - once you register at RennTech.org
- View Classified Ads
- DIY Tutorials
- Porsche TSB Listings (limited)
- VIN Decoder
- Special Offers
-
OBD II P-Codes - Paint Codes
- Registry
- Videos System
- View Reviews
- and get rid of this welcome message
It takes just a few minutes to register, and it's FREE
Contributing Members also get these additional benefits:
(you become a Contributing Member by donating money to the operation of this site)
- No ads - advertisements are removed
- Access the Contributors Only Forum
- Contributing Members Only Downloads
- Send attachments with PMs
- All image/file storage limits are substantially increased for all Contributing Members
- Option Codes Lookup
- VIN Option Lookups (limited)
Leaderboard
-0001-0001.thumb.png.17f5bb25bf8ec261a17c21e6321c8492.png)


Popular Content
Showing content with the highest reputation since 03/01/2025 in all areas
-
Attended an introductory high performance driving school at the National Corvette Museum Motorsports Park in my new to me 2002 996.2 C2! It was awesome! Learned a lot and had a great time. We had classes, autocross, & track time all day long. There were only 10 of us so we pretty much had an instructor to each pair all day. I learned that I am slow & can’t rev match downshift very good at all. Also learned that my stock suspension car has some body roll, understeer, & some brake feel issues. I’m thinking about some braided brake lines, good fluid, new tires, & some Ohlins suspension to start with. I have read a lot of threads about suspension, sway bars, tops, and linkages. Is there a definite go to for top mounts? I’ve been looking at the Ohlins or Tarett mounts. I want to do the coil overs first & then the sway bars. Any comments or recommendations are appreciated. The car will be used as my sunny day driver & once a month track day experience.1 point
-
Glad you had a great experience and want more. Tracking is a lot of fun! The track you'll be driving determines a lot of this. One local track required a lot of brake so I spent on brake. The new track uses little brake but a lot of grip so sticky tires and suspension overhaul are good. One of my 996 buddies spent a ton on his suspension including all the adjustable links, but went back towards stock as it was too uncomfortable as a daily. Maybe just a simple refresh of the 3 arms on each corner with new bits unless yours have already been done. Another intermediate step would be firmer bushings in the metal arms. Next, there are intermediate steps between coilovers and stock dampers. Stiffer Bilsteins (B4 is stock, B6 is stock height but stiffer, B8 is for use with lowering springs and same stiffness IIRC as the B6). I run B6 on my Box and its a good compromise.1 point
-
1 point
-
Try 10761 point
-
Try 54321 point
-
Also if you don't want to replace the switch you can just bypass it so you can use the top Here's a good video how to do it:1 point
-
Oh man, I hope you have a better result than I did with my 09 2S. Mine failed when I tried to pull away from a traffic light a year ago. Got the transmission emergency run on the dash. Car wouldn't move forward or backward. The gear indicator flashed back and forth between 1 and 2 when I had it in drive but the car wouldn't move. Couldn't clear it with Durametric while at the traffic light. Shift rod 3 failure. Towed the next day to a PIWIS which cleared some of the codes but could not clear the Shift rod 3 error. Tech tried first to run PIWIS calibration routine and then to reflash it - both to no avail. I was out of warranty and ended up paying for PCNA re-manufactured unit to be installed. Based on other failures he had seen, tech thought the issue was in the hydraulic section of the box but of course Porsche doesn't share what they found when the failed unit was opened up in Germany. What part of the country are you from?1 point
-
Filter location underneath the rear seat behind the driver side Replacing the filter: Recommended to do this job while the fuel tank is almost empty Fuel tank located underneath back seat Gain access to fuel filter need to flip back seat and look under the carpet Pull the seat buckle below the seat and flip the seat bottom Remove seat mount hinge, note you need special socket to fit the nuts Find below a round cut made on carpet, open Find round stainless steel caver with four screws, open it Then you will see the filter Use special tools to open the lock ring or use big flat screw driver with light hummer to remove the ring, slowly slowly, hit from different angles and corners to distribute the hummer pressure, Then disconnect fuel hose and electrical connection from top, be careful fuel house might be under pressure Note: petrol smells very strong and harmful, do this job in good ventilated area Note: there is a house connected between fuel filter on the left side of the fuel tank and fuel bump at the right side of fuel tank. Go to the right side of rear seat and flip the seat Find carpet cut same as left seat Remove seat mount hinge, note you need special socket to fit the nuts Open the stainless steel cover Find the plastic cover same as fuel filter housing Open the lock ring Then disconnect electrical connection and fuel house from top of plastic cover Be careful fuel might be under pressure Pull the plastic cover up, look down you will find a house that going to the filter at left side and some other house going to fuel bump, pull the house which is going to filter side several times back and forth to make sure it is the correct house going to filter side Then go to filter side on the left and remove the filter and note the house going to the right side, and pull to make sure that this is the right house going to left side After you are sure of the right hose Go back to right side are and tight the house with a string (or any available robe) before pulling the house this string will help you pull back the new house for the new filter back to the right side, Unplug the house go to left side and slowly pull the filter and un plug the other house and wire connection at the bottom of the filter side and make sure to tight the house and wire connection with strings to make sure not to fall down inside the tank bottom, Note: much petrol will comes out from filter After removing old fuel filter bring the new filter and first thing to do is to tight the string we all ready have from the old filter house side and insert in the fuel tank and pull slowly to right side Then connect back house and wire connection of the filter. Go to right side pull the string until you catch the new filter house and connect back to the plastic cover and put back all parts. Go to right side and put back every thing once an again.1 point
-
@ RFM - Is it possible to overpressurise the bellows as described by 4CN Air? Does the air suspension system have a high pressure cutout? What is the normal operating pressure inside the strut bellows? @ 4CN Air - When your air strut blew, did the other 3 struts or the opposing strut deflate as well, or was it just the blown strut that drooped?1 point
-
On occasion during the most humid months of the year, the air coming out of the vents of my nearly 8-year-old car would smell a little 'off.' Since the a/c condensation was draining just fine and the odor wasn't ever-present, it wasn't a major concern to me. However, surfing the web I found a variety of A/C refresh kits that seemed worth a try, if for no reason other than to experiment and see if it was any benefit. But, no good deed goes unpunished. There are a variety of kits out there, some seem OE but most are aftermarket. I found them to have so much in common that I began to think they were made by only one or two manufacturers. The kits I was considering are two products: 1) a foaming spray that you inject into the evaporator housing through the condensation drain, and 2) a spray that you empty into the external air intake while changing the HVAC settings. The kits state or imply that they will clean the evaporator of crud that comes from dirt, mold, mildew, etc. and kill whatever causes odors in the venting. As I mentioned, the kits seemed nearly identical to each other so I bought one based on convenience at a local parts supplier for about $18. For another point of reference, there is a Toyota kit, part number 00289-ACRKT, that you can find here for instance. The product I used was the following: Note: This attempt to clean an HVAC system was for my particular 2003 986S. Other vehicles may be different and there are safety risks involved in doing mechanical or electrical work on a vehicle. What's presented here is a general overview of my DIY project, not a complete step-by-step set of instructions. Please obtain, understand, and follow the necessary repair and installation procedures in order to work safely, avoid damaging anything, and achieve a safe result. Preparation steps: I raised the vehicle up onto four(4) jack stands. Then I loosened or removed numerous underbody panels to expose the area under the passenger side floor pan. The location of the condensation drain is identified by an arrow in the photo below: First use the larger can of "evaporator foaming cleaner." You can read the instructions on the can in one of the photos above. I had to use another piece of tubing between the tapered nozzle and the condensation drain because the drain tube is not flexible and wouldn't hold the nozzle. That should have been the first indication to stop. Notice the grommet around the drain tube in the photo above and how the tube is inconveniently situated between the hot water supply/return for the heater core. As I was trying to force the tubing onto the drain, I pushed the drain tube and grommet into the passenger compartment. I knew it was going to be a pain to put it back, and it was. I had to remove the umbrella trim along the passenger-side door threshold, loosen the floor carpeting, and shove my arm under the carpet to reinstall it. Photos of the attachment and foam injection below: The foam went in, it seemed to sit for a while, it liquefied a bit, and then it drained out. The photo below was taken at a moment just as it was starting to drain: The liquid in the bucket was mostly clear, with a little particulate matter--nothing worth photographing. It didn't have much of a smell; it was slightly medicinal, like disinfectant. Following the instructions on the can, the next step is to use the "a/c intake refresher." Take out the pollen filter and spray into the air intake. You are supposed to change the vent settings between spraying intervals so that the mist runs through different duct work. Again, it has a slight disinfectant smell--pleasant but not flowery and not too strong. Not too bad, right?... Well, I was too preoccupied with the camera to realize what was happening inside the car: After all the effort for something that wasn't really necessary… I had to laugh. I was doing this process as I was preparing the car for winter storage. It was about 40° F (4° C) in my garage. Obviously, a lot of the foam didn't liquefy and drain. If I were to do this again, I would warm up the HVAC system beforehand, or just do the whole process at a higher ambient temperature. I'd also let the evaporator core drain longer (a lot longer) before doing the 2nd can. The photos above are the worst of it; only a little came out of the other vents. I blasted the system for a long time after that and it cleaned up without a problem--no damage to any surfaces. A few days ago I fired up the car for the season. No issues. Live and learn and pass it on. --Brian1 point
-
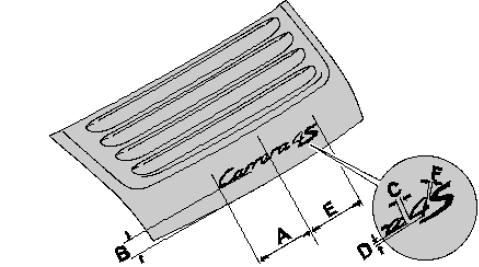
997 1. Find the middle of the lid. 2. Position logo Carrera with the dimensions A and C Carrera logo dimension 129.6 mm+/−1 mm and B Carrera logo dimension 45 mm−1 mm and stick on lid. 997S 1. Find the middle of the lid. 2. Position logo Carrera with the dimensions A Carrera S logo dimension 175.6 mm+/−1 mm and B Carrera S logo distance 45 mm−1 mm and stick on lid. 3. Position logo S with the dimensions C Carrera S logo dimension 175.6 mm+/−1 mm and D Carrera S logo distance 39 mm+/−1 mm and stick on rear lid. 9974S 1. Find the middle of the lid. 2. Position logo Carrera with the dimensions A Dimension: 175.6 mm +/-1 mm and B distance: 45 mm -1 mm and stick on lid. 3. Position logo 4 with the dimensions C Dimension: 19 mm +/-1 mm and D Dimension: 2 mm +/-1 mm and stick on rear lid. 4. Position logo S with the dimensions E Dimension: 190 mm +/-1 mm and F Dimension: 3 mm and stick on rear lid.
 1 point
 -
1.) Un-screw the one phillips head screw at top center of side air intake... 2.) The molded air duct and the intake grill are still attached by three delicate plastic tabs at the three points... The best way to remove this is gently insert your fingers through the grills into the intake at the points circled in red and gently try to free the tabs... All three points come forward towards you, but if one is stuck or gets caught it will break... 3.) Inside the drivers side air duct you will find a snorkle... The snorkle is added to most US cars for noise restrictions. Now this piece is attached by no screws or tabs, but it most likely will give you some troubles removing... The best way is to remove this, just grab a hold of the long snorkle (not the small dish on the end)... Now wiggle it from left to right and vice versa while pulling out towards you. This works, but might take a little effort. 4.) This is what the intake is going to look like after the snorkel is removed... Just carefully insert the three tabs back into their points... Make sure that all three are tightly in by pushing the airduct cover (not the grill)... Insert your 1 screw into top center of cover and you are done.1 point