Jump to content

Welcome to RennTech.org Community, Guest

There are many great features available to you once you register at RennTech.org
You are free to view posts here, but you must log in to reply to existing posts, or to start your own new topic. Like most online communities, there are costs involved to maintain a site like this - so we encourage our members to donate. All donations go to the costs operating and maintaining this site. We prefer that guests take part in our community and we offer a lot in return to those willing to join our corner of the Porsche world. This site is 99 percent member supported (less than 1 percent comes from advertising) - so please consider an annual donation to keep this site running.

Here are some of the features available - once you register at RennTech.org

  • View Classified Ads
  • DIY Tutorials
  • Porsche TSB Listings (limited)
  • VIN Decoder
  • Special Offers
  • OBD II P-Codes
  • Paint Codes
  • Registry
  • Videos System
  • View Reviews
  • and get rid of this welcome message

It takes just a few minutes to register, and it's FREE

Contributing Members also get these additional benefits:
(you become a Contributing Member by donating money to the operation of this site)

  • No ads - advertisements are removed
  • Access the Contributors Only Forum
  • Contributing Members Only Downloads
  • Send attachments with PMs
  • All image/file storage limits are substantially increased for all Contributing Members
  • Option Codes Lookup
  • VIN Option Lookups (limited)

Leaderboard

Popular Content

Showing content with the highest reputation on 04/24/2025 in all areas

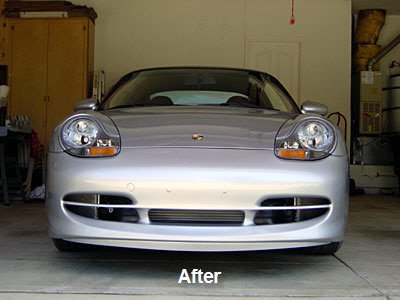
  1. Note: Part numbers sometimes change without notice. Always double check with your supplier that you have the latest part numbers. A third (center) radiator is standard on the Porsche GT3, Boxster S and all Carrera's or Boxster's with Tiptronic transmission. As well, the third radiator is now standard on all X51 Carrera Power Kit (engine power upgrade). Although the Tiptronic radiators are plumbed differently it is obvious that Porsche did this to increase the cooling capacity of these cars. Having great concern for my engine, specifically it's cooling in the hot California weather and... knowing that what Porsche does for it's competition cars is usually a good (yet sometimes expensive) idea for our street (sometimes tracked) cars. I decided to add the GT3 radiator to my 1999 Carrera Coupe (w/factory aerokit). The goal being that extra amount of protection that the additional cooling capacity adds. Initial tests show that the highest temperatures (after hard driving) have gone down 10-20°F (7-12°C) after this installation. Here is my installation procedure: It took me 4-5 hours taking pictures and cleaning. I would expect this can be done in 3-4 hours (or less). Parts you will need GT3/996 Radiator Kit (available as a kit from Carnewal.com) consisting of: 1 ea 996 106 037 51 Radiator 1 ea 996 106 666 52 Radiator Hose (right side return line) 1 ea 996 106 665 55 Radiator Hose (left side intake line) 1 ea 996 575 141 02 Air Duct (center) (for MY02 and newer 996 575 141 04) 1 ea 996 504 485 02 Retaining Frame (bottom) 1 ea 996 504 487 02 Retaining Frame (top) 4 ea 930 113 430 00 Rubber Grommets (for retaining frame) 2 ea 999 507 550 02 Speed Nut M6 (for retaining frame) 2 ea 900 378 036 09 Bolts M6 (for retaining frame) 2 ea 999 512 552 00 Screw Type Hose Clamps (now included in kit) 4 ea 999 591 869 02 Speed Nut M8 (for mounting bracket on the car) 4 ea 900 378 074 09 Bolts w/washers M8 (final mounting bolts for the assembly) Other items you will need: 4 ea 999 512 551 00 Screw Type Hose Clamps (large, do not reuse the spring clamps) 2 liters 000 043 203 78 Porsche HMZ Coolant Tools you will need Jack Jack stands 19 mm socket for wheel bolts Key for security wheel bolt Metric sockets - 10 mm, 13 mm Regular screwdriver Phillips screwdriver Torx bit- T25 Torque wrench (97 ft-lb) to tighten wheel bolts Utility Knife Cooling line mounting paths (what it will look like). The parts kit from Carnewal.com. Two views (second one courtesy of Scott Mandell). Pre-assemble the Radiator. Using the numbers in the illustration you can pre-assemble some of the radiator parts using the rubber grommets (4) and the M6 Speed Nuts (6) and M6 Bolts (5). Note the radiator outlet positions and the retaining frame top and bottom (see parts list for p/n). The radiator hose connections face the car and are on the top. The top retaining bracket (2) has tabs with small hooks. The tab hooks point towards the car and the tabs themselves angle away from the car. The bottom bracket (3) has tabs that face the car. When mounted the radiator will NOT be vertical it will be at a slight angle up. Raise the car and remove the wheels. Start by jacking the car up and placing jack stands under the front wheel jack mounts. This really puts the car at a more comfortable height to work on. Next remove the front wheels. Remove the side markers. Move the wheel well liners back. Remove from the wheel well the 3 plastic rivets and the 10 mm nut. Pull the wheel well liner back as shown (I used twine). Remove the front bumper cover. There are two screws on each side at the side marker area. One is at the forward part where the side marker assembly attaches, the other is behind the side marker. Remove the screws and rivets under the nose (2 rivets and 7-9 screws). Remove the plastic cover over the front trunk latch. This is held in place by four plastic fasteners. You just rotate these 90 degrees to remove them. Carefully pull the cover off over the latch handle. Finally remove the 2 screws (now visible). Detach the air temperature sensor cable. Lift the bumper cover off and place on a padded surface to avoid scratches. Remove the air scoops. There are 5 torx screws on the scoops to remove them. On the right side you will need to feed the rubber grommet (for the temperature sensor) through the scoop to remove it. Clean the radiators. Detach the air conditioning condensers (2 torx screws) and use a soft brush and vacuum to clean the radiators and air conditioner condensers well. Loosen the radiator assembly on each side. Remove the two bolts (13 mm) under the support bracket. Then remove the (13 mm) nut that holds the bracket (inside the wheel well). This will now allow the whole assembly to move about 6 inches down and to the side allowing enough room to change the hoses. Replace the lower hose on right (passenger side) side. Using pliers slide the hose spring clamps back on the hose but don't remove the hose yet. Place a clean container (about 2 quarts should be enough) to catch the coolant when you carefully remove the hose at the radiator end first. Coolant. This about the quantity of coolant you should expect when you remove the lower hose. I would guess slightly more than one radiator capacity. Right side (passenger side) Hoses. Old hose on left new hose on right. Place the clamps on the hoses and re-attach. Before tightening down the hose clamps rotate the hose so that the small hose is correctly positioned at to the top center of the car (for the new radiator). Replace the upper hose on left (drivers side) side. Place the clamps on the hoses and re-attach. Before tightening down the hose clamps rotate the hose so that the small hose is correctly positioned at to the top center of the car (for the new radiator). This one is a little trickier but you should see the hose path as it sits up and under the fender. Left side (drivers side) Hoses. Old hose on left new hose on right. Attach the center radiator to the car. Using the M8 speed nuts place them on the brackets on the car and attach the radiator (assembly) loosely using just the top 2 bolts. Attach the small hose to the center radiator. To easily attach the left hose remove the bolt from the left side mounting (now only supported on the right) and attach the hose and tighten the clamp. Do the reverse on the other side (place bolt back in left side and remove right bolt). Finally tighten down all 4 M8 bolts to hold the radiator firmly in place. Re-attach the radiators. Carefully re-position the radiators and replace the 2 bolts and nut that holds the assembly in place. Take care to line it up as it was previously. Reattach air conditioner condensers and tighten the 2 torx screws that hold them in place. Test for leaks. Start the engine and run for at least 5 minutes while checking for leaks. If everything is tight and leak free proceed with the rest of the re-assembly. Attach center air duct. Carefully position the air duct such that the 6 protrusions snap into the places on the radiator frame. Reattach the side air scoops (5 each torx screws). Remove the center plug in the bumper cover. This may sound easier than it is. Seems Porsche uses a black silicone type sealant on this. I found the best way was to use (carefully) a utility knife to cut away as much of the sealant as possible and then carefully pull until I got a corner up and worked my way around the edges. Note: For standard (non-aerokit) front bumpers; cut the inside gasket along the line. Remove the center plug as shown in these images (courtesy of Scott Mandell) Or, you could replace the rubber bumper insert with: 996 505 553 05 01C Air Inlet for Tiptronic (or for MY02 and newer 996 505 561 02 01C). This replaces the original insert and installs across width of stock 996 bumper. Re-attach the bumper cover. Basically, the reverse of removal. Re-attach wheel well covers. Ditto, basically the reverse of removal. Re-attach the side marker lights, wheels, lower car. Again, the reverse of removal. Add coolant, check for leaks (again), and bleed system... Add a mixture of antifreeze and water using the HMZ coolant. Antifreeze in coolant: 50% gives protection down to -31°F (-35°C) 60% gives protection down to -58°F (-50°C). Be careful not to overfill (it will get pushed out on the floor). Lift the bleed valve. Start the engine and allow it to get to full operating temperature (I also ran the air conditioning to force circulation). The coolant warning light will likely start to flash. Shut the engine off and WAIT until the engine and coolant has cooled enough to remove the coolant tank cap. Then add coolant to the tank and repeat the process. You made need to do this 2-3 times. When the coolant level fails to fall then the system is bled and you can close the bleeder valve. Enjoy your "cool" car. Just to be safe it might make sense to check the coolant level a couple of times in the next one or two days. I found under heavy (track) driving in hot weather my coolant temps run 10 to 20°F (7 to 12°C) cooler now.
    1 point
  2. The use of the engine case center point is a temporary lift point that is used by Porsche trained service technicians and with the jack placed correctly is perfectly safe. The use of the rear suspension cross-member can also be used, but requires the use of a jack with a long and low tongue. The possibility of inadvertent damage to the engine is much higher using the suspension cross member because of the requirement to reach under the engine to get to the lift point. The use of the rear suspension forward attachment points is high discouraged because of the high probability of bending the attachment bolt in the center of the casting. Using the engine case as a lifting point puts the lifting pressure to the body through the engine to the engine mounting points which are compressed upon lifting. This puts the same amount of force on the mounting points of the the car as if was resting on its wheels. As long as one does not lift on the engine sump cover, there is little chance of damage to any components, or the car slipping off of the jack plate. Remember this is a temporary lifting point that is only used until the rear jack stands are in place. It is misinformation to suggest that lifting from the engine is not safe or effective.
    1 point
×
×
  • Create New...

Important Information

We have placed cookies on your device to help make this website better. You can adjust your cookie settings, otherwise we'll assume you're okay to continue.