Welcome to RennTech.org Community, Guest
There are many great features available to you once you register at RennTech.org
You are free to view posts here, but you must log in to reply to existing posts, or to start your own new topic. Like most online communities, there are costs involved to maintain a site like this - so we encourage our members to donate. All donations go to the costs operating and maintaining this site. We prefer that guests take part in our community and we offer a lot in return to those willing to join our corner of the Porsche world. This site is 99 percent member supported (less than 1 percent comes from advertising) - so please consider an annual donation to keep this site running.
Here are some of the features available - once you register at RennTech.org
- View Classified Ads
- DIY Tutorials
- Porsche TSB Listings (limited)
- VIN Decoder
- Special Offers
-
OBD II P-Codes - Paint Codes
- Registry
- Videos System
- View Reviews
- and get rid of this welcome message
It takes just a few minutes to register, and it's FREE
Contributing Members also get these additional benefits:
(you become a Contributing Member by donating money to the operation of this site)
- No ads - advertisements are removed
- Access the Contributors Only Forum
- Contributing Members Only Downloads
- Send attachments with PMs
- All image/file storage limits are substantially increased for all Contributing Members
- Option Codes Lookup
- VIN Option Lookups (limited)
Leaderboard

Popular Content
Showing content with the highest reputation on 08/24/2019 in all areas
-
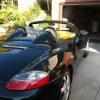
This is a DIY on care and treatment of the cabriolet top. Porsche recommends regular maintenance by simply hosing off the top with high pressure water spray and the use of soap sparingly. But once a year I find it necessary to treat the top with a more thorough cleaner and a water repellant treatment. And for that I use RaggTopp. RaggTopp can be found online and prices are tough to beat at Amazon. The cleaner will last several treatments and the protectant only one treatment. You can also buy a kit that comes with a soft brush for cleaning. Use short circular strokes to clean the cabriolet well. Then rinse it well. I let it dry thoroughly in the sun, then mask it off and use a whole can of the protectant. I let the protectant dry thoroughly, then wash the car to remove any overspray. During a recent rain (hard to believe I know , rain in Seattle!) The protectant worked great!1 point
-
Hello. I have done this today on my 996Turbo MY2002, but it will probably work for 996 Carreras and Targas. Switchable power supply is available if your car is equipped with auto-dimming mirror. Here are the steps to complete installation: 1. There are two dimmed plastic covers on the sides of the dome light. Remove them (they go off pretty easily, do not use a screwdriver as you may damage the plastic). My guess is these are transmitter/receiver for the IR motion sensor of the car's alarm system. 2. Locate two screws there and use a philips screwdriver to undo them. 3. Now the dome light is only held back by the clips. Pull it down gently and it will hang loose. 4. Now locate the mirror harness. Shouldn't be very hard to do since you can track the wires going to the mirror. Undo the black duct tape holding the harness together and let loose the wires. 5. Now, you need a brown wire (ground) and black/orange wire (switched +12v). The latter is quite easy to find since it's the only one of this color, whilst there are 3 brown wires in this harness. One is sort of light brown, the other two are darker. You will need one of the darker wires, but you'll have to use a multimeter to find the one you need. Measure impedance between wire in question and any ground part of the car (there are metal parts under the dome light that we have removed in step 3). Find a wire whose impedance to ground is less than 10 ohms. You don't really need to remove insulation before you have found the right wire, just pierce through insullation using the multimeter's probes. After you've found the wire, use duct tape to insulate the other one. 6. Now you have the two wires you need. Locate the ground and +12v wires of your radar detector power cable and connect them in parallel to the brown and black/orange wires you have found in the mirror harness. Use duct tape to insulate the wires, then bundle them together into a harness also using duct tape. You can route the radar-detector power cable around the dome light mounting and hide it underneath the pillar. 7. Now assemble everything in reverse order and you're done! Some photos are included below. Enjoy!1 point
-
The finish on the U-shaped silver trim that surrounds the shifter boot on the 996 (1994 C4 I my case) can start to bubble and lift, as you can see from the pictures. While I had read that it would require a full replacement the boot assembly (over $250) as the trim is an integral part of the boot assembly, I decided to try to remove and repair it. Trim removal from shift boot assembly It is possible to separate the trim from the assembly. Six plastic studs are molded into the back side of the trim to hold it in place in the boot assembly. Starting at the open end of the “U”, I pushed from the backside and lower part of the trim. It took some time to work them free and separate it. Go slowly, be firm, but gentle. Removal of old trim finish The trim is a piece of U-shaped plastic covered in a foil-like silver finish. It is this finish that was bubbling. Starting where it had bubbled up, I used a sharp knife to peel the old foil off. This can be time consuming because the foil adheres quite well where it is not bubbled. Using a sharp blade (razor or x-acto) flush against the surface allows you to peel back the foil enough to use your thumb and forefinger and pull it off in small to medium-sized strips. I also found that if you do this at the edges of the tri, you could get larger edge to peel off. You want to be careful not to gauge the surface as this will likely show through when you paint it. I removed 100% of the foil from the visible portion of the pieces, all of the edges, but could not get about 15% to 20% of the foil on the inner (concave) portion of the trim piece to come off and did not think it was necessary to spend any more time. Refinishing Preparation - Very lightly sand the outer surface of the piece with 220 grit (I did not have any 360 or 400) to rough up the surface and smooth any knife marks. Wipe it down with a damp rag to remove the sanding dust and then wipe with a rag dabbed in a small amount of acetone to clean the surface. Prime with Dupli-Color grey primer – 3 light coats. Finishing – Finish with 3 coats of Dupli-Color VW Diamond Silver (P/N 8802029) and 2 coats of clear coat. (I took the trim to the store and VW Silver was the closest match). Reinstallation The trim piece simply snaps back into place. Conclusion The silver is a pretty close match (the picture is not representative). The new finish lacks, perhaps, a bit of metallic lustre, but is much better than what was there. Total time was about 1.5 hours, but it took about 8 hours with paint drying time.1 point
-
Start by removing the air filter/metering unit. Two clips hold the Air Fuel Meter cable in place. Disconnect AFM connector and set aside.Remove single bolt holding AF assembly (13mm) and tilt unit back to remove. Set aside. Remove 2 bolts and 1 nut (10mm) holding air pump. One nut holds the Coolant Reservoir. Set aside. I used some string to pull it away from CR. Drain antifreeze by means of drain plug at the bottom of engine. Drain just enough to empty CR, then a little more. I used an aluminum turkey tray to hold antifreeze and reuse. Loosen 3 spring clamps holding hoses to CR. There are two fuel lines that will prevent you from removing the tank from the engine compartment. Loosen (17 & 19mm) them and tuck away (see picture). Disconnect tank sensor. In my car, it seems like it was leaking... (see picture) Slide tank towards engine and maneuver tank out. Be careful with other hoses and electrical connectors. Reverse the procedure to install. Add antifreeze, purge and check for leaks.1 point
-
My shift knob was looking pretty rough. The brushed steel was scratched and looked well worn. I originally assumed the brushed steel portion of the knob was just painted plastic to match the rest of the 996 interior and I was planning on sanding it down and repainting myself. I had even gone as far as looking for a replacement mostly because I enjoy the look and feel of a good shift knob. I tried scratching off a little paint and realized the finish was actually brushed steel and not plastic :-) Since I had already decided to refinish the knob I started the steps to refinish. I used tools that I already had available which included: electrical tape to protect the leather while polishing dremel with a flexible shaft 100 grit circular paper sanding disks (approximately 2cm diameter). (3 or 4) 400 grit circular paper sanding disks. (3 or 4) circular cloth polishing attachments for the dremel (5 or 6) course "steel cleaning" polishing compound final finish polishing compound liquid polishing paste (probably not necessary) black shoe polish to clean up the leather The first step was to protect the leather using electrical tape. It was pretty easy to position the tape very close to the steel by stretching the tape. I originally taped over the Porsche crest, but later found out that it was easy enough to avoid touching it using the circular sanding disks. I then used a small paper sanding disk with a dremel to sand off the brushed finish and remove the scratches. The first step was with 100 grit sanding disks. Using a circular paper disk make it easy to get very close to the edge of the steel and also follow the contours of the knob. This took about 15 minutes. After the first stage the knob looked like this (still with the electrical tape attached) The next step was to sand away the scratches from the 100 grit sandpaper. For this I used 400 grit paper sanding disks with the dremel. It took approximately as long as the first step (15 minutes). With a little practice I was able to get very close to the edge of the steel. At this point there were still a few scratches that were too deep to easily get with the 400 git paper so I had to repeat the process using the 100 grit disks. The next stage was using a course polishing compound with a small round polishing wheel for the dremel. The polish melts when it comes in contact with the spinning wheel. The polishing compound removed the irregular reflections from the steel and made a noticeable difference from the previous sanding. I then did the same with a polishing compound made for the final polish. This step didn't make much of a difference but the knob was now looking pretty shiny. For a final polish I used a liquid metal polish (Mothers) that I had previously been using on my rims. After this the knob looked almost perfect. I removed the electrical tape and use shoe polish on the leather to clean it up a little. The result was better than I had expected. Not quite "brand new" but very close. And since it is pretty easy to polish I may end up doing this every year or two. The final pictures are below. It looks much better 'live' than in the pictures.0 points